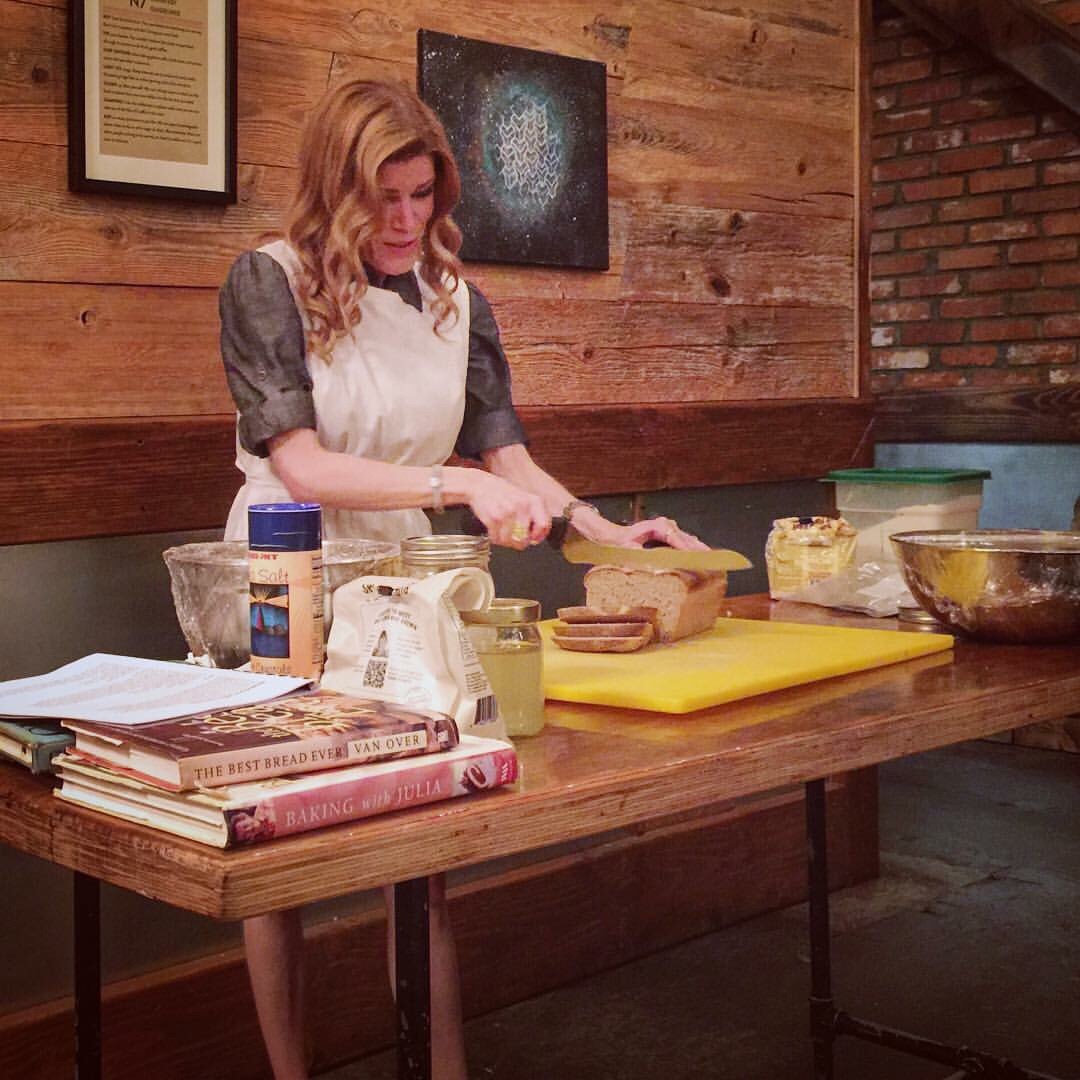
This enriched sandwich bread is a loaf that I developed for the grilled cheese and pb&j eaters in my life. The rustic, country loaf is my personal favorite but all the holes in its beautiful, open crumb don’t hold mayo or jelly very well. It also has a crunchy crust that can be undesirable for certain sandwiches. I had to perfect a loaf that is very soft and has a fine crumb so that we could completely opt out of buying bread at the grocery store.
Let me quickly explain why this is important to me. Almost none of the bread that you can buy at grocery stores is naturally leavened. No matter how much you pay for a beautiful, organic, (expensive) whole grain loaf of bread, if it was risen with commercial yeast, it’s just not that healthy. I want to restate that… breads made with whole grains are not healthier than white bread if they aren’t naturally leavened. It was worth it to me to figure out how to make a soft sandwich loaf because what I want to feed my family is simply not available to buy.
I need to be real with you about how long it takes to make this bread! Since the leaven is really best when it sits overnight AND the bread has the best nutrition and flavor when the formed loaf also sits in the refrigerator overnight, this is a 3 DAY loaf of bread. Luckily, during almost all of those 3 days, the dough is sitting on the counter or in the fridge. It will take a couple of loaves for you to get the feel for how the process works, but once you get going, you can easily schedule the mixing and folding into a busy day. So since this is a 3 day loaf, I usually make two loaves at once. It is hardly any extra effort and then I only have to do it once a week.
One last note – You really must have a kitchen scale to make this bread. The amounts of ingredients like starter or milk are very precise. The measurements do not translate well into teaspoons and cups. The scale will also save you a lot of dishes! When you measure the ingredients for the leaven and dough, you can add each one into the bowl used for mixing, taring (zeroing out) the scale between additions. When you are finished, you won’t have a bunch of measuring cups and spoons to wash!
Leaven
Start this leaven one day before you would like to make bread
40 grams Active Sourdough Starter
50 grams Whole Milk
50 grams Bread Flour
Mix ingredients together using a spatula or wooden spoon.
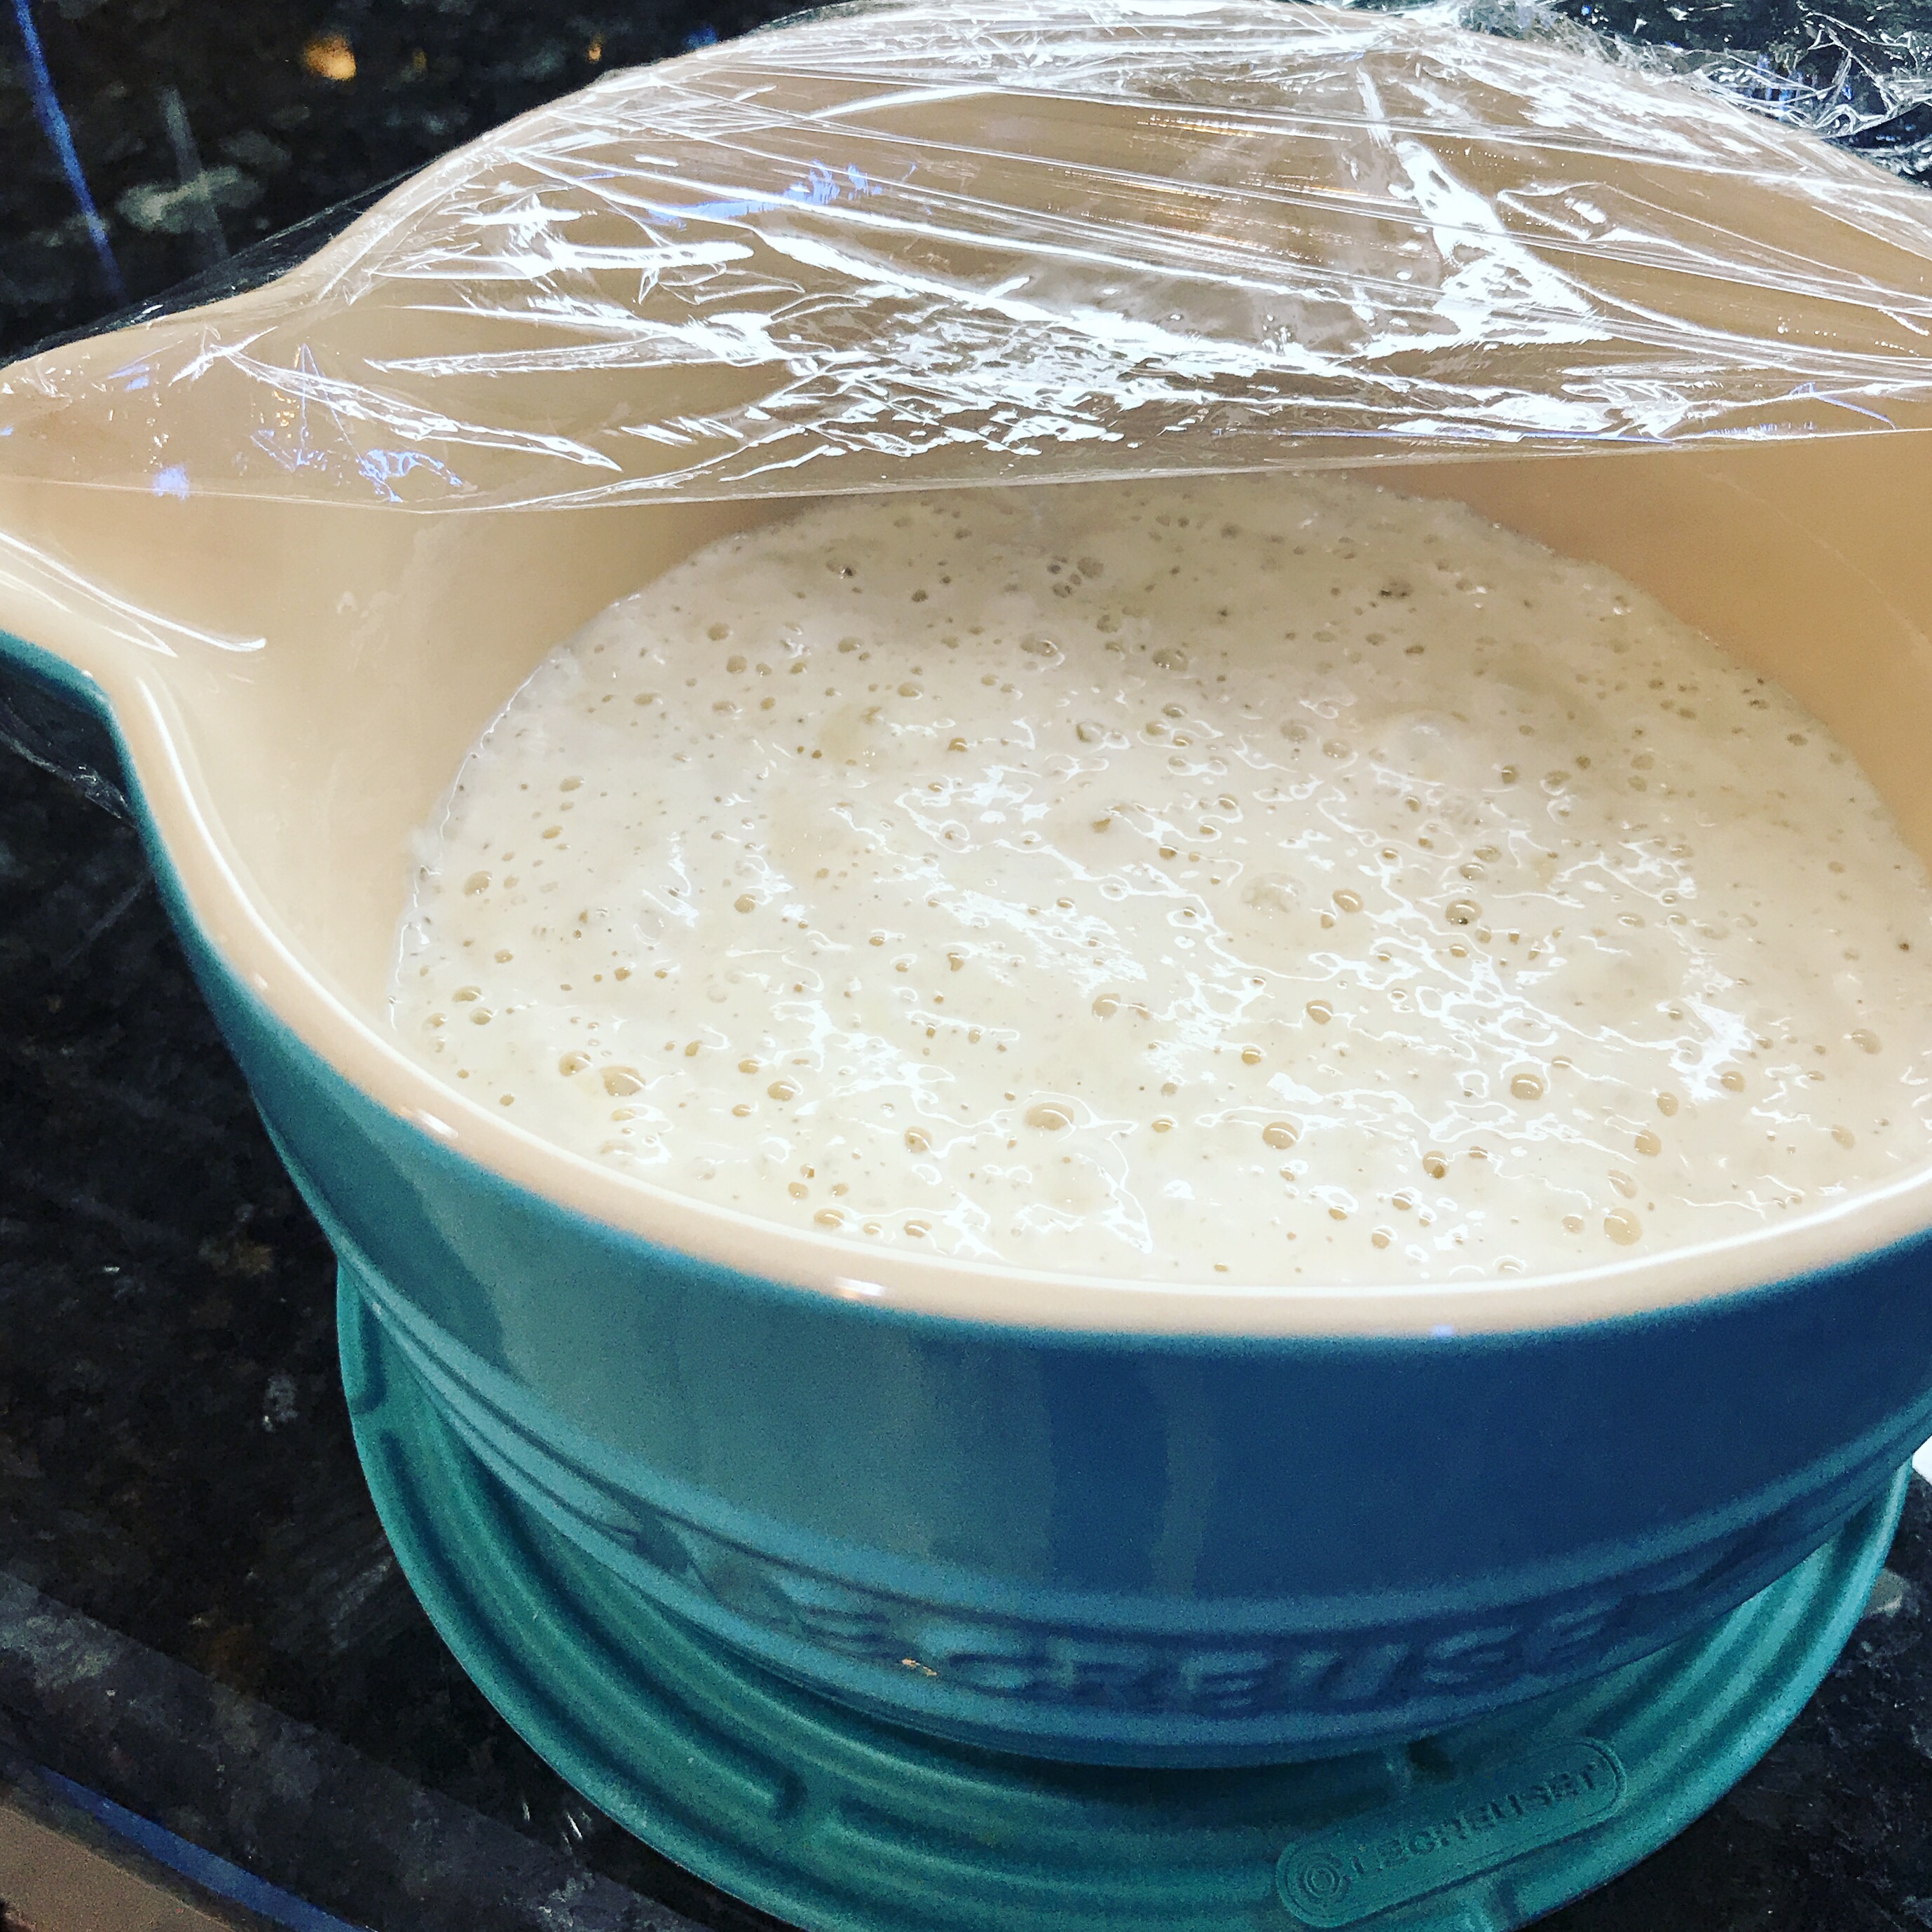
Adjust with a small amount of extra flour or milk (if needed) so that the consistency resembles thick pancake batter. Keep the sides of the bowl as clean as possible by scraping it down with the spatula. Cover and allow the leaven to sit until very active and full of bubbles, at least 8 hours or overnight.
Mature Leaven
Active leaven will be full of bubbles!
Dough
All of the Leaven
200 grams Bread Flour
76 grams All Purpose Flour
34 grams Sugar
1 Large Egg
134 grams Whole Milk
Add all of the dough ingredients to the bowl of a standing mixer. This is where having the scale comes in so handy. Put your mixing bowl with the leaven already in it on the scale and tare it out. Add the 200 grams of flour and tare the scale again… Keep doing this as you add the ingredients and when you are done, no extra dishes!
Tare the scale for each additional ingredient.
At this stage we are adding the milk, egg, sugar, & flour
Now a Attach the dough hook and begin mixing on the lowest speed. As the dough comes together, increase the speed to medium until the ingredients are just combined. It’s ok if there are still a few specks of dry flour showing because you will be doing a lot more kneading soon. Turn off the mixer and let the dough sit for about 10 minutes to autolyse.
After Autolyse Add –
34 grams Butter, Softened
10 grams Fine Sea Salt
Mix on medium speed allowing the mixer to knead the dough until it becomes absolutley smooth. And by this I mean, you have to beat the tar out of this dough for your loaf to bake up beautifully without a bunch of air bubbles on the surface. It can take as long as 30 minutes. Your patience will be rewarded.
This dough has been mixing for about 10 minutes and is still a little shaggy so we know that the gluten strands are not well developed yet.
At about 20 minutes, I’m still not quite there! Just keep mixing.
Now it’s perfectly smooth and shiny!
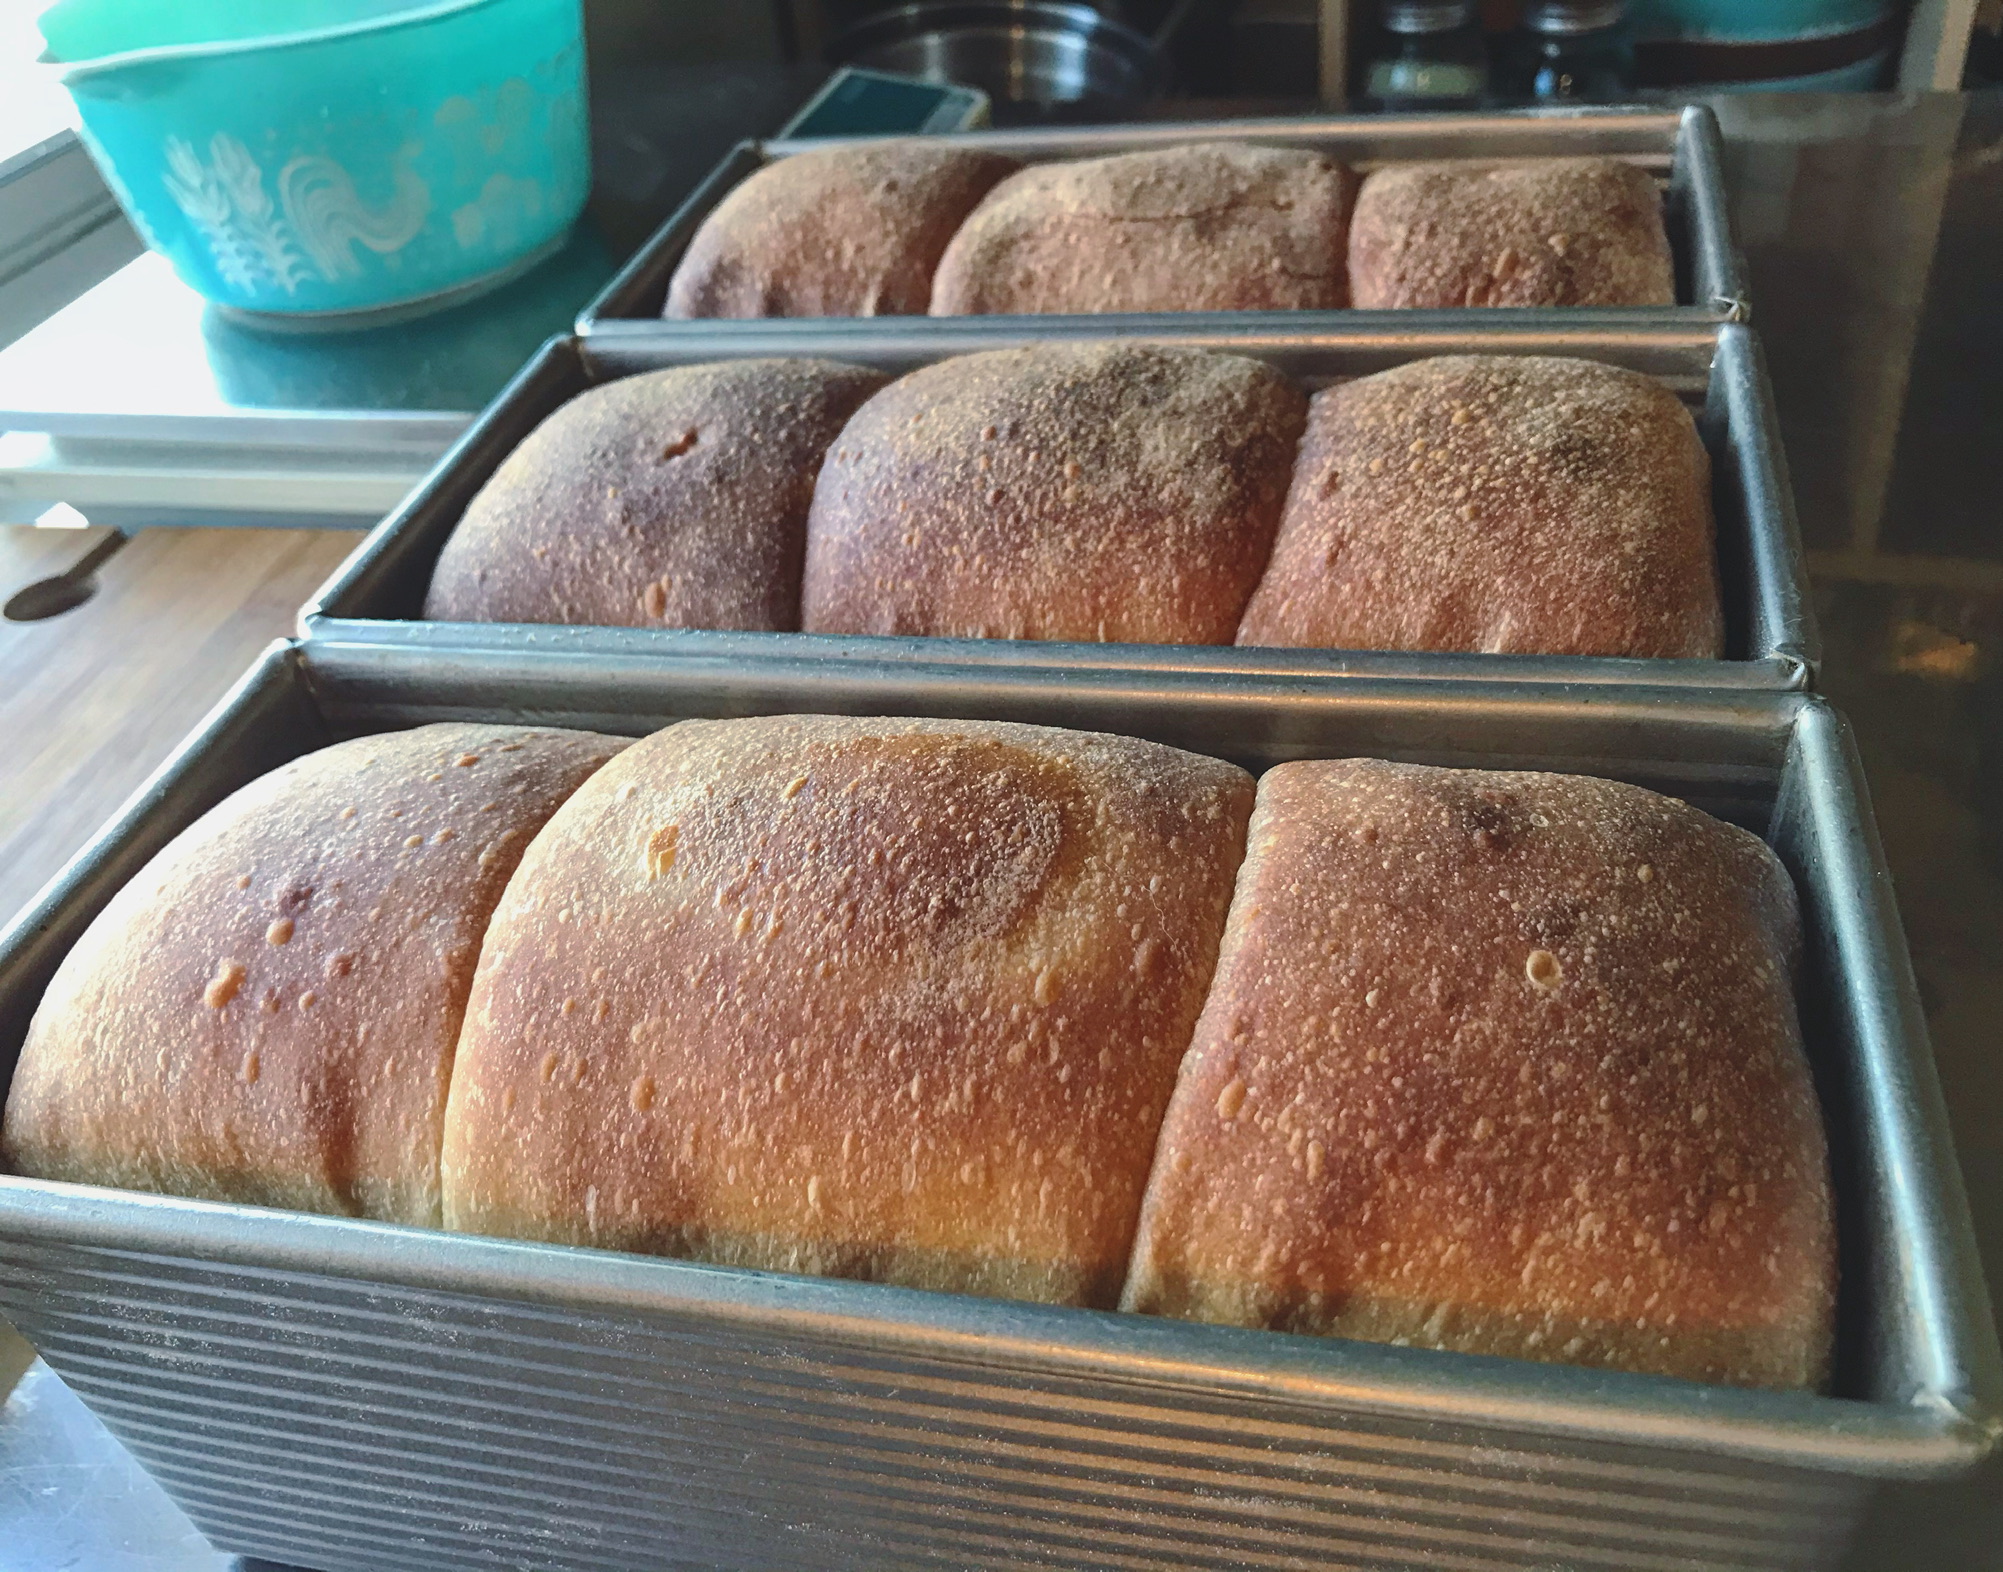
Divide the dough into 3 peices and create 3 smooth, tight balls of dough. Use the envelope method shown here to stretch the dough over itself left to right, top to bottom, right to left, and then bottom to top. As you do this process, gently pinch the dough at the seams to form a ball. Repeat with the 2 other pieces of dough.
Place your dough balls into a buttered loaf pan. Use a brush to butter the top of the dough as well. You can also use avocado or coconut oil spray so that you don’t have to deal with melted butter. Cover with plastic wrap and allow to proof at room temperature for 6-8 hours or until the dough just begins to reach the top of the pan. This takes the whole darn day in the winter and may only take 4 hours in the summer. Let the way the dough looks be your guide, not the clock.
Once the dough has proofed, let it rest overnight in the refrigerator. This step is not absolutely necessary but will increase the nutrition and enhance the flavor of the bread without adding any more active work to your process.
When you are ready to bake, remove the loaf from the refrigerator and preheat your oven to 450 degrees. Remove the plastic wrap and put the loaf in the oven, immediately turning down the oven temperature to 400 degrees. Bake for 15 min. Now reduce the temperature of the oven to 350 degrees and set the timer for another 15 min. During the second half of the baking, you may want to loosely tent the loaf with a piece of aluminum foil to prevent it from over browning before it bakes all the way through. You may also turn the loaf pan once, to ensure even browning.
When the timer goes off for the second half of baking, your loaf should be golden brown and sound hollow when thumped gently. Remove the loaf onto a hot pad and allow it to sit for 10 minutes. Once it has cooled slightly, you can turn it out onto a cooling rack. Resist the urge to cut into it for at least an hour!
Once completely cooled, you can store your bread in a zip-lock or bread storage bag. You can also freeze these loaves, wrapped tightly in plastic wrap, and defrost them in the refrigerator without any loss of quality.
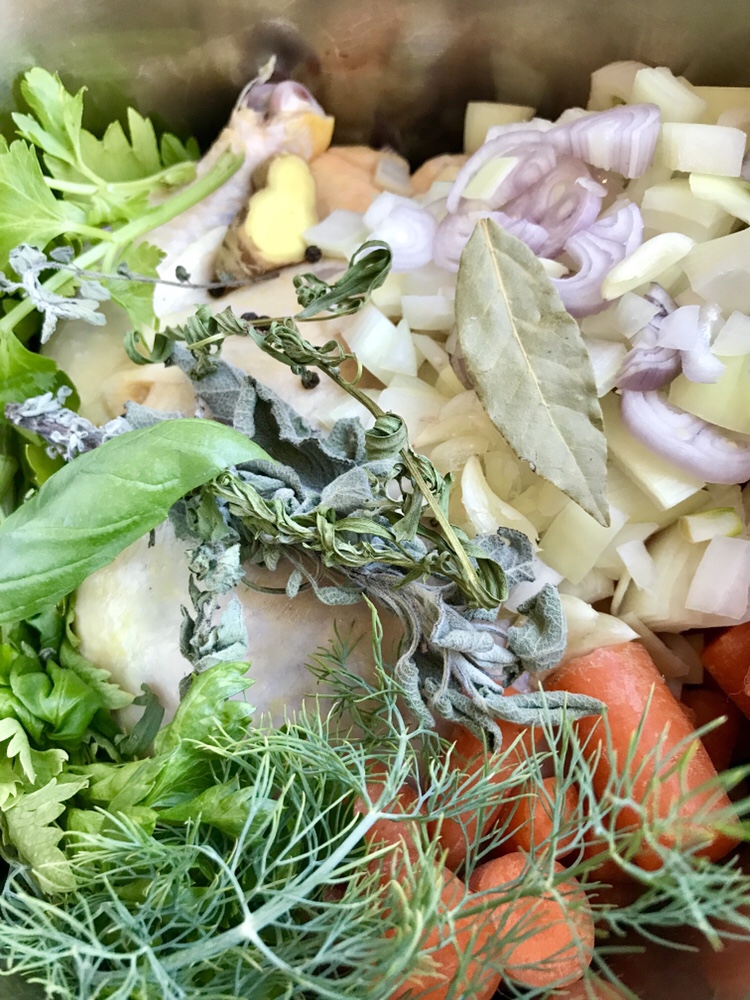
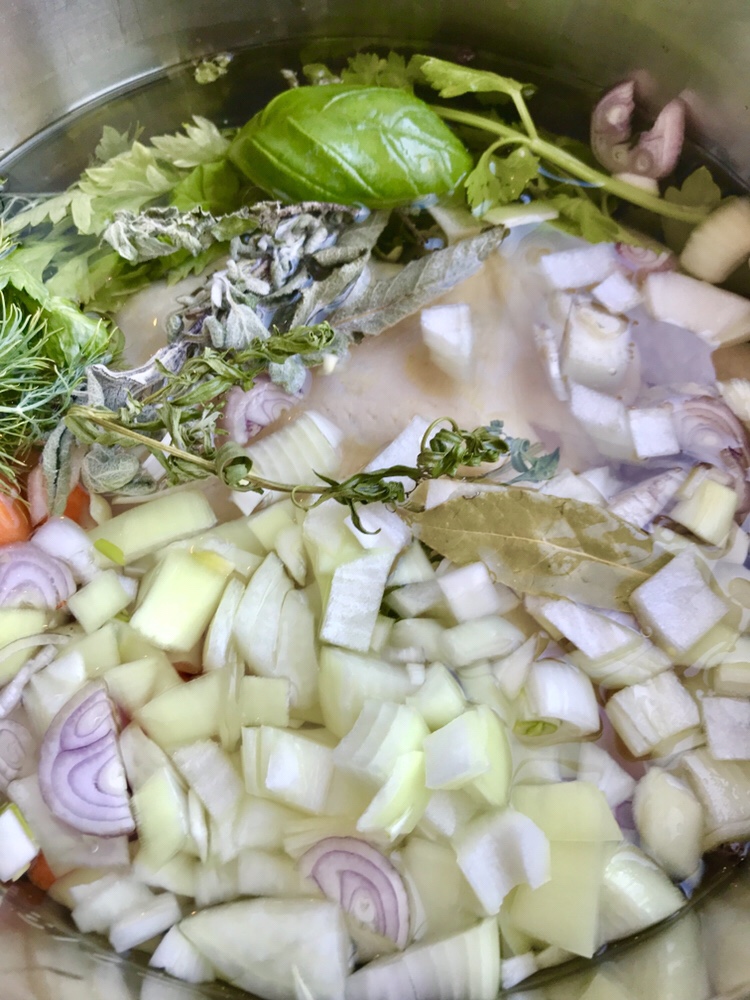
If you know me, you know that I don’t like to waste food! I save bones and stems to make broth and rollover recipes so that I don’t have to throw away things my family is tired of eating as leftovers. So, one of the things that bothers me about getting a happy sourdough starter going, is that most recipes recommend that you discard part of your starter before feeding it. This is because it works best to feed the starter an amount approximately equal to its weight with flour and water. This isn’t much at first, but as you continue feeding the starter, it can turn into quite a lot.
Once you begin to make bread, you will use up some starter and that will help with volume control. You can also refrigerate your starter, pulling it out each time to make leaven, 24 hours before plans to bake. Only mature starter will last well in the fridge. My favorite way to control my starter volume though is to make pancakes! This recipe uses an entire cup of starter, making it a perfect way to use up what recipes suggest throwing away.
These pancakes taste great! That’s the point of pancakes right? They are a celebration food in my house, served on birthdays or special weekend mornings when everyone has time to gather for breakfast. In addition to being delicious, though, they are packed with nutrition, unlocked by a long, slow fermentation of the dough. It takes just a few minutes of effort the night before you wish to make them to stir together the flour and starter. Then the next morning, adding the eggs and other ingredients is just as simple as a standard recipe or boxed mix. The recipe yields a lot of pancakes so you may have leftovers. They will keep well in the fridge or can be frozen and heated throughout the week. Serve them nice and hot for the best texture.
Recipe
8-10 hours ahead:
240 grams or 1 cup sourdough starter
480 grams or 2 cups warm water
* The thickness of the starter greatly impacts how much water you need. This is just an approximatemeasurement. Add water until you have a thick batter. I thin mine with milk more in the morning if needed.
480 grams or 2 cups unbleached, organic, white flour
360 grams or 1 ½ cups whole spelt flour (finely ground)
22.5 grams or 1 tablespoon flaxseed meal (chia seeds make a greatsubstitute)
The night before you plan to cook your pancakes, combine sourdough starter, warm water, the two flours, and the flaxseed meal into a large mixing bowl.
The scale in these photos reflects a half batch of pancakes
Stainless steel or ceramic work well. Try not to use plastic and avoid other types of metal bowls. Mix your ingredients well with a wooden spoon or spatula. Scrape the edges down well so that small bits of dough won’t dry out overnight.
Cover the mixture with plastic wrap and leave on the kitchen counter to ferment. The room temperature should be comfortable for you. If you are cold or sweating, your dough will be too and not get an ideal fermentation.
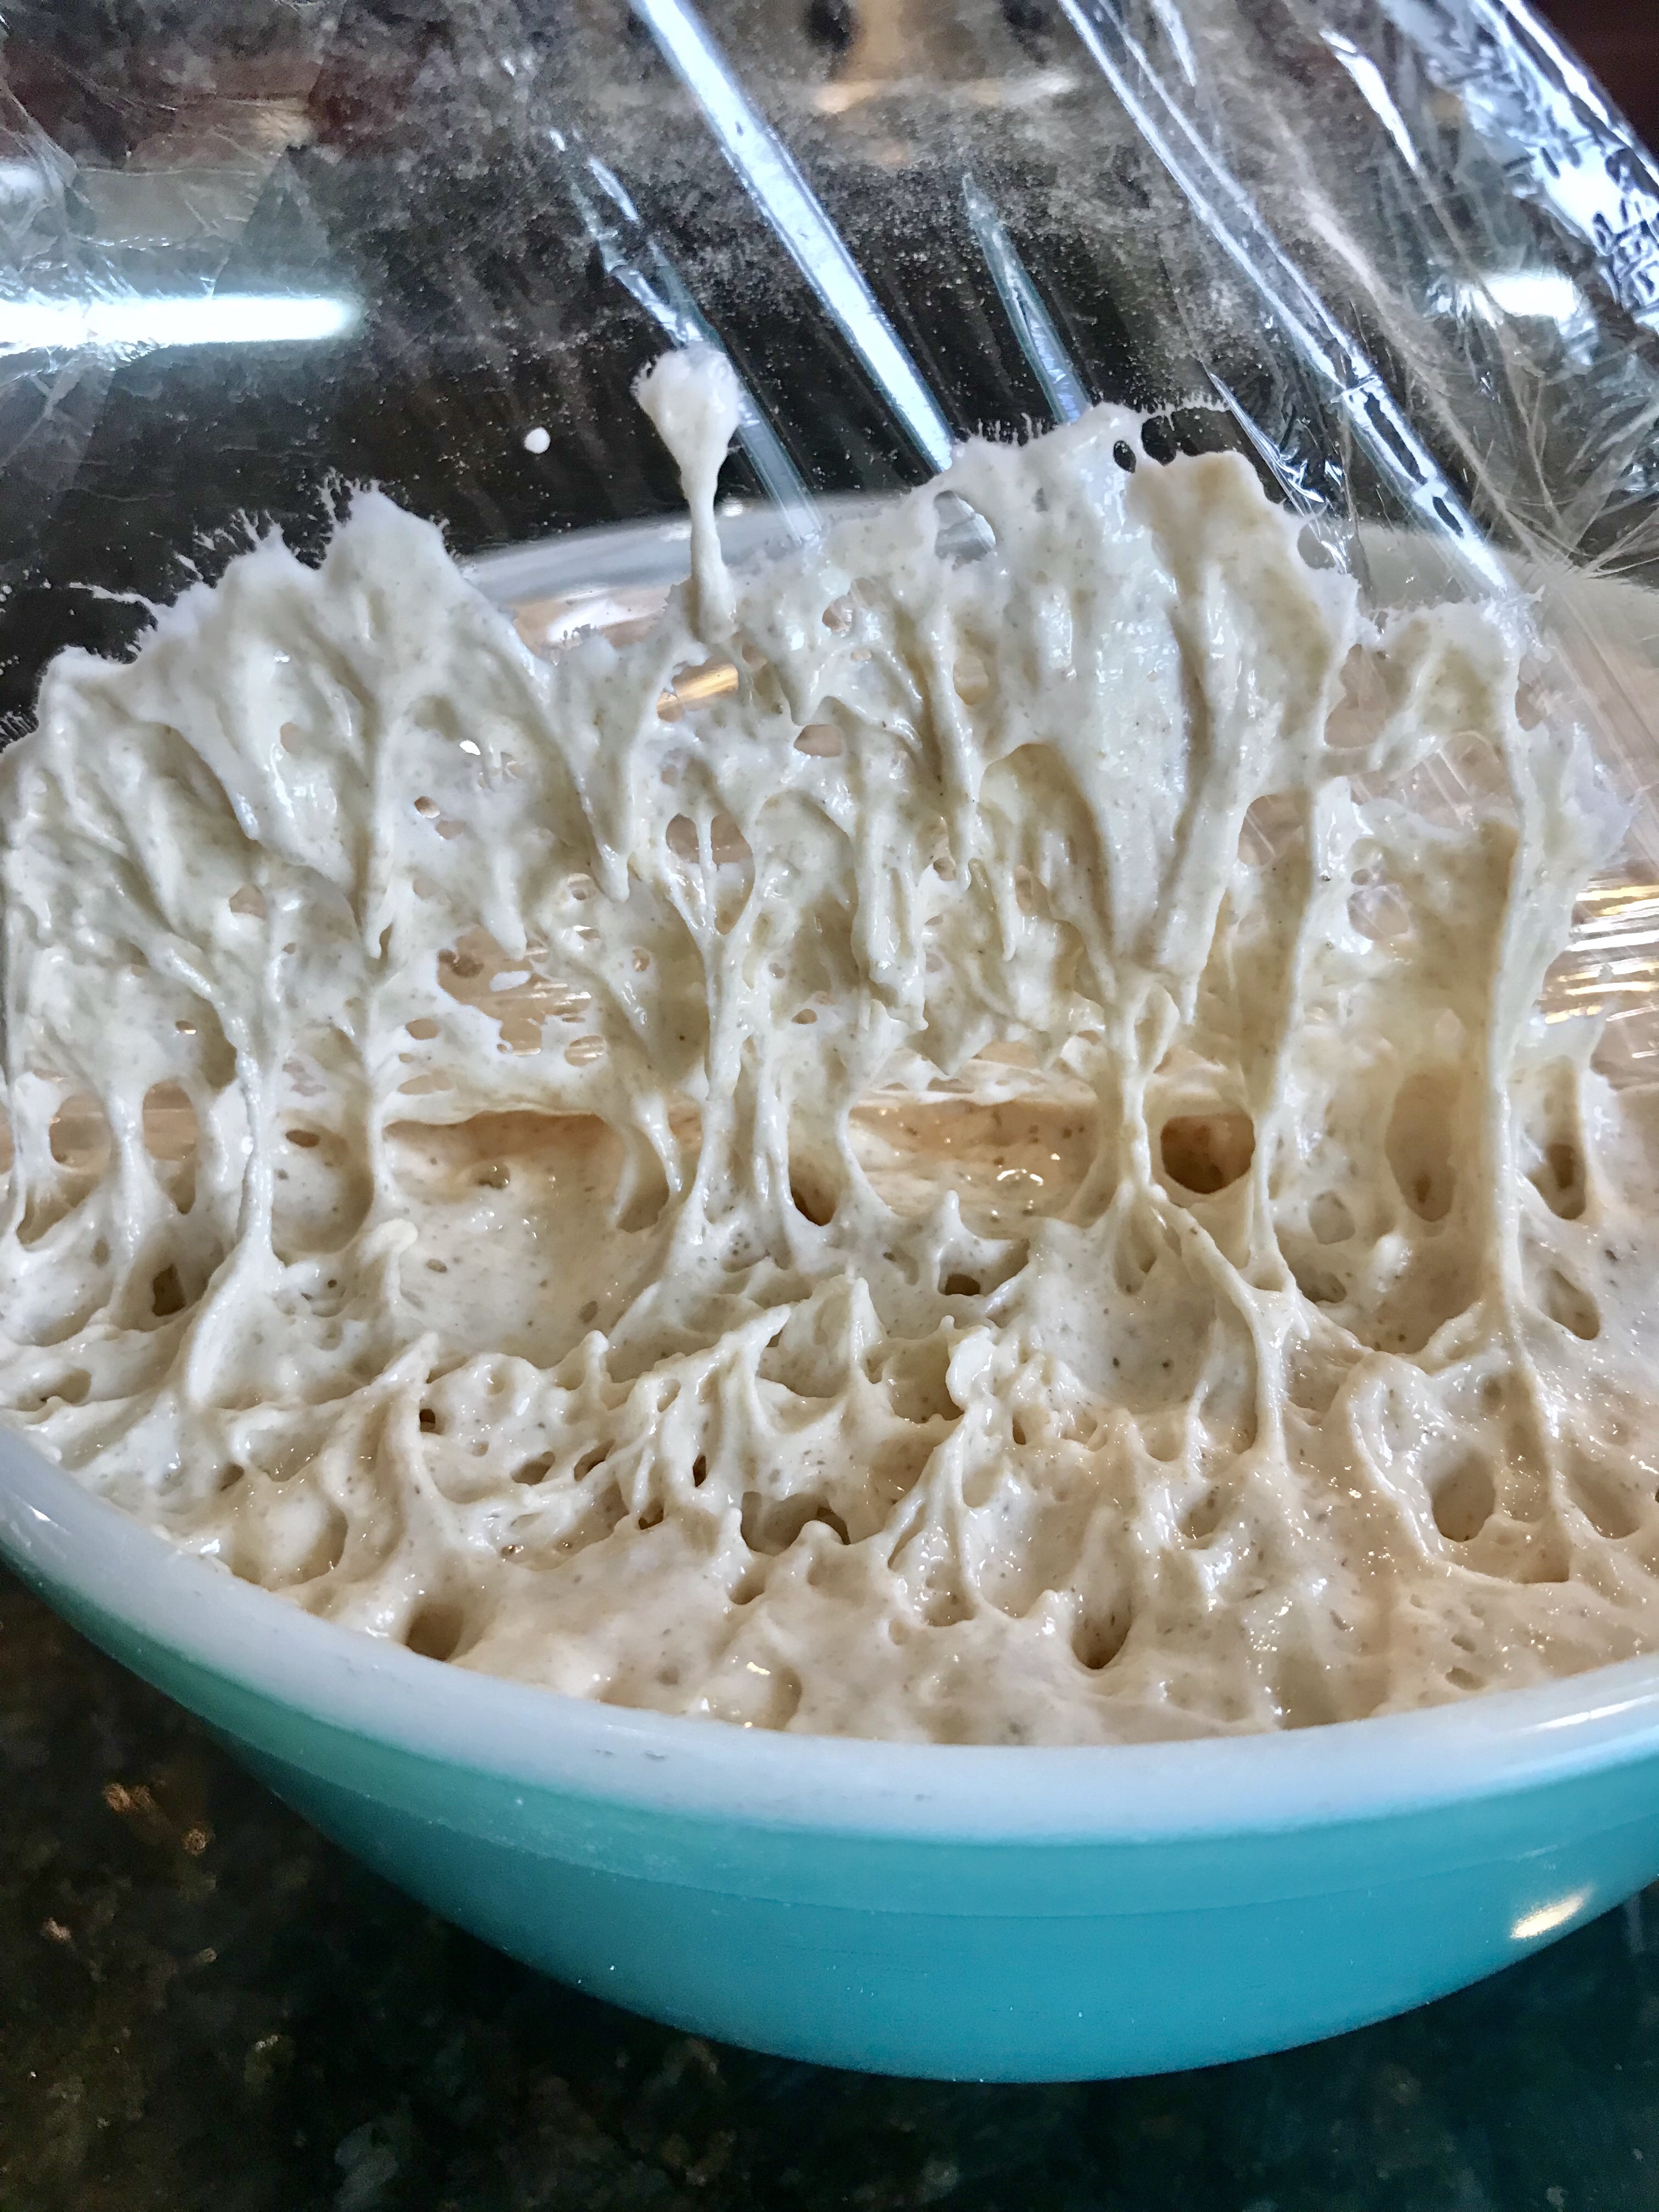
This batter has been rising overnight and is ready for the next stage
To prepare the pancakes:
3 large eggs, beaten
37.5 grams or 2 tablespoons raw sugar or honey
60 grams or ¼ cup melted butter or coconut oil
5 grams or 1 teaspoon baking soda
5 grams or 1 teaspoon salt
Heat a large, nonstick, skillet over medium to medium/high heat.
Add the eggs, sugar or honey, butter or coconut oil, baking soda, and salt to the dough that you fermented the night before. Stir well to combine the ingredients. The batter will be clumpy at first and then come together to be very sticky and stretchy. It will not look much like standard pancake batter and will definitely not behave that way. Don’t lose hope! They will be nearly identical once they are cooked. Let this mixture sit for a few minutes before you start your pancakes.
Risen batter will deflate when you add ingredients
Once the batter is well combined, coat your skillet with a small pat of butter and let it melt. If the pan is the right temperature, it will sizzle nicely but not brown straight away. If the skillet is too hot, the butter will turn brown and begin to burn very quickly. If this happens, turn your heat down just a little and wait a few minutes to start cooking. When the butter is melted, wipe the pan over gently with a paper towel to spread the butter evenly and remove excess.
Scoop ¼ cup of batter into the skillet with a measuring cup for each pancake. Since this dough is quite stretchy, you’ll need a large spoon or butter knife to scrape the dough off of the sides of the cup before transferring it into the skillet. Shake the batter out of the cup with one or two firm jolts towards the skillet. It will not just pour out like standard batter. Add three to four pancakes to the skillet, depending on the size of your pan. The batter will spread and rise a lot as it cooks so leave plenty of room between each one.
Leave the pancakes to cook on medium heat for two to three minutes per side. You can tell they are ready to turn when they are just beginning to dry at the edges and most of the bubbles in the batter have popped. Once they are golden brown on both sides, you are ready for the next round.
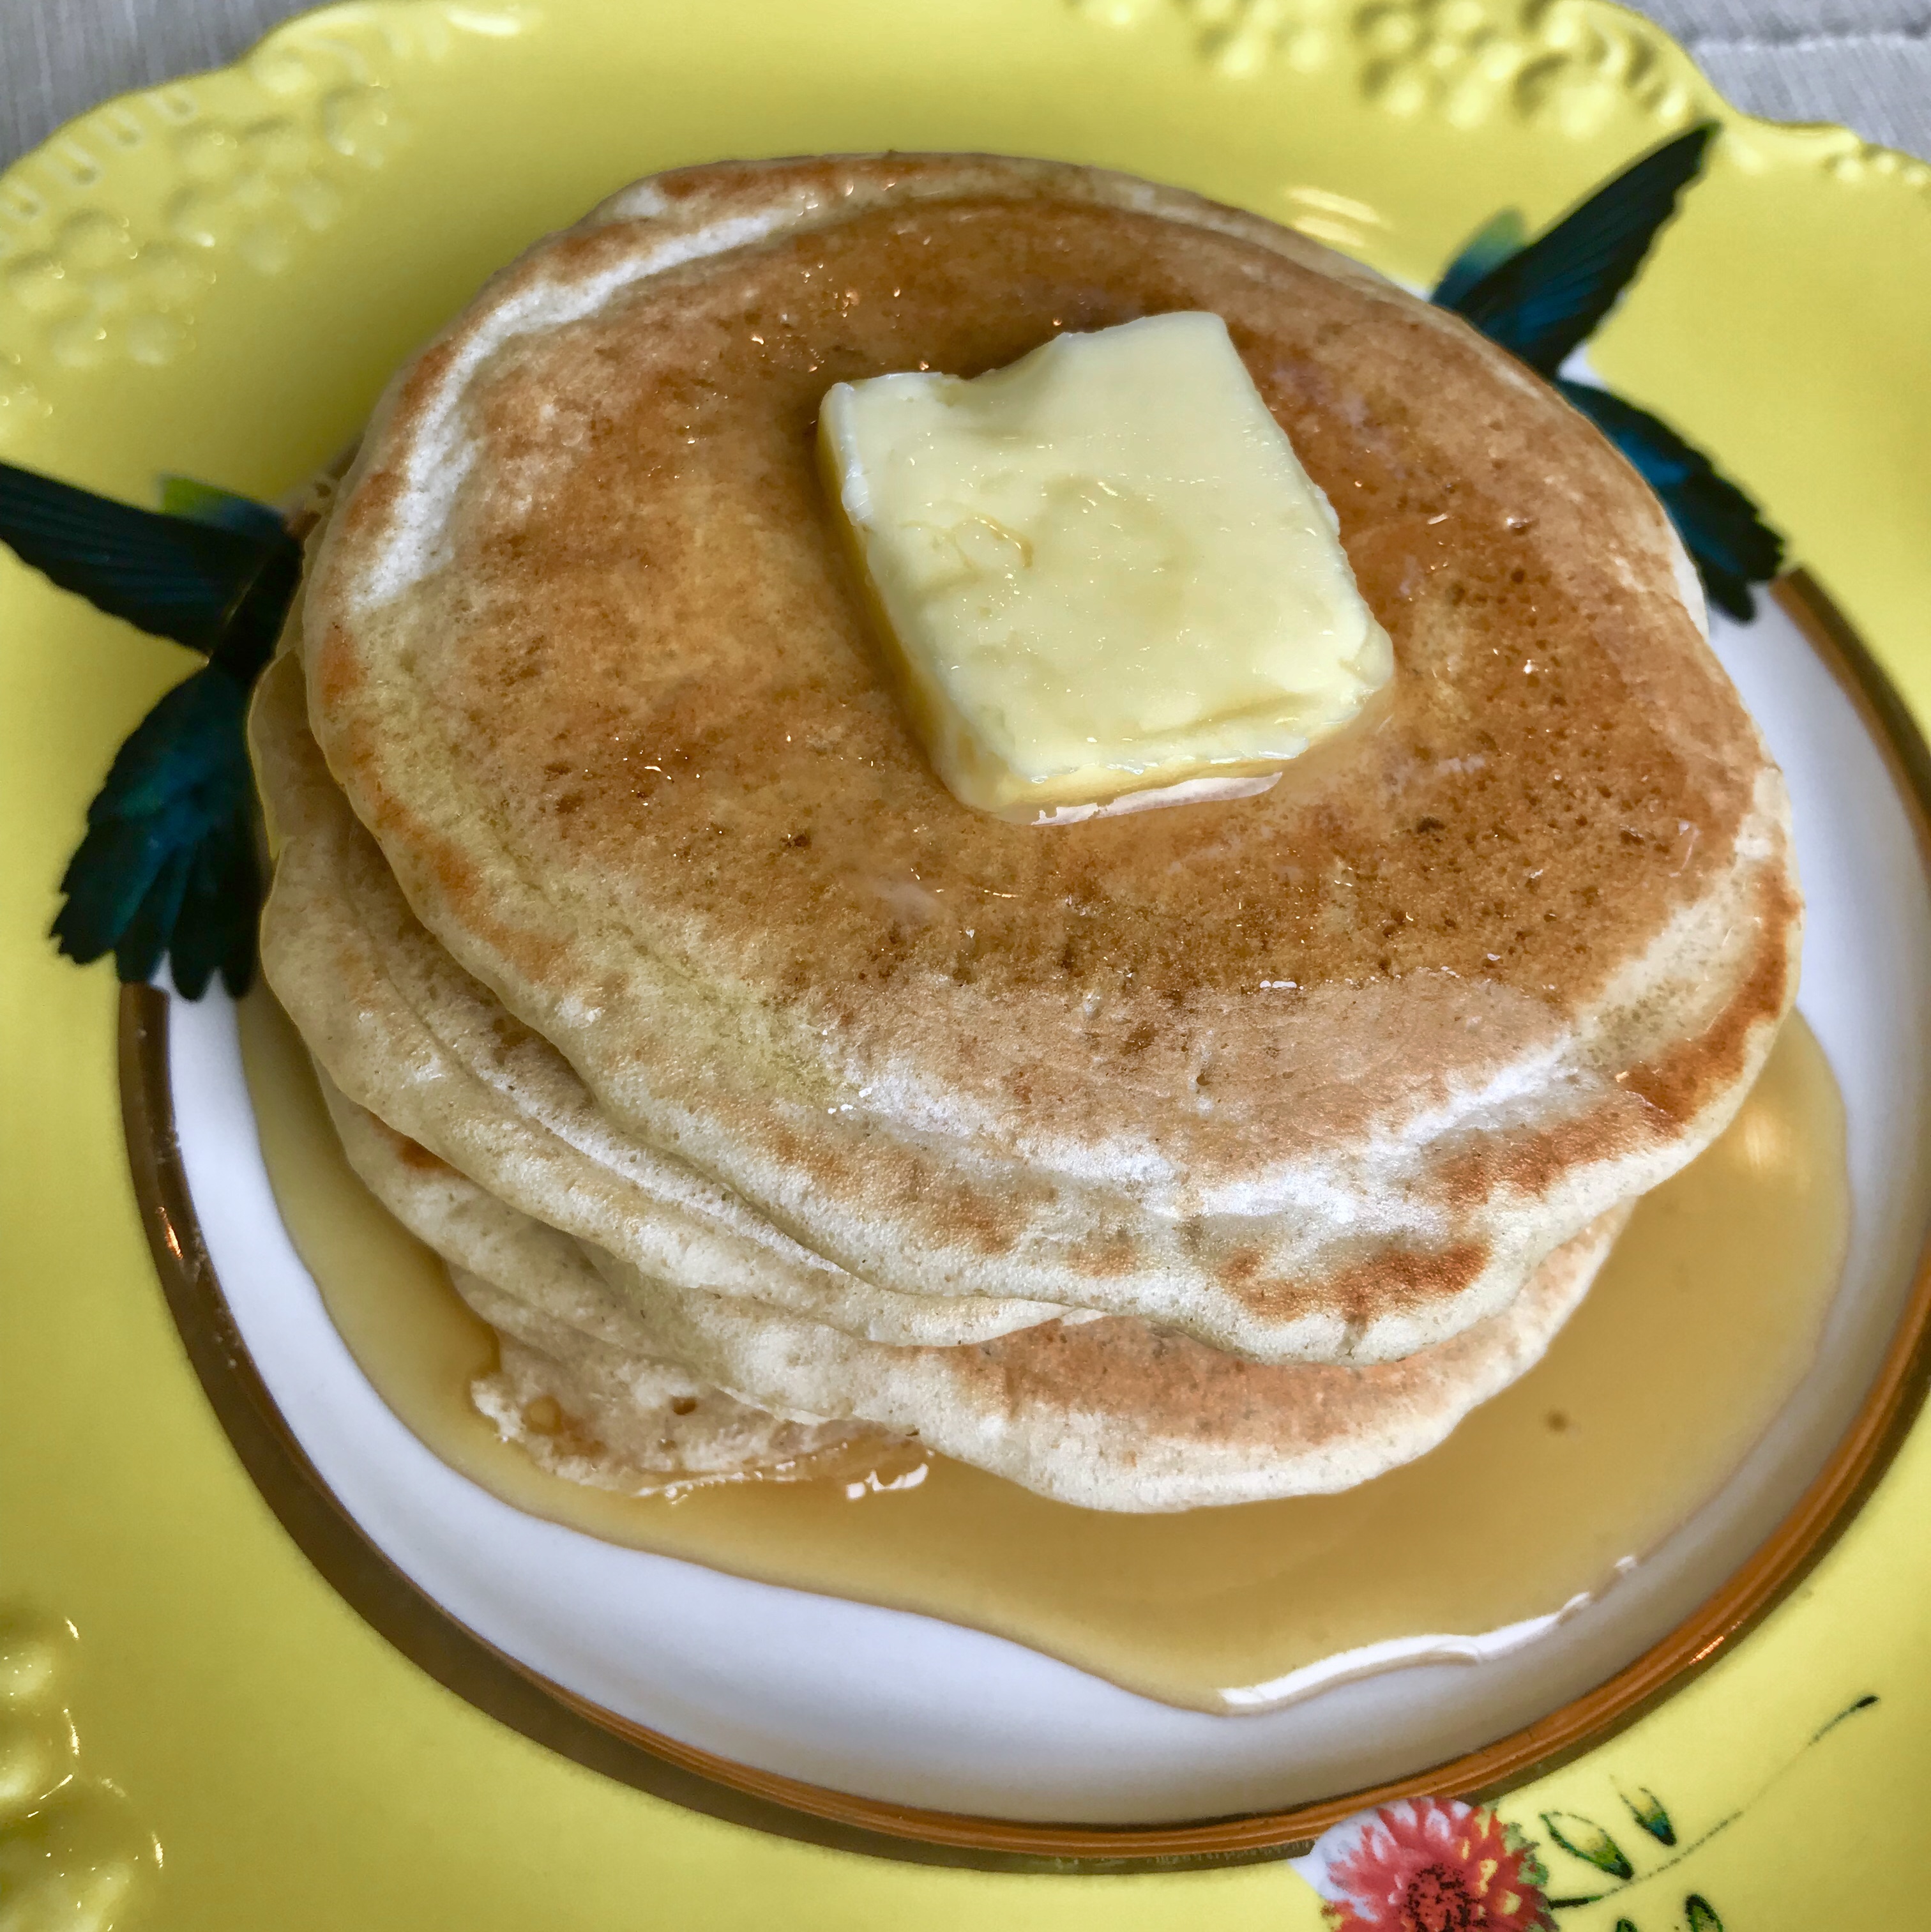
You can reserve them under a paper towel so that they won’t dry out or inside a container for longer storage once they have cooled completely. Enjoy them with butter and maple syrup, honey, nut butters, or jam.
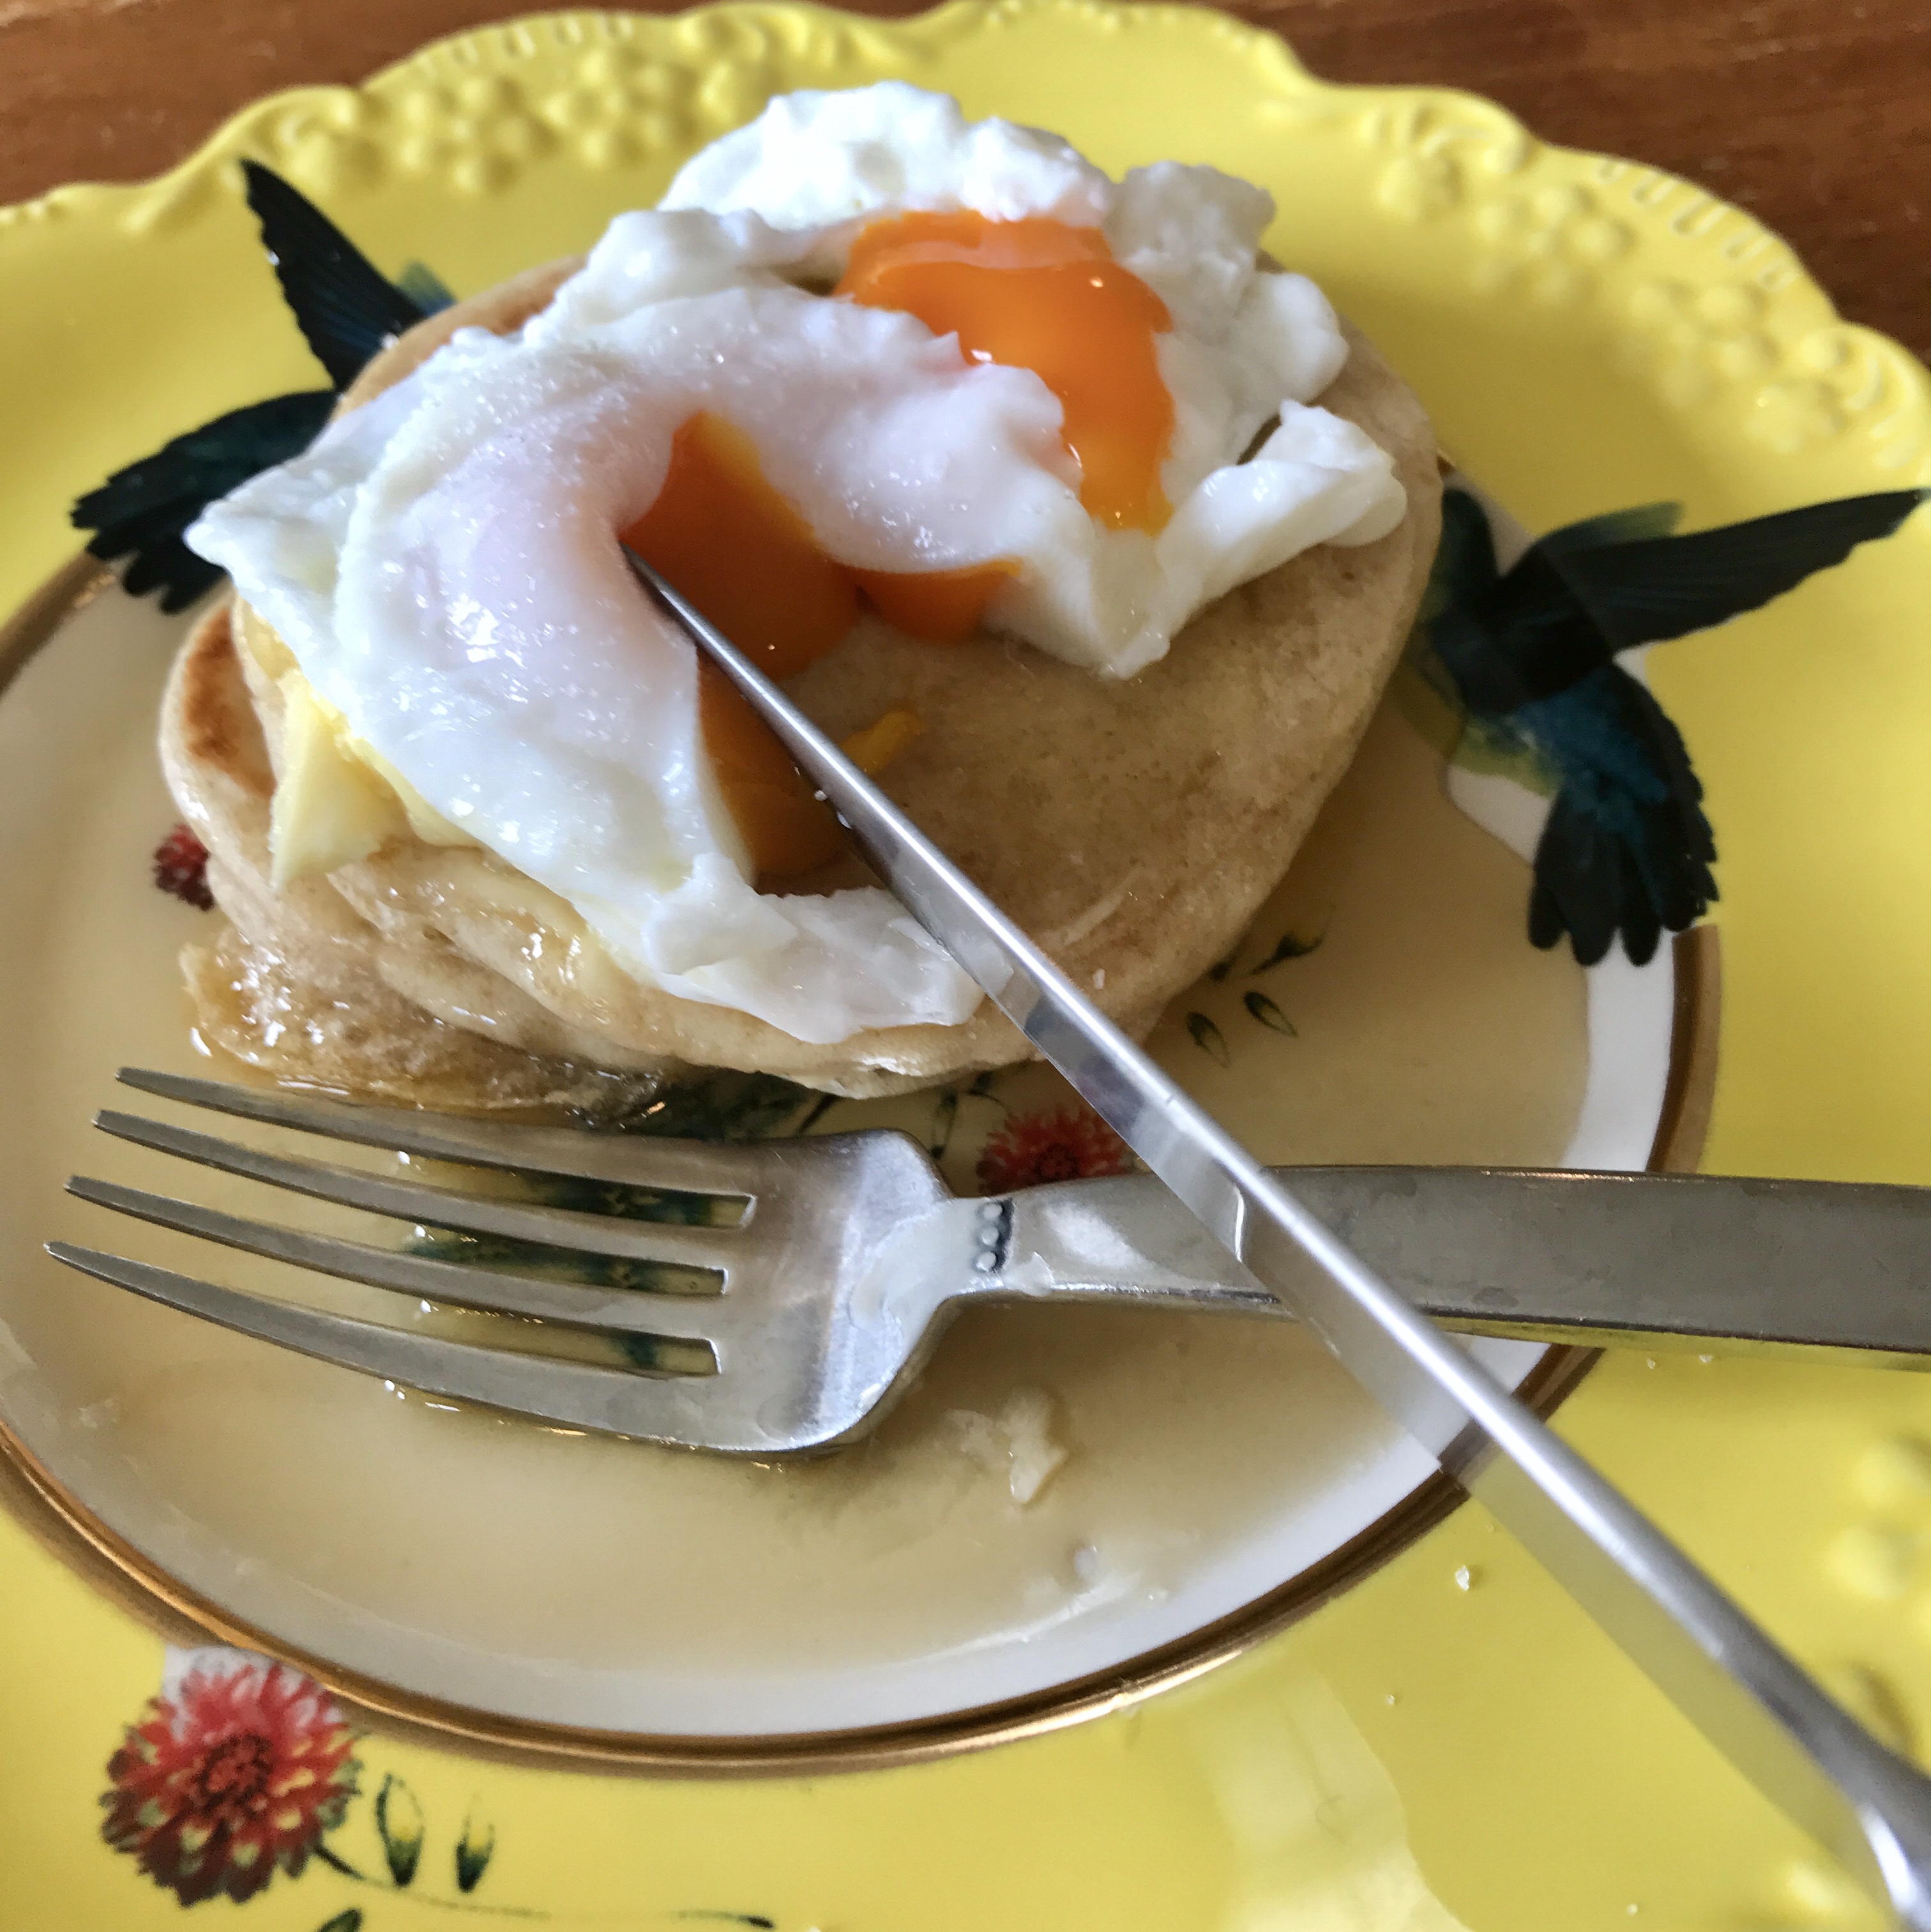
My favorite way to eat pancakes is with a perfectly poached egg on top!
In a world filled with innumerable options for organic, whole grain, artisan baked, and seriously fancy bread, why would someone go to the trouble to make their own? Control over ingredients, incredible smell and taste, and satisfaction from producing homemade loaves are just not enough for most of us to make time for bread baking as more than a special occasion activity. But if you are reading this, I could safely guess that you want to eat healthier and feel better.
Long fermented sourdough is the bread that our ancestors depended on as the cornerstone of their daily diet and the “staff of life”. Now in our current culture, bread has been vilified to the degree that we often feel bad for enjoying it. We buy gluten-free substitutes or pass on bread completely thinking that it’s the only choice we have for optimal health. New science (and old sensibility) are revealing that for most, gluten is not the problem. And this goes far beyond bread. In our effort to industrialize food production, we have lost some very important practices that affect our digestion of all grains. This means that much of the gluten-free product at today’s grocery stores is just as indigestible and irritating to your system as the wheat products you were buying them to replace! Let me repeat that. It’s not just gluten making you sick.
Wheat and other grains like brown rice, quinoa, and spelt, plus nuts, seeds, and legumes all contain protective mechanisms that work to ensure that they can still propagate themselves when they are consumed by herbivores with one stomach. The grains are eliminated “pre fertilized” in nature. Gluten, other lectins, enzyme inhibitors, and phytic acid allow the seed to pass through the digestive system without harm. This is good for the plant but bad for our digestion and absorption of nutrients. Luckily, old methods of soaking and fermenting grains break down this protective barrier, making the grains less irritating to our system and much more digestible and nutritious.
A long sourdough fermentation process as described in the following recipes breaks down the carbohydrates and the long stretchy gluten in the dough and greatly reduces phytates in the grain. This process produces a very tasty loaf, but also neutralizes the antinutrients and unlocks vitamins and minerals in the grain. People who have experienced gluten intolerance (not the 2% of the population who have celiac disease) should be able to eat and enjoy this bread without discomfort.
Long fermentation does take a long time though. If you want to incorporate this bread into your daily life, you’ll need to make some new habits. First, you need a starter and that starter needs a little attention to stay alive. Once it’s working well, you just need to feed it once or twice a week. Then you’ll need to create a leaven and let the dough rise overnight. All of this can be done on a weekend with the active work of mixing and kneading only taking a short time and the rising happening while you do other things or overnight. Once you get into the swing of things, it will become second nature and you’ll have healthy, homemade loaves, our staff of life, available whenever you like.
SOURDOUGH STARTER
I started baking homemade bread for my family in 1996. Crusty french baguettes were not available at the supermarket back then so I became obsessed with perfecting the recipe so that we could enjoy them at home whenever we wanted. The rest of the country was on a bread tangent too so my close friend often brought me freshly ground flour that she was using to make daily loaves in a bread machine. My results were incredibly tasty and much healthier than anything I could buy at my local market. The cookbooks that I used to perfect my methods, Baking with Julia and The Best Bread Ever, both contained lengthy recipes for sourdough starters that intrigued me. I was daunted though by the amount of time required to create one (I was making bread in between nursing babies and diaper changes) and the number of variables that could go wrong, so I never gave it a go.
Fast forward to 2013. A book I read a couple of years ago by Michael Pollan called Cooked that talks about the four elements Earth, Fire, Air, and Water and how they relate to cooking and eating that was turned into a Netflix documentary. I watched it with my homeschoolers and we were inspired to finally take the plunge into traditional bread making as a science project. I searched the internet for information and found loads of different processes. I decided to use the easiest one that seemed most likely to end in a loaf of bread rather than frustration.
What follows is so simple! I find this to be a top priority when trying something new. Expensive or hard to source ingredients and complicated instructions stall us when we are embarking on a new idea. To me, simple equals success. Once you have mastered this technique, research the other traditional starters. Rye and spelt flour produce wonderful results, and you can even do a starter with organic grapes. The world of fermented dough awaits!
*Note 12/19
Nearly 7 years into sourdough baking, I have learned a thing or two that will make your experience even more successful. The main tip is that you need to discard a lot of starter to get yours active to its maximum potential. I am never one to waste even a morsel of food. It goes against my morals as much as stealing! So what to do with all that starter? Since the original writing of this post, I have added Sourdough Crackers & Pancakes to Bloom.
Let me tell you that while the crackers take a bit of time and muscle, they are the most loved of all my recipes by my family. I make a lot of good food and frankly, they are a little spoiled and hard to thrill. They are grateful for my meals but not often gushing with praise. Not so for these crackers that taste like the orange crackers in the red box that aren’t as healthy a treat as they are advertised to be. The pancakes are no harder than any others from scratch. Just remember to start them the night before.
The discarded starter that you end up with when you feed your developing friend has all the health benefits described above. It just doesn’t have the strength yet to give sourdough bread the lift it needs. So keep a separate mason jar labeled “discard” and add what you would throw away in the instructions until you have enough to make one of these recipes. You will also have to discard some starter if you are reviving it after a long rest in the fridge. If you are making bread often and need “discard” for pancakes or crackers, just feed the starter for a few days before you make your bread instead of waiting. It will help it grow even stronger and you will end up with all you need.
Recipe
Ingredients
unbleached, organic, white bread flour – The quality of the flour is important for your health and for developing a strong starter. Please feel free to use whatever you already have, but buy the good stuff when you restock. It should only be a dollar or two more than standard commercial flour
finely ground, whole, organic spelt flour (optional)
filtered water, room temperature
Equipment
2 quart, wide mouth mason jar or ceramic bowl (do not use metal)
measuring cups or a scale (highly recommended)
mixing spoons (I like a small wooden spatula)
plastic wrap or the lid to your container
Creating a sourdough starter takes about 5 days depending on the temperature in your house. The ideal temperature is between 70-75 degrees. If your space is cooler than this, the fermentation will take longer. If it’s too hot though, this will kill the developing yeast. The general rule of thumb is that if you are sweating, your starter will be unhappy.
Day One
1/2 cup or 120 grams flour
3/4 cup or 180 grams of water
Combine the flour and water in your jar or bowl. Mix the ingredients well until they are combined into a thick, smooth batter. When you are done mixing, scrape down the sides of your container so that there are very few small bits left which can dry out and ruin your final product. Place the lid on the container loosely without tightening it or cover with plastic wrap, leaving a tiny corner open for air circulation.
Day Two
Discard all but 75 grams or 2/3 cup of the starter. Feed the remaining starter with the 100 grams (7/8 cup) of flour and 125 grams (1 1/8 cup) of water. Stir well to incorporate the flour and scrape down the sides. Place the lid on the container loosely without tightening it or cover with plastic wrap leaving a tiny corner open for air circulation.
You may have small bubbles forming today, but if the starter doesn’t look much different yet, just stay the course.
Day Three
Discard all but 75 grams (2/3 cup) of the starter. In your original container, feed the starter with the 100 grams (7/8 cup) of flour and 125 grams (1 1/8 cup) of water. Stir well to incorporate the flour and scrape down the sides. Place the lid on the container loosely without tightening it or cover with plastic wrap leaving a tiny corner open for air circulation.
By day three you should have lots of bubbles forming letting you know that there is some good yeast developing. It should also be starting to smell like a warm loaf of sourdough bread. Don’t get too excited if your starter has a huge burst of energy in these first days. This initial activity is a great sign but does not mean it is ready to use. If you are concerned, check the troubleshooting guide below.
Day Four
Discard all but 75 grams (2/3 cup) of the starter. In your original container, feed the starter with the 100 grams (7/8 cup) of flour and 125 grams (1 1/8 cup) of water. Stir well to incorporate the flour and scrape down the sides. Place the lid on the container loosely without tightening it or cover with plastic wrap leaving a tiny corner open for air circulation.
On day four, you should notice that the batter is honeycombed with bubbles before you feed it. It will also smell even more pungent. If you taste a little bit, it should be quite sour, but without salt, it will not taste like bread. Check the troubleshooting suggestions if you are concerned.
Note: I like to add two tablespoons of finely ground, whole spelt flour (in place of two tablespoons of white flour) to the starter on day four and every few times I feed my mature starter. It gives it a quick kick that causes the fermentation to accelerate and strengthen the starter. This is not required and can be done anytime once your starter is established as well.
Day Five
Discard all but 75 grams (2/3 cup) of the starter. In your original container, feed the starter with the 100 grams (7/8 cup) of flour and 125 grams (1 1/8 cup) of water. Stir well to incorporate the flour and scrape down the sides. Place the lid on the container loosely without tightening it or cover with plastic wrap leaving a tiny corner open for air circulation.
By now the starter should be active enough that it will double in size from one day to the next. This will tell you the yeast is very active and is creating tons of little pockets of air inside the batter.
After day 5, you can continue to feed and discard your new starter for another week or more to give it great strength and activity. It will rise bread after day 5 but if your first loaf is dense, it is simply because your starter is too young. Mine is many years old now and is as reliable as Old Faithful. It also comes back to life very quickly if I leave it for a rest in the fridge. It’s worth the patience to feed it for a long period at first.
Resting Your Starter
Now your starter is ready to use or can be placed in the fridge to rest until you are ready to make bread. If you’d like to rest the starter, cover your mason jar or transfer it to a clean jar if you had it developing in a bowl. Keep it in the fridge until one day before you want to make bread. A quick note about mason jars… If you take an active starter and put it in the fridge, it will continue to expel gas continuously, just more slowly. I never fully tighten my jars so that if the starter is super active, the gas can escape without exploding the glass jar. This has happened to friends and it’s not pretty!
In this refrigerated state, it must be brought to room temperature and fed at least once a week. When you feed it, leave it on the counter for twenty-four hours and then cover it tightly and put it back in the fridge. For this process, follow the directions above, discarding all but 75 grams and feeding 100 grams of flour and 125 grams of water.
Now you are ready to make leaven. I use my starter so often that I don’t need to follow the discard and feeding instructions above to make leaven. I simply remove my starter from the fridge, let it come to room temp, and measure out the ingredients for the leaven. If there is leftover leaven from the Rustic Boule, add it back to your starter jar. The leaven for the Enriched Sandwich Bread is completely added to your dough and also wouldn’t go back into the jar because it contains milk.
If you are taking a long break from making bread, you will need to discard some of your starter before feeding it. You can discard up to half the starter without harming it and still keep it growing strong. Set a task in your schedule to remove it from the fridge and feed it once a week, leaving it out to develop for 24 hours and placing it back to rest in the refrigerator.
Troubleshooting
This recipe is for the most foolproof starter I’ve found. That doesn’t mean that nothing can ever go wrong with it, though. Once you have a bubbling happy starter, I suggest dividing it into two containers and even freezing about 120 grams of it tightly sealed in a small freezer bag. This way if you have a mishap with mold or forget about it on the counter for too many days, you don’t have to start all the way over at square one.
Q Nothing is happening inside my starter. It just looks like paste.
This may happen if you are trying to get a starter going during the coldest months of the year or if your flour is highly processed or bleached. If the flour looks clean and white, but just lifeless, add one teaspoon of active dry yeast when you feed it next. This will give it a little kickstart to get things bubbling away. I’ve also found that a tablespoon of finely ground, whole rye or spelt flour can have the same effect. Additionally, always make sure you are using room temperature water. Water that is too cold will slow the fermentation and water that is too hot will kill the starter.
Q There are tiny black dots on top of my starter that are not mold.
Early in the developing process, a little bit of the flour on the surface of your starter may oxidize. This can mean that you had a little too much air circulation or not quite enough water. You can gently scrape off the top layer and discard it or just stir it into the mix. Once the fermentation is going strong, this will stop happening.
Q There is a thin layer of liquid on top of my starter that is slightly grey or red.
This indicates that your starter had too much liquid and too little flour. Pour off the liquid and feed the starter normally, increasing the flour by a tablespoon or two until it feels like a firm paste when stirred. If the flour/water ratio gives you consistent trouble, try weighing the flour instead of using measuring cups.
You may also notice liquid rises to the top of your starter consistently when you rest it for a week in the refrigerator. This is normal. When you are ready to bring your starter to room temp and feed it, pour off this liquid or stir it in and feed it normally. Many people say that this “liquor” gives the starter more flavor. I have nothing scientific to prove this but I never pour it off.
Q My starter is moldy
In order for a starter to get moldy, it has to have had undesirable bacteria introduced to it at some point. Make sure that your jar or bowl and mixing spoons are scrupulously clean. You can also transfer your starter to a clean jar for storage every few weeks to avoid buildup of hard batter on the sides, rim, and lid. If your starter is moldy, carefully spoon off all but about ¾ cup from the bottom of the jar. Put this in a new clean jar and feed it until it is forming a strong honeycomb of bubbles again before you put it away to rest. Alternatively, discard the entire thing and defrost your frozen “emergency batch” as described above. Once it’s defrosted, feed it and let it develop on the counter for a few days before you put it in the fridge to rest.
Now you are ready to make bread! Your starter will work for sandwich bread, classic sourdough, pita, pizza crust, English muffins, or rolls… Actually, anything that you can imagine can be made with a starter.
When you’ve been married as long as I have, there is a tone of voice your spouse occasionally uses that you know means trouble long before sentences are exchanged or completed. When you hear its decreased volume and subtle waiver, your heart races and attention pinpoints while you wait to hear the subject of whatever potential emergency that is about to redirect your day. In the 25 years I’ve been married to my husband Brett, this voice has announced rebounding cancer, car crashes, broken collar bones, lost contracts, and any number of other calamities that thread their way through a physical life.
Most recently, alarming phone calls involve the daily crises that are associated with running a restaurant alongside my oldest son and husband. In the past, I frequently heard the hushed voices of partners calling about laboring mamas, working as a midwife. These were happy calls, but always required nimble thinking and revised plans.
Today, I don’t like this voice. At about 8 AM on May 18, 2017, my beloved telephones when I know he is supposed to be returning from taking our daughter to work in Oak Glen. When I answer, he calls me “Jessica” instead of my nickname and begins to talk in this tone of dread. I demand that he spit out the bad news loudly enough, that my son Ashton overhears and immediately comes to my room to help.
The morning is supposed to be unfolding with scheduled precision, as my teen’s charter school representative is coming to facilitate this year’s standardized tests. The house is company tidy and my home-made breakfast and lunch are both warm on the stove to ensure our day is smooth and hospitable for the kids and teacher taking her time to help out my homeschoolers. In my bathroom, where I’d answered the phone, my hair is half curled, but I am right on track to make everyone’s day seamless and productive. Our conversation is about to change this day and all the days that follow.
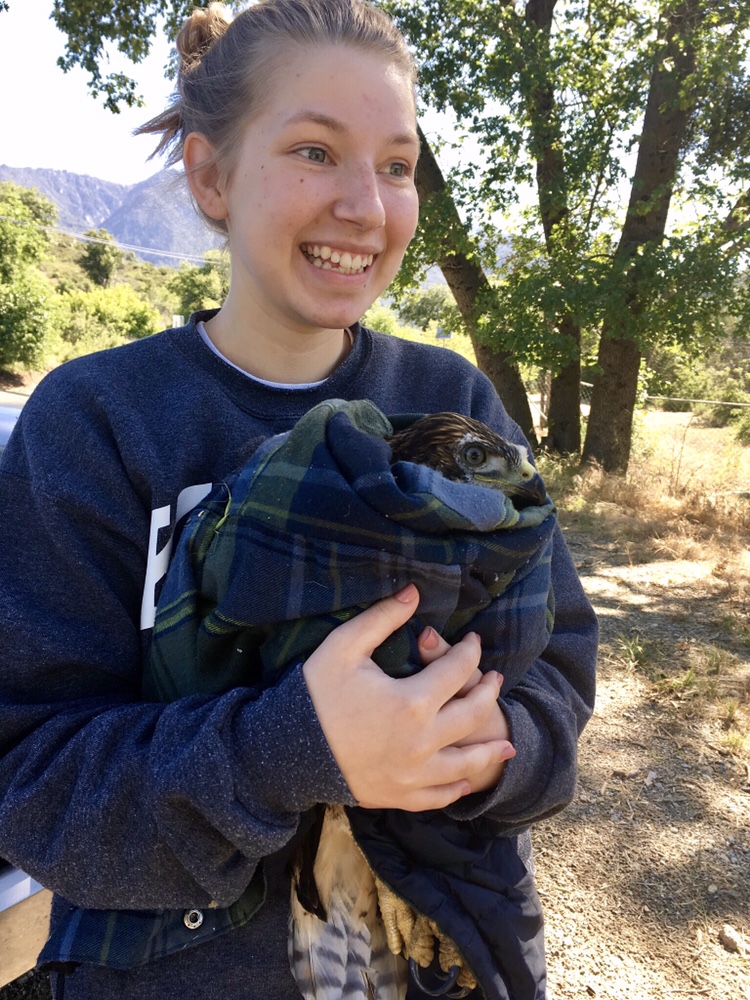
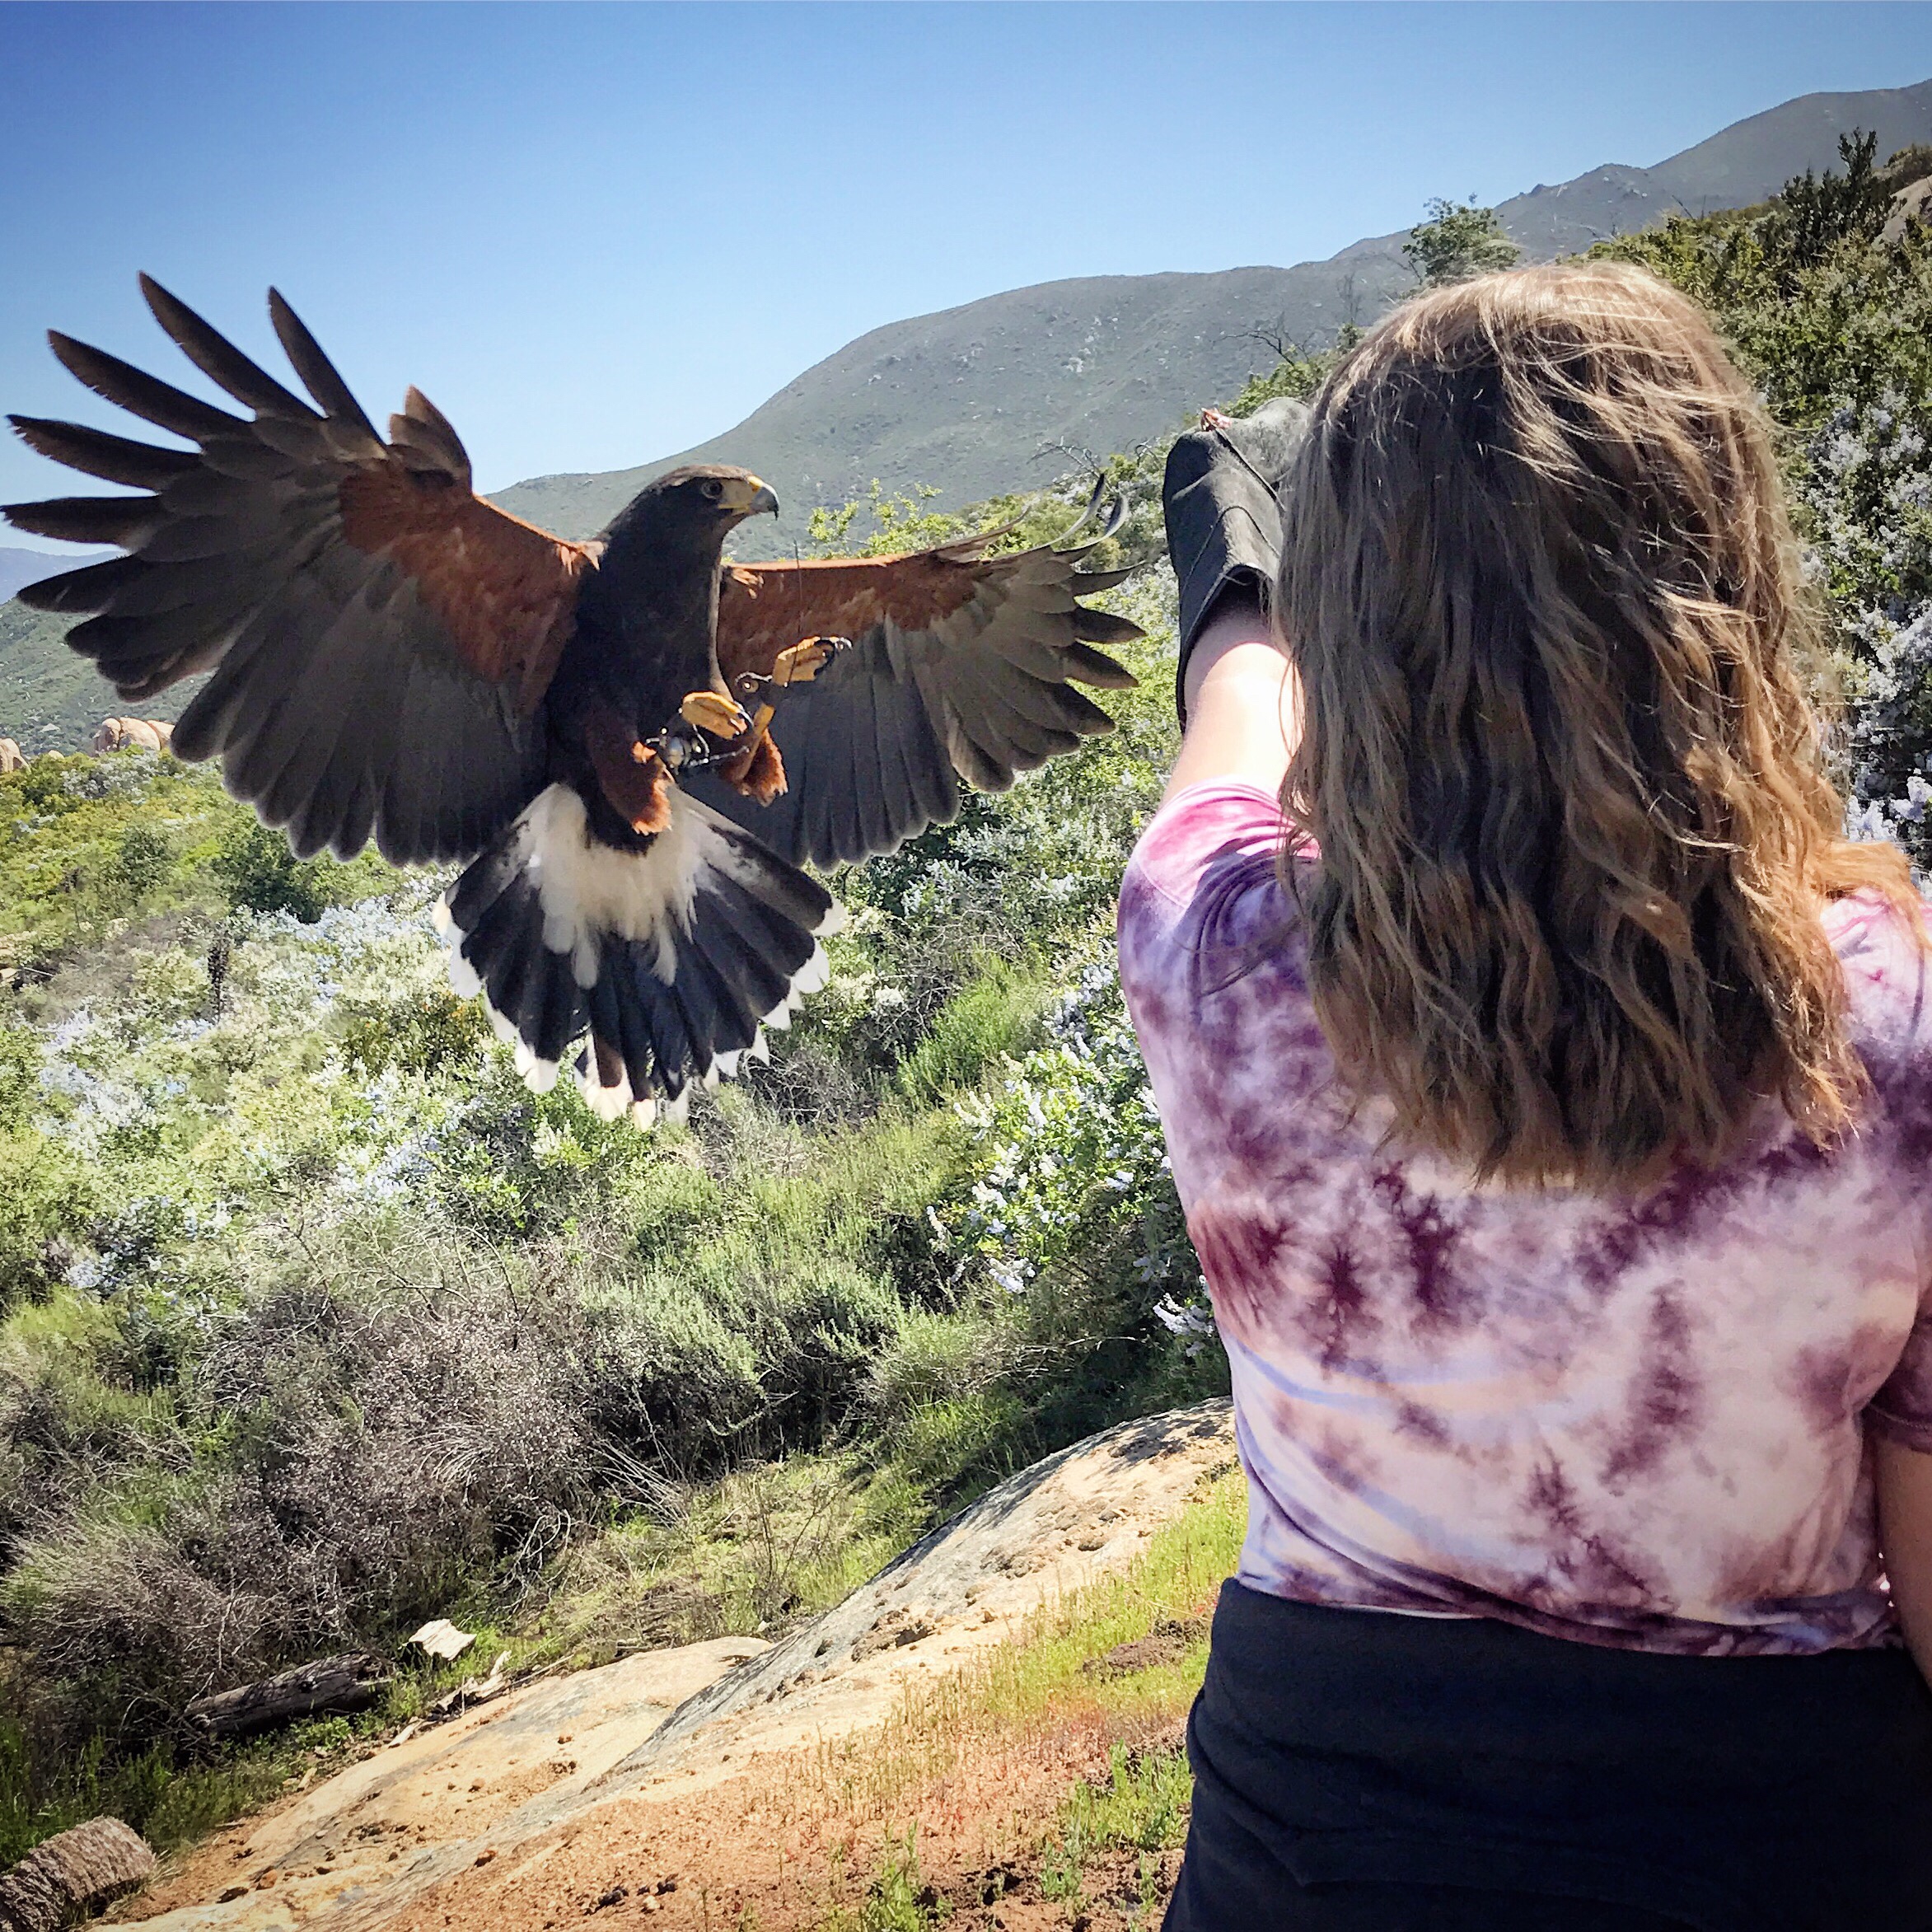
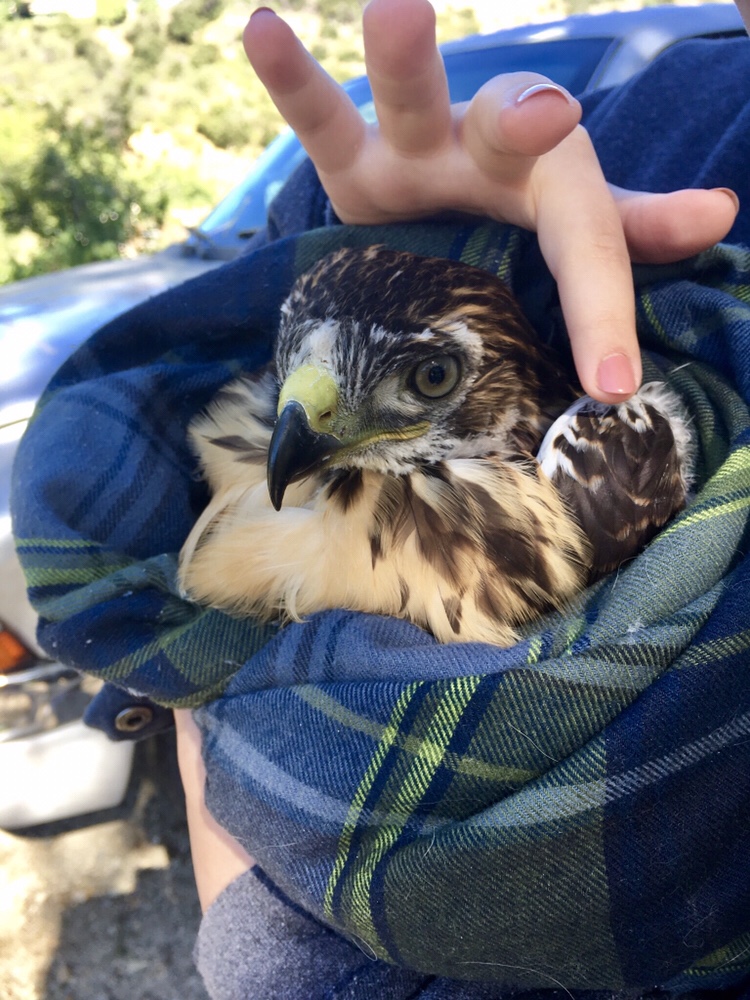
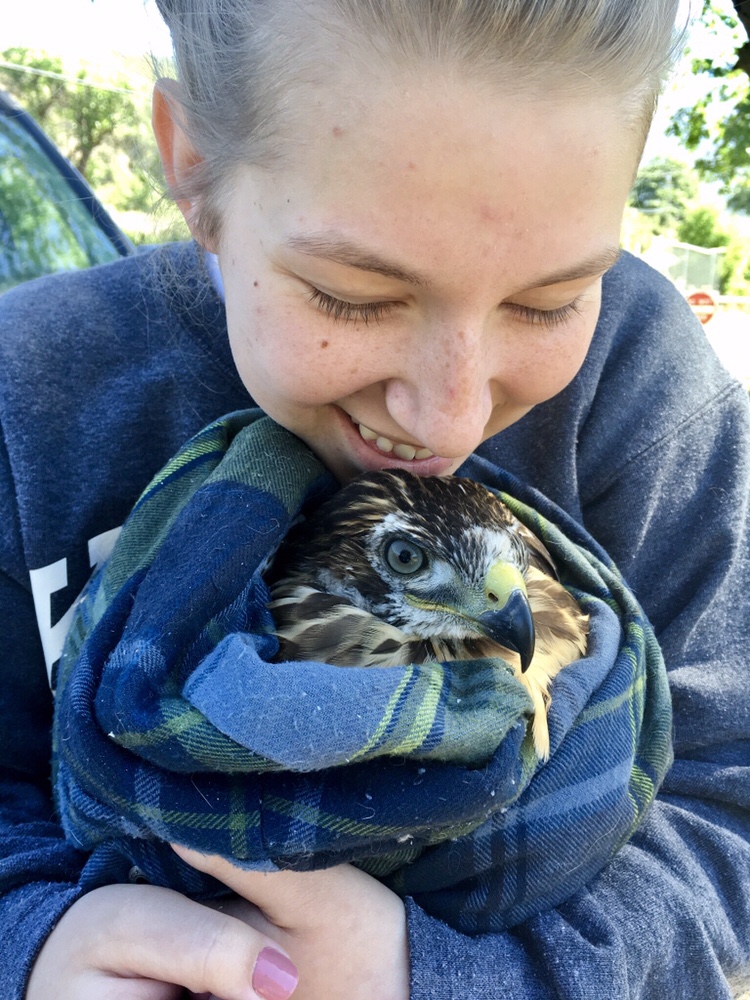
With Ashton commanding me to “please stop freaking out”, time slows while I listen to Brett and realize that his tone is not because of some nauseating catastrophe. Instead, his muted volume is actually because he is holding a taloned beast that, if completely healthy, could scalp him. He says “Honey, I found a juvenile Red-Tailed hawk on my way home from dropping off Alexis. It doesn’t seem hurt, but it’s weak and needs help.” I tell him to hold tight and get off the phone swiftly, making Ashton swear not to tell his raptor loving, sister Audree until I make some calls to figure out what in the world to do.
I call Fish and Wildlife but can only leave a message at this early hour and also call the teacher that’s on her way, to beg forgiveness for needing to reschedule. In the ten minutes that follow, I struggle to figure out the legal next step to find care for the bird. They are a highly protected species with both federal and state laws ensuring their safety and protection. You can’t just take home a hawk and turn it into an exotic pet for good reason.
While I wait for returned phone calls, I beckon Audree into my room and tell her that dad found a young hawk that seems to have left its nest too soon. I attempt to quickly finish my half-done locks, with hands shaking, while Audree races around grabbing supplies. She finds some gloves and packs a helmet. Yes, her adrenaline-fueled mind thinks that we might climb a tree and put the bird back with its mom. The helmet will protect us while we invade her territory. I didn’t know this detail until much later and it still cracks me up every time I envision the story she had to play out in her head to think up these details.
While we hustle around, BRETT LOSES THE BIRD. Now I’d already told the girl, and wheels are turning in a new direction, far away from the seamless agenda I had once awoken to direct. When he tells Audree the bird has hopped out of reach, I snatch the phone from her and say, “You go get that damn bird!”
I decide that since I haven’t heard from Fish and Wildlife and we have no idea if Brett will even be able to get to the hawk again, that the most logical thing to do is tell the teacher to go ahead and come, though my heart (and now Audree’s) is still with the bird. The very second I hang up from organizing the day’s second change of plans, Brett rings and says he has the bird safely captured and to “HURRY UP”. Ughhhh!
Audree and I decide to leave Ashton for the standardized testing and take off, figuring out the right plan on our way. Now Mrs. Bennett will know rather than wonder if we are crazy as she passes us driving up the street to our house. Audree and I rush up the hill, hoping for the phone to ring, listening to Sia sing Angel By The Wings… because, why shouldn’t you give your wacky life the proper background music? The chorus says, “You can, you can do anything, anything…You can do anything” over and over. I have no idea how much I’ll need this mantra in just a few minutes.
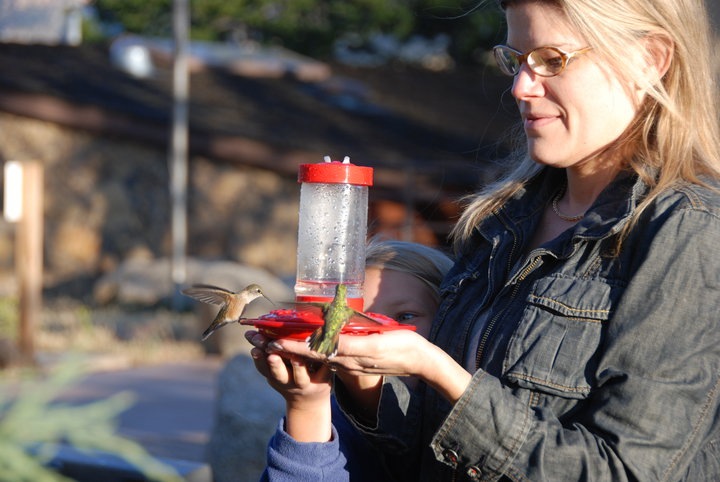
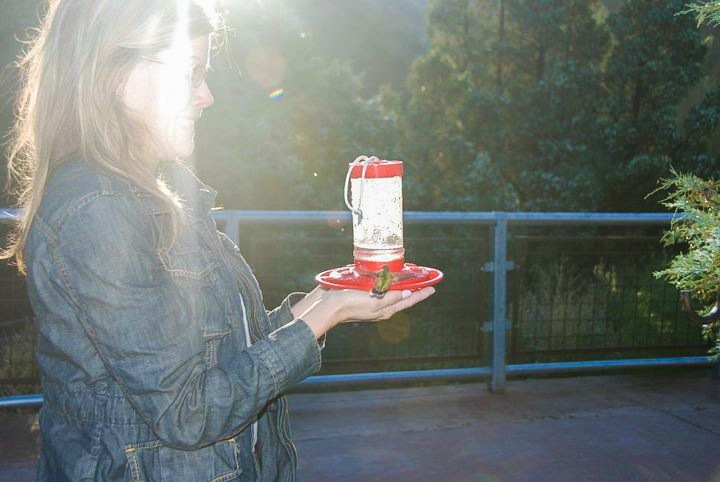
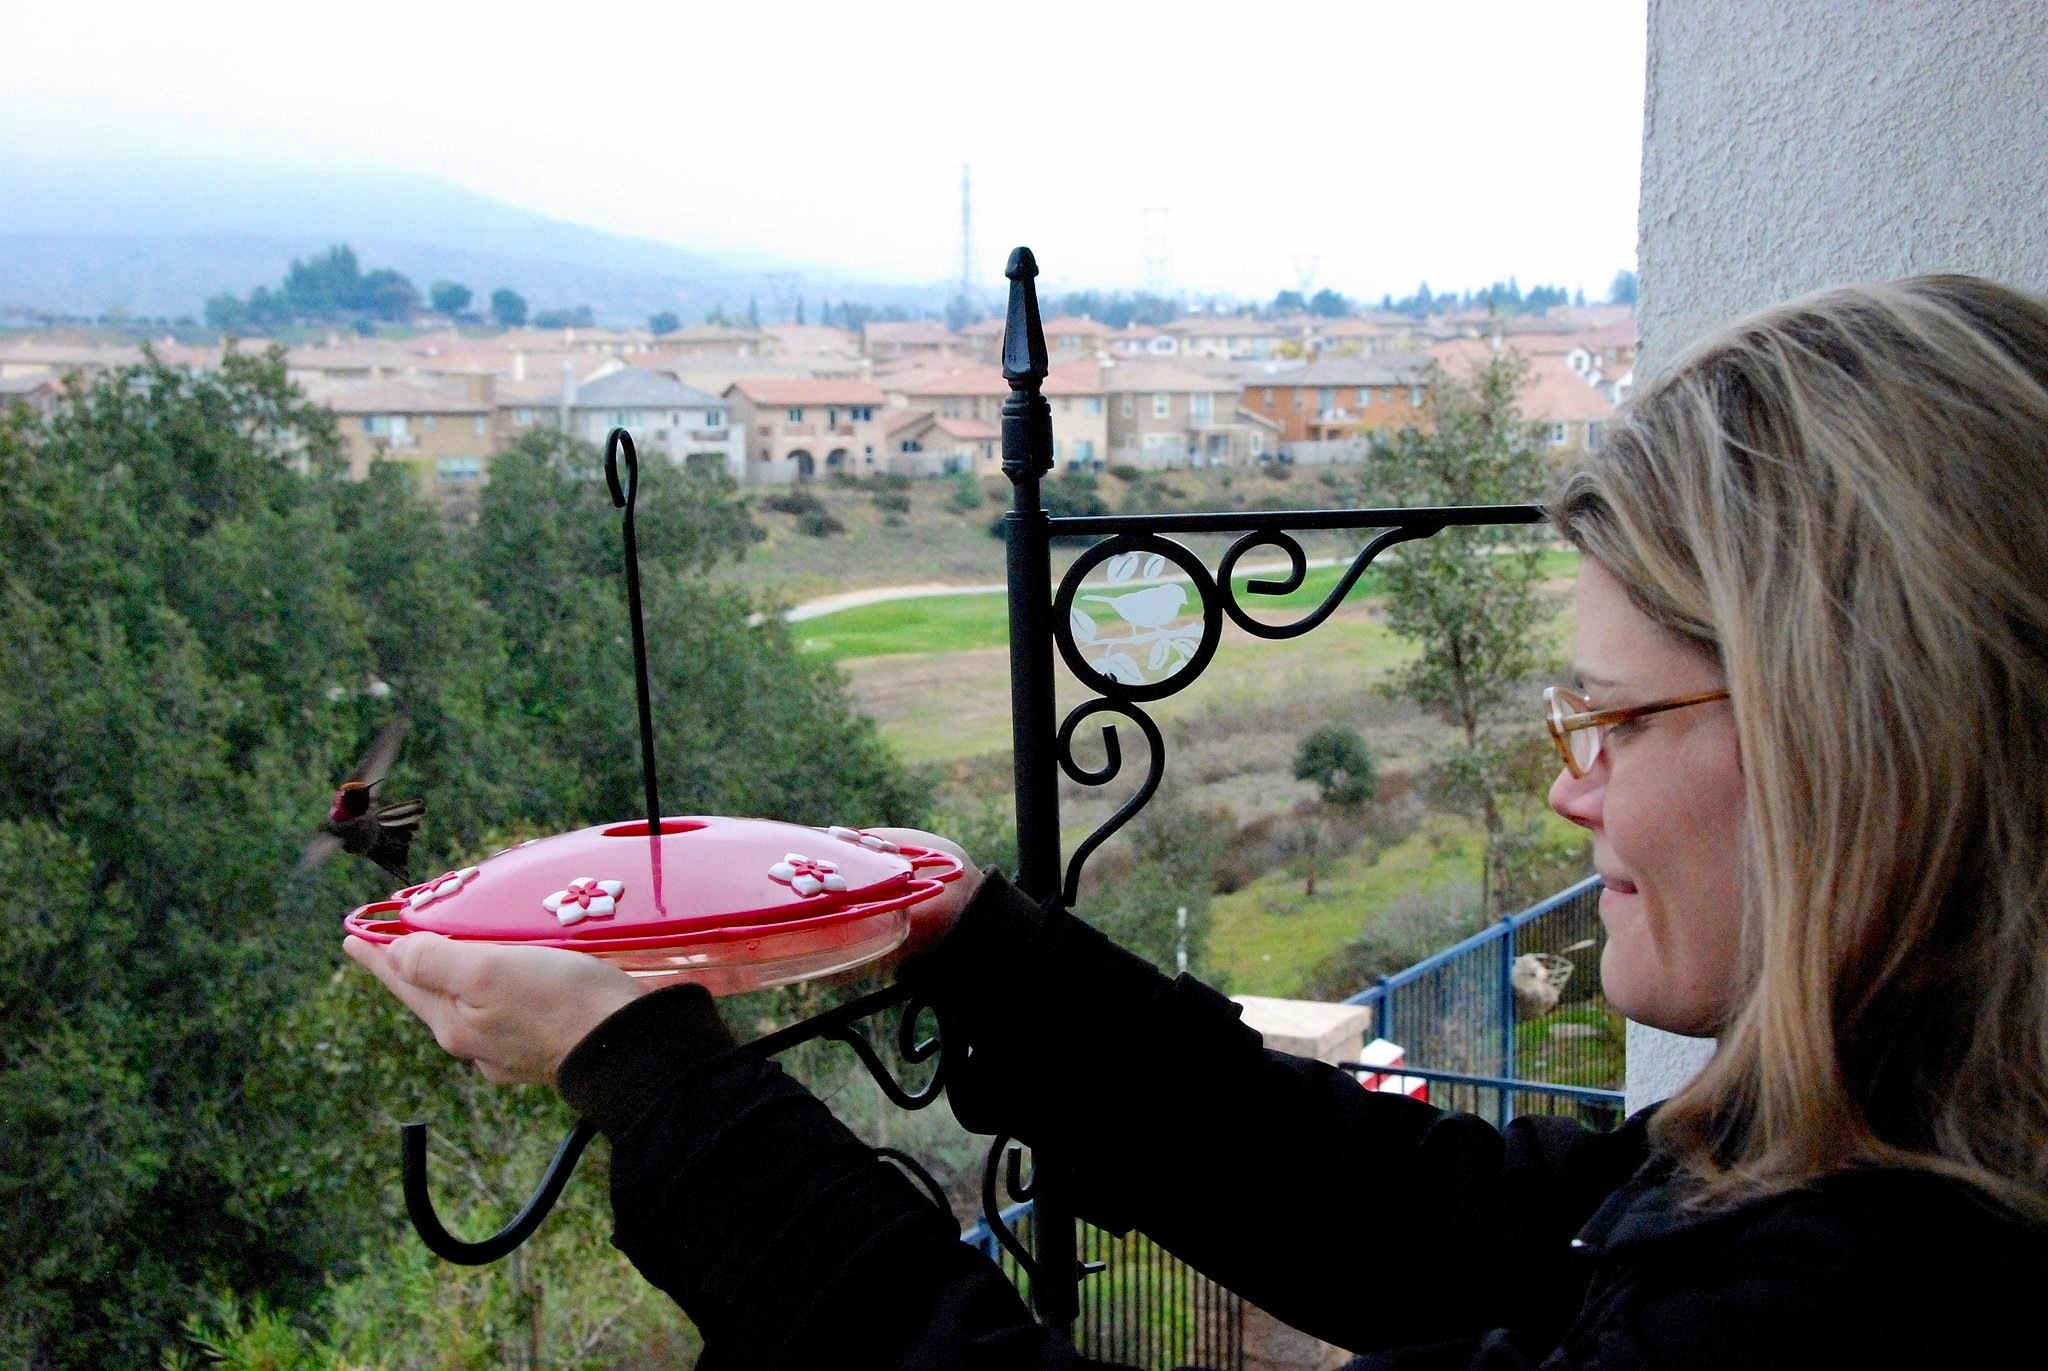
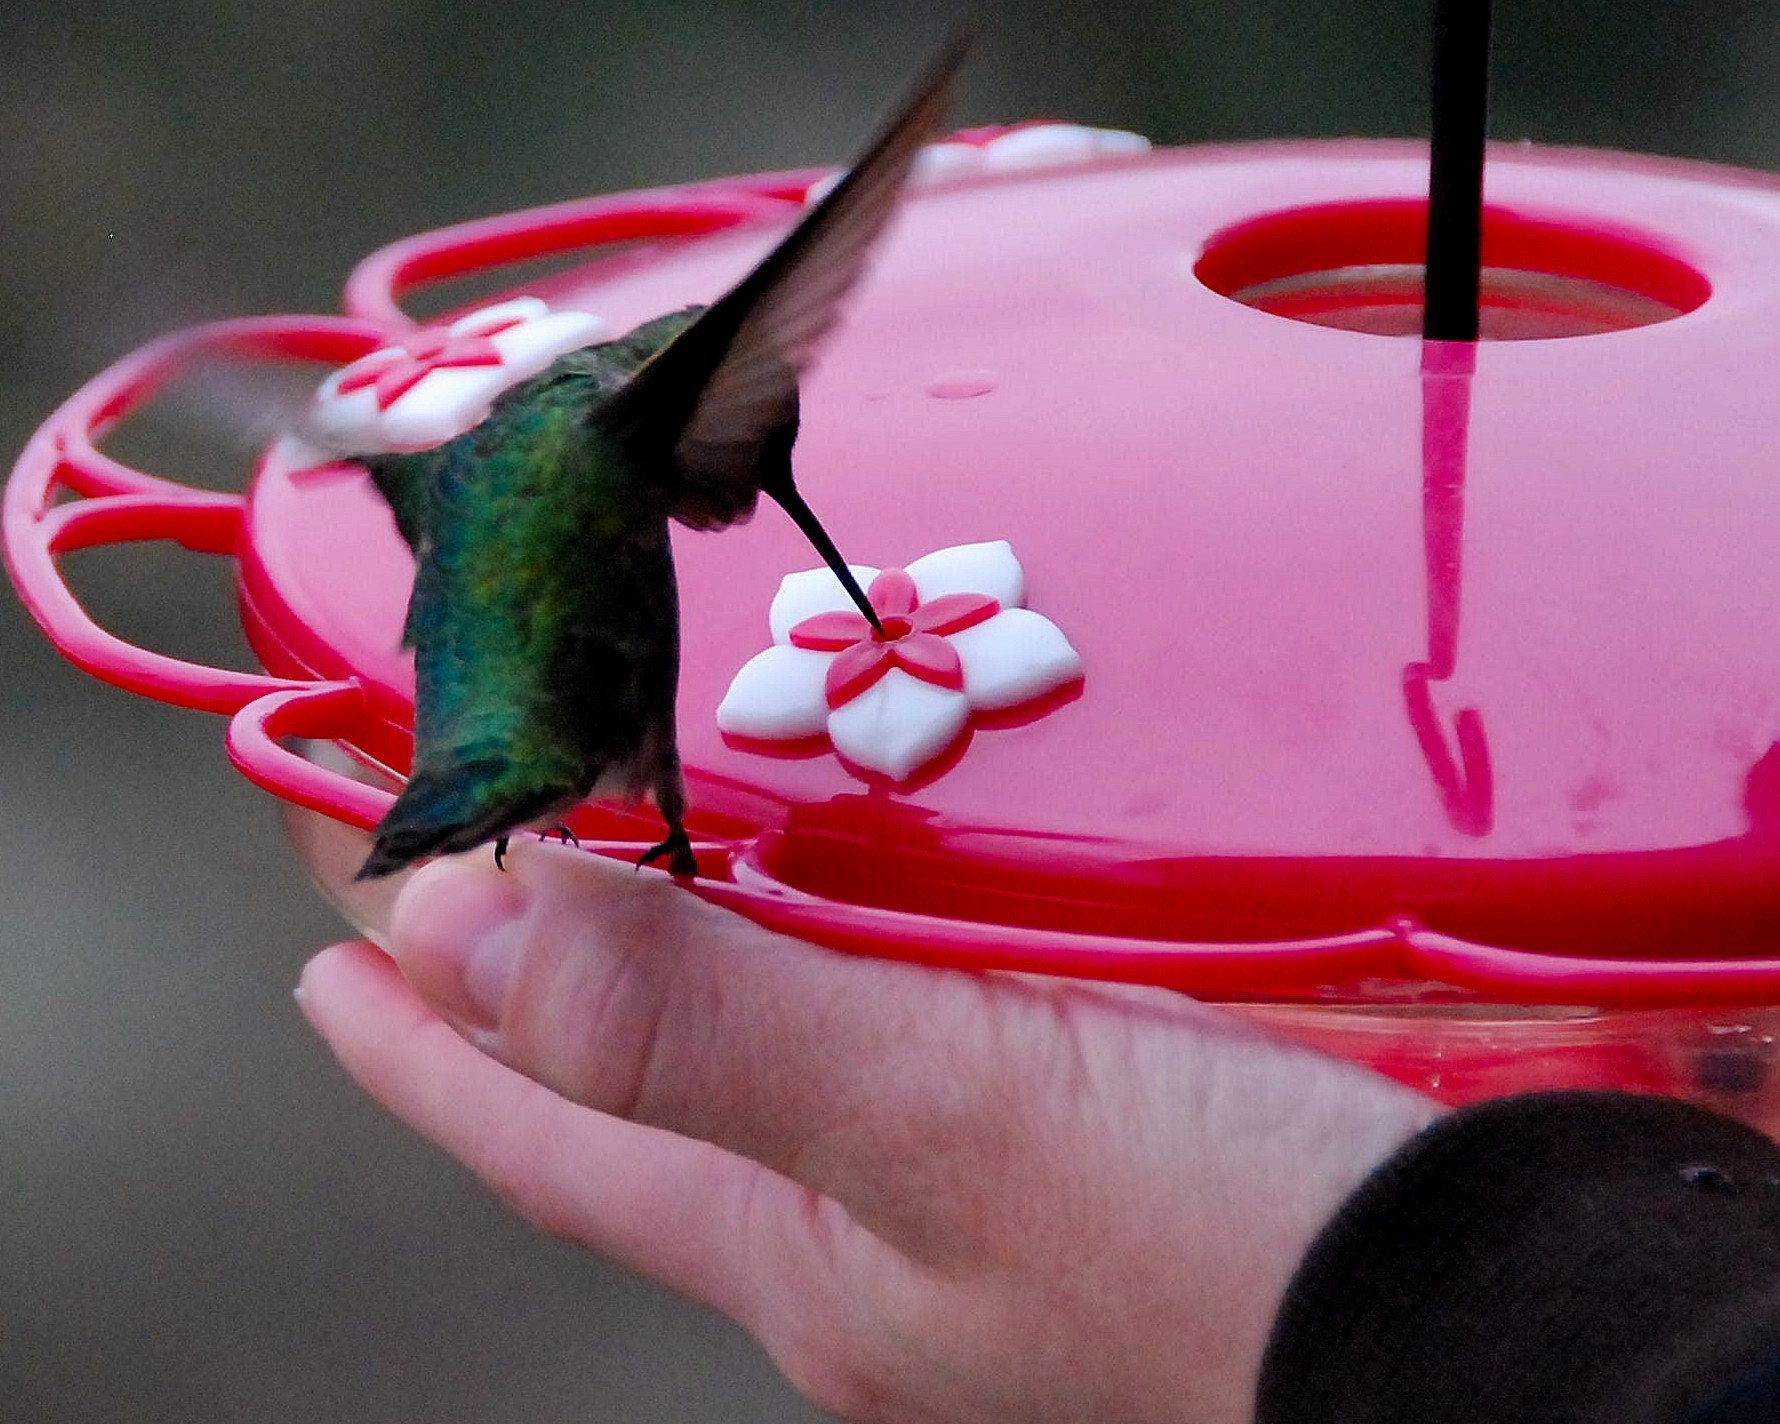
My family and I haven’t always been enthralled with raptors. Nature, yes. Animals, for sure. We’ve trudged through muddy rain forests, blanketed with insects to see Capuchin monkeys and sloths in Costa Rica, and had close encounters with gentle-eyed, giant bison and tiny foxes in Yellowstone. I adore hummingbirds and would rather spend the night sitting with the kids watching and hand feeding them, than at a 5-star hotel. We’ve discovered that we need nature as fuel and have had so many awe-inspiring, hilarious, and dangerous moments enjoying the innumerable wonders that exist on our planet.
It wasn’t until we moved to our home in Beaumont that hawks and other raptors captured our fascination. Very soon, after settling into our new residence, I realized that a mating pair of Red-Tailed hawks nest in the electrical pole directly across from our backyard. With almost no effort, we could watch them hunt, mate, and raise their young each year. It is really like having a National Geographic documentary happening right outside every day. Once we started watching, we noticed them everywhere. They are on freeway light posts no matter where you go in this country, and often swoop in front of our (and anyone’s) car, showing off their impressive skills. The more we watched, the more they seemed to be showing up all the time. And because I always look for life messages in nature, I thought they might have something essential to share.
Red-tailed Hawks are large raptors with broad, rounded wings and a wide, short tail; Buteo jamaicensisto be more scientific. They use invisible air currents to travel and hunt by soaring and hovering over their prey. Once they are aligned with the natural flow in the sky, they can travel at incredible speeds with very little effort.
This example of surrender to external circumstances to progress at the greatest possible pace became an imperative message for my daily life. As I enjoyed them coming incredibly close to the yard or noticed them circling, and soaring overhead while we hiked or enjoyed a day outside, it seemed like they were constantly reminding me that resistance and worry are useless and even counterproductive. On a particularly challenging day, I would send out some hawk vibes and they would appear almost magically, swooping and swirling above, giving their bird sermon on surrender when I needed it most.
One summer, the Hawks showed me a lesson about what to do with fear. I guess this could be called chapter two in the Hawk Instructional Manual for Humans. This fourth of July, I was totally dressed and ready to leave for work at our restaurant when my oldest son Andrew, the chef there, called and said I didn’t need to come in. Fourth of July is a BBQ holiday and people don’t really come out to malls so it was an especially quiet day at N7 Creamery. I firmly resisted his suggestion because I really like to show up when I’ve said I’ll be somewhere, but he said he’d lock me out if I tried to come to work. He can be bossy like that. When I finished our conversation, I went to sit on my balcony and rethink my day’s plan.
Outside, I noticed that this year’s three Red-Tail juveniles were perched on some identical, track home chimneys just across the golf course fairway. We’d been watching them, enthralled with their rapid development for several weeks, and noticed that they could really hop and glide with style now. Although, what they’d been doing certainly couldn’t be called flying yet. I wondered how they had gotten down here, so far from the nest, and wondered how in the world they would get back, given the lack of skills I’d observed just the day before.
As I watched and worried a little (like there was anything I could do to help), a huge raven started dive-bombing the babies. Within seconds, their mother came out of nowhere to save the day. She flew, barreling with feet tucked, torpedo style toward the raven at top speed. Mrs. Raven decided it was best to take her leave but moved toward the fledgling instead of away, to avoid a collision with the angry hawk mama. Just before the juvenile was toppled off the chimney by the raven, it lifted up, caught the air stream its mother was in and SOARED right alongside her. Its two siblings immediately followed as I watched their first real flying and hunting lesson. Observing the whole scene was extraordinary, especially since I would have been in the car driving had Andrew not called to say I wasn’t needed at work just minutes earlier.
Upon reflection, I realized that this hawk and its nestmates had taken flight for this first time as the result of getting into a pickle, plus a generous measure of fear. And isn’t that how life often goes? Difficulties, discomfort, or fear are often the impetus for us to make a great leap into something new. And when we are willing to just make the smallest shift forward, afraid or not, we are soaring.
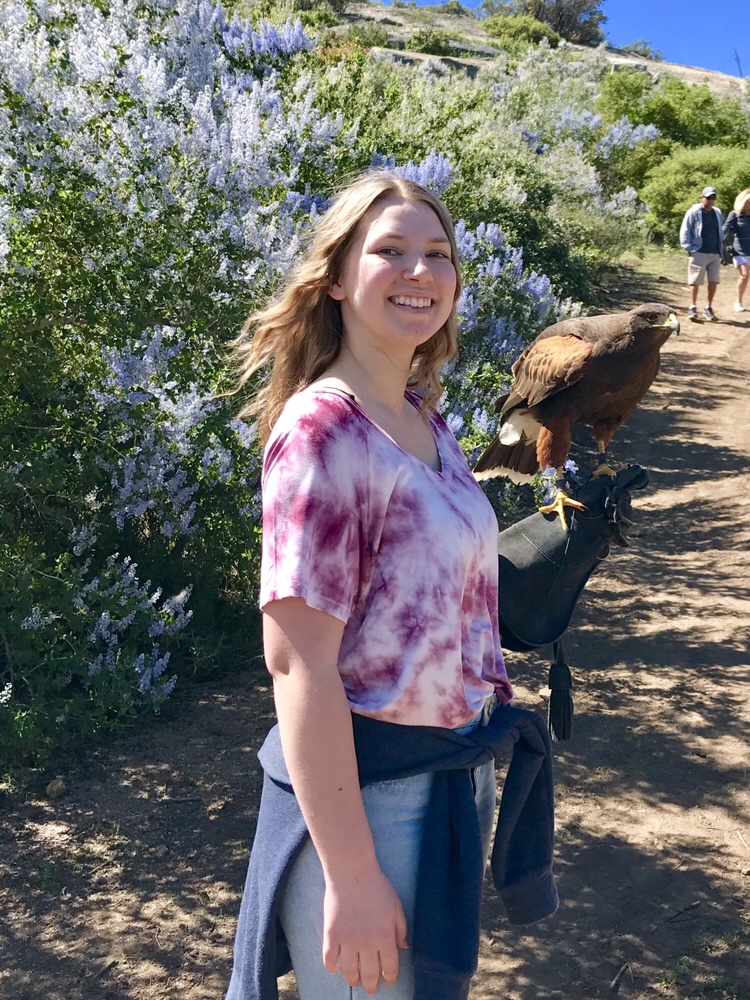
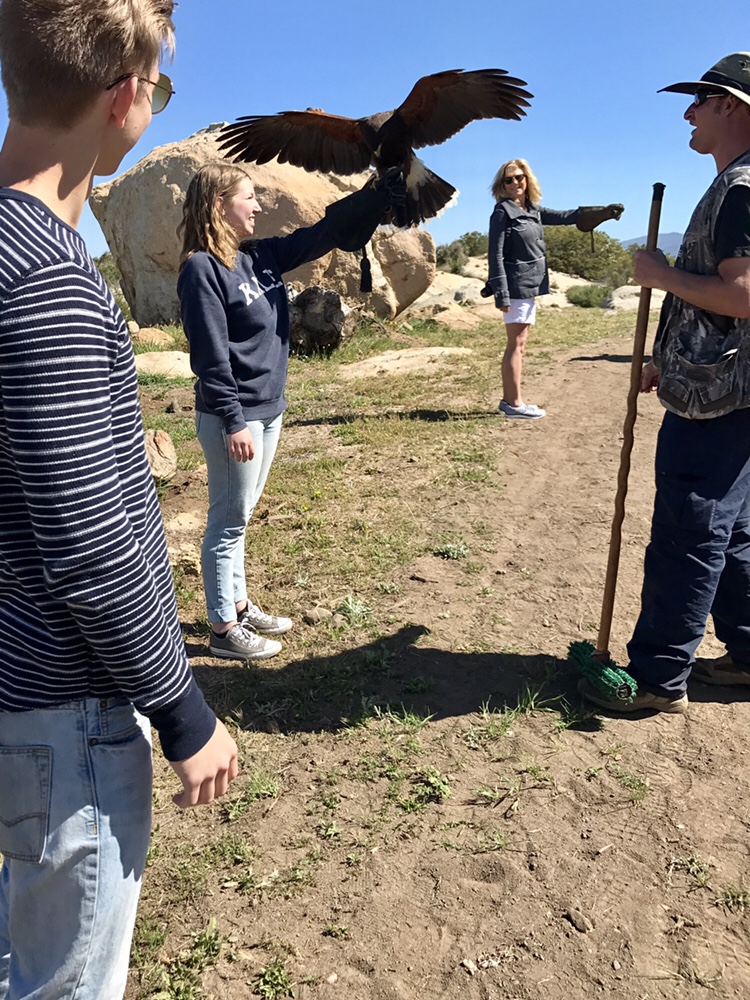
Brett and Audree really caught the raptor bug with me and eventually, we got to visit a place in San Diego called Sky Falconry where we could free-fly Harris’s hawks with seasoned falconers. Harris’s Hawks, Parabuteo unicinctus, were named by John James Audubon, the most famous nineteenth-century ornithologist, after his friend and fellow naturalist Edward Harris. Called wolves of the air, they are often seen in groups of three or more, perching on cactus and hunting collaboratively, rather than the more solitary behavior of most other raptors. Their relatively calm nature and pack behavior make them wonderful falconry birds. They are absolutely stunning animals, who seem to have so much going on in their raptor brains behind their warm, chocolate eyes.
During our first visit, it made a great impression on us that these birds choose to stay with the humans they hunt with. They retain all of their wild instincts and abilities but decide that the falconer is a good hunting partner and come back to live in the mutually beneficial relationship. Audree solidified her previous notion that she wanted to start to study falconry and raptor rehabilitation after our visit. She sees that close encounters with animals can have a great impact on how people think about nature and chose to behave on this spectacular planet and starts to dream about carrying on our family lineage of working with animals directly instead of just being an enthralled observer. Since I can turn nearly anything into a homeschool learning opportunity, I immediately started putting together a course for her to get high school credit studying something she loves. We order books and make hundreds of flashcards to begin learning the facts and laws… all things raptor.
The day before Brett found the juvenile Red-Tail on the ground, while Audree and I were working on school, we heard tiny squawks coming from the electrical pole across from our house that can only mean one thing! This year’s eyas had hatched and were telling their parents they were hungry. We jumped in the car to get a closer look. At the nest, we could see at least two, if not three eyas bouncing around and making an incredible racket. We sat and watched as their parents delivered a meal and they struggled to get the biggest bite for themselves.
Several times, they got very close to the edge of their enormous nest, looking like they might fall out. Audree laughed and said, “Hey hawk babies… If you tumble out of there, I know some people who would love to take you home and take care of you”. She knew this was not only illegal but that we also had very little idea of how to care for a young hawk. We laughed and dreamt of how cool it would be someday when we had the right contacts for training and licensure to make something like that possible. We had no notion that someday would turn into tomorrow!
Driving up the familiar, twisty road to Oak Glen, we both think that we are just going to go sit with Brett and the hawk until the proper authorities arrive to take the juvenile to a rehabilitation center. Even though we had flown the hawks at Sky Falconry, we had never touched a hawk before since they sit on your arm covered by a thick glove. This was going to be a huge honor to participate in getting this bird to the right people to care for it and just flipping awesome to be so close to an animal that we are so captivated by. When we arrive, we wrap the bird in a jacket and start trying to make phone calls again to figure out what to do.
Licensed rehabilitators are very careful handling the animals they work with. Different than education and falconry birds, who benefit from having a rapport with their handlers, rehabilitated animals are returned to the wild. In fact they are still considered wildlife by the state. This is why it is essential that they not become habituated to humans in any way while we help them. So let me make a little disclaimer about these pictures. I LOVE THEM! Audree’s dream was coming true before our eyes. She wasn’t a rehabilitator yet though! This kind of contact is not appropriate in a rehab setting. We just didn’t know that yet.
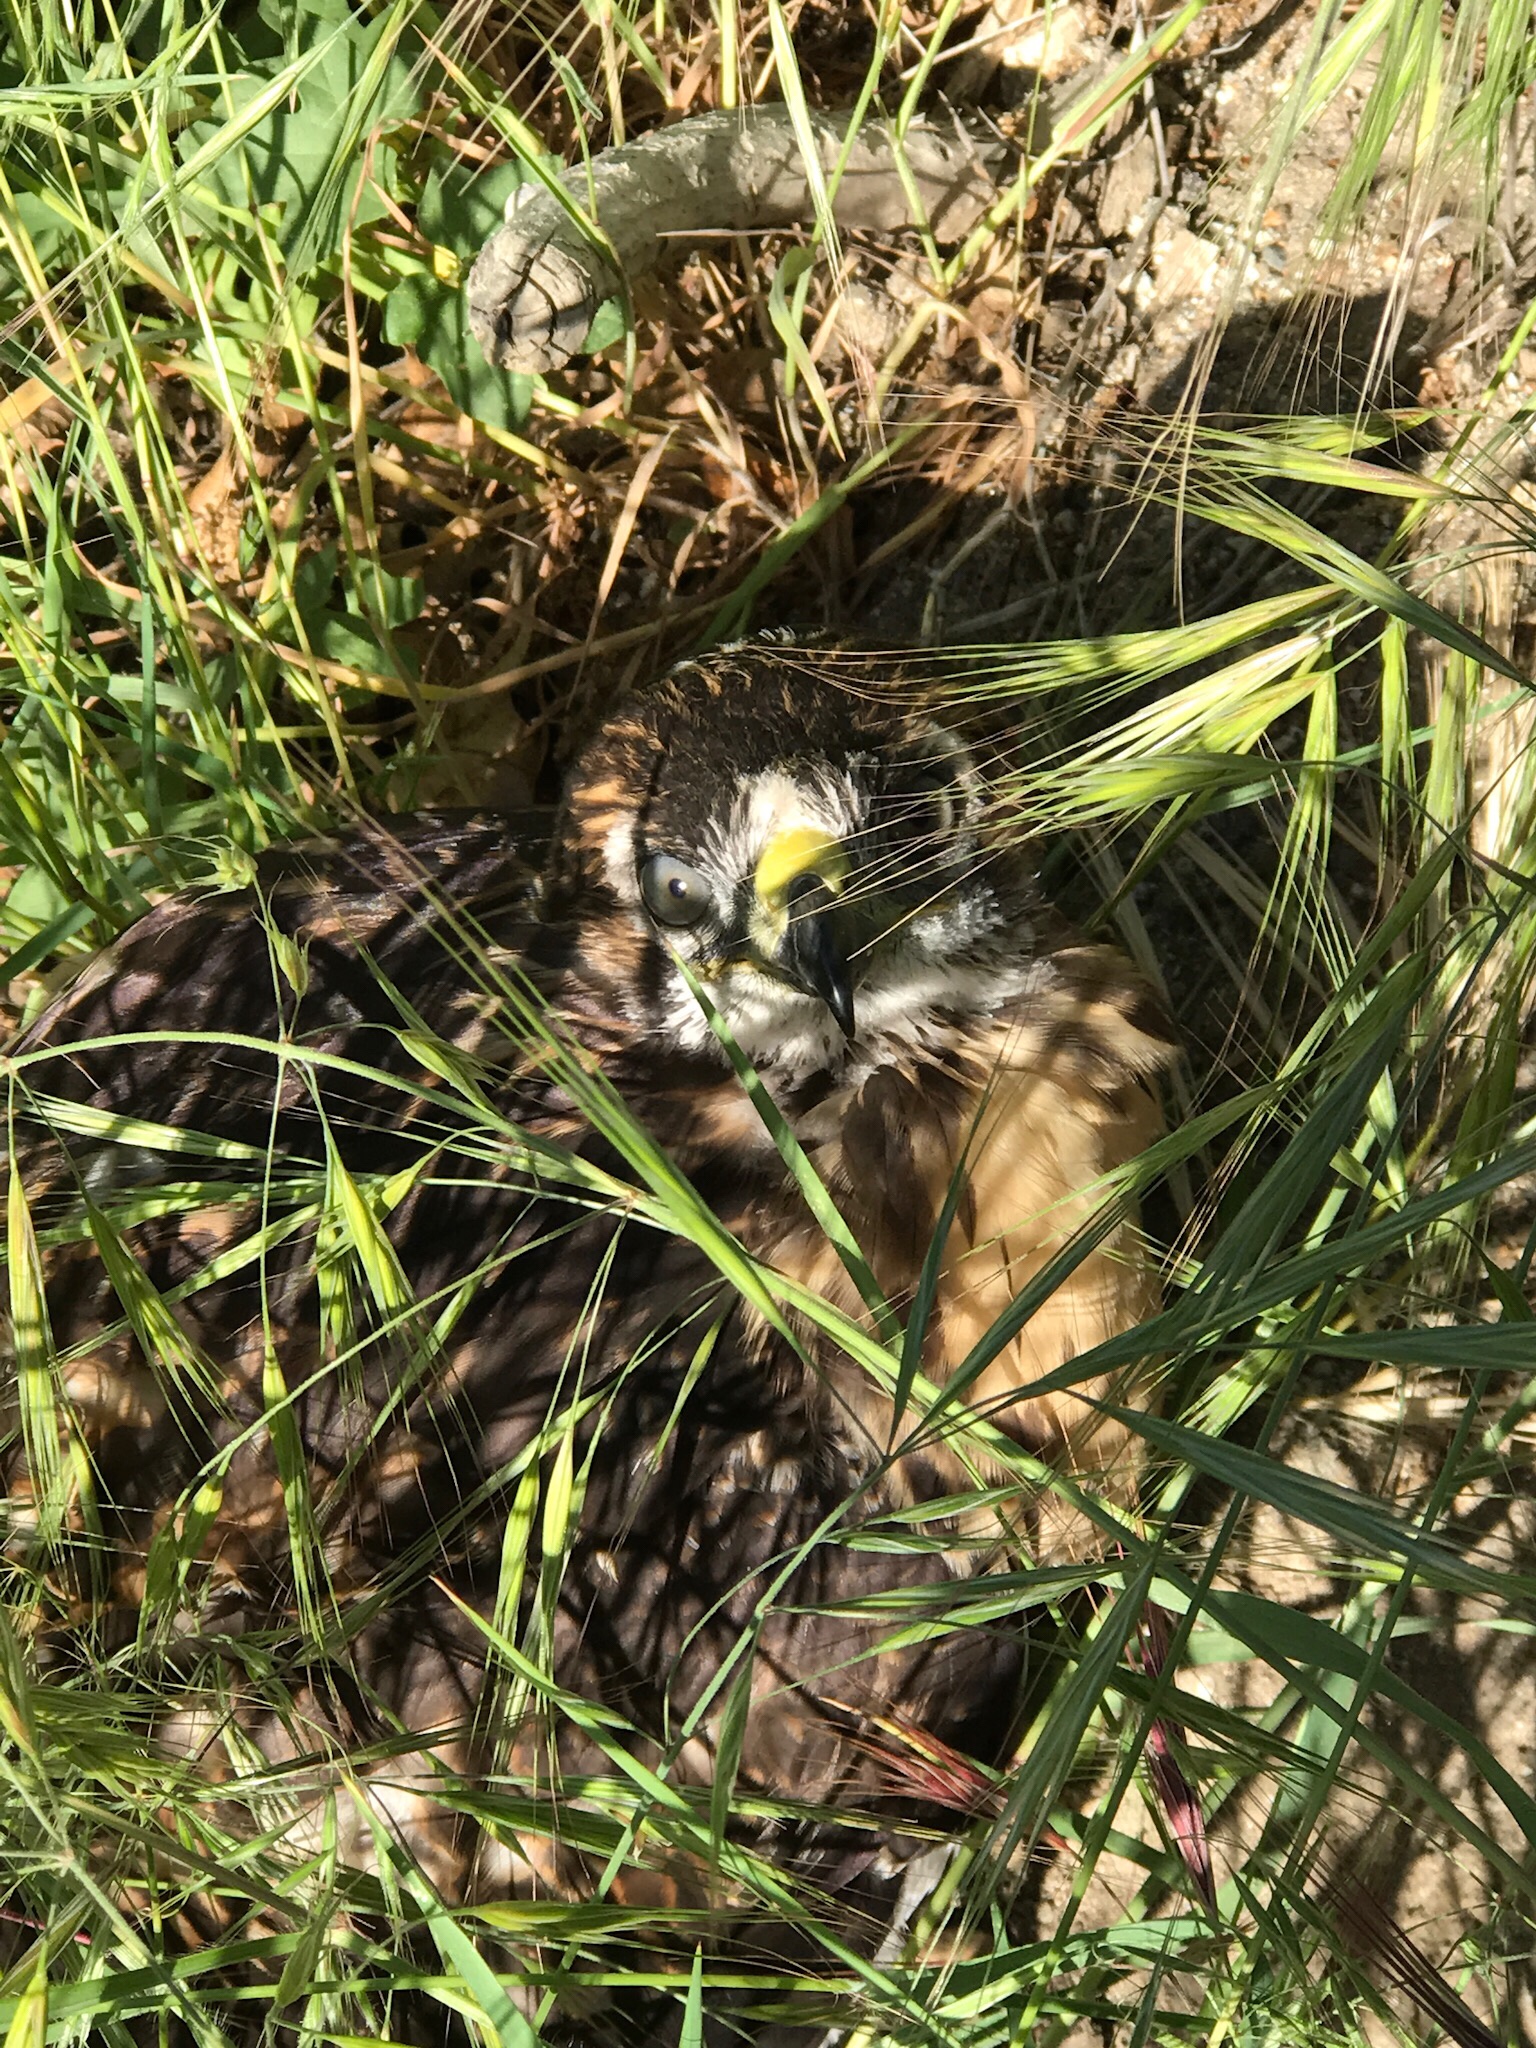
It is absolutely surreal to observe all of us handling this bird with some degree of confidence even though we’d never done anything like this before. I find that there is always a measure of grace in extraordinary situations like this that give us the ability to do things we never knew we could. Adrenaline doesn’t hurt either. The hawk is an absolutely dazzling animal. The baby down that still remains on her head is incredibly soft and her taloned feet are much more supple than one might expect and toasty.
She smells like warm leaves in the summer sunshine, looking us right in the eye as if to thank us for helping her. She isn’t in shock or frozen from her natural fear of humans. I’ve seen plenty of animals with that paralyzed deer in the headlights look. She is inspecting us just like we are her, and none of us are afraid.
Brett finally has some success at getting Fish and Wildlife on the phone and they provide the name of the local raptor rehabilitator who happens to be just up the street. When he rings her, he is disappointed to learn that she doesn’t have space for another rescue because it’s nesting season and she is already full. There is no room in the inn. As he gets off the phone, he mentions that Audree and I are working on our falconry license and, though he doesn’t want to impose, that we might offer our help to her if it would allow her to work with this bird. He also shares that my dad is a veterinarian and that I’d worked as a midwife so we have some grit and minimal skills to offer. She says she doesn’t usually invite people to her house, but that we should buzz up the road and meet with her so that she could asses the hawk’s condition.
The equipment that Audree didn’t think of when she was packing her bike helmet, was a box! The hawk is weak so it’s easy to get Audree seat belted in, with the bird secured in her lap, but this is nowhere near ideal. Thank God we only had a few miles to travel to the rehabilitator’s farm. With this most precious cargo in the back seat, I gently pull out onto the narrow, winding highway.
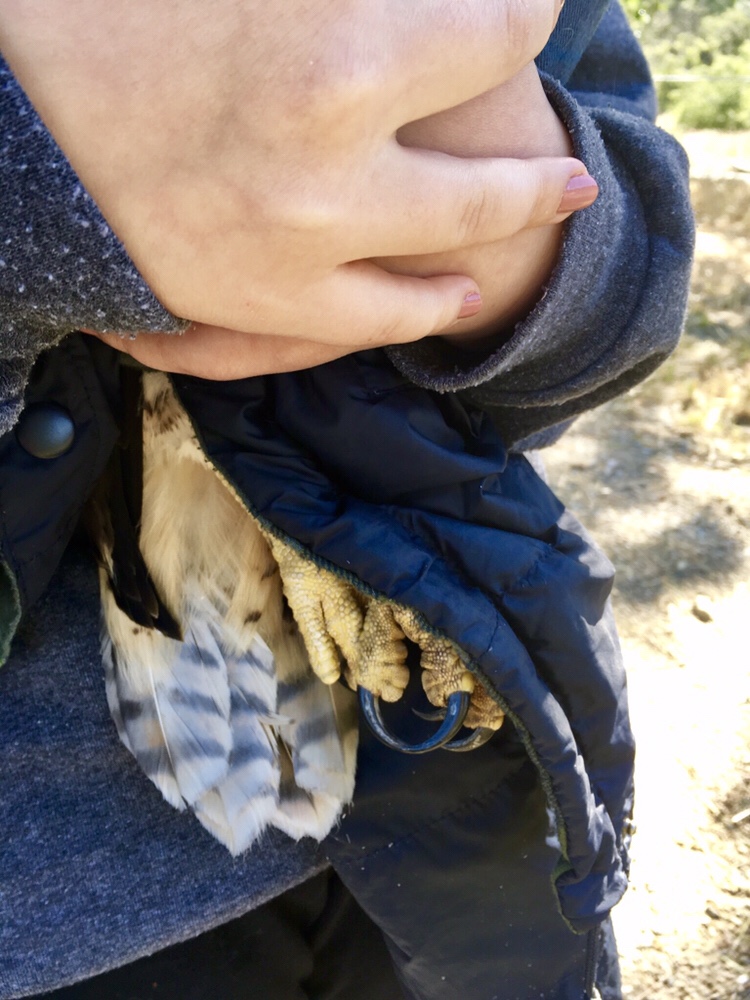
When we arrive at our destination, we make quick introductions and get straight to checking out the bird with the rehabilitator Kandie. She handles the bird with grace and ease that really impresses Audree and me. Audree thinks, “Someday I want to be able to do that. What an amazing lady”! The hawk’s keel (a ridge along the breastbone of raptors to which the flight muscles attach) is poking way out, indicating that it has been a long time since she’s had a meal. Other than this, she has no injuries or broken feathers and seems to be healthy. She is just starving.
It is common during nesting season, to find raptors who just accidentally leave the nest a little early. If they can’t quite fly, they can’t get back to their parents where the food is served up all day. In some cases, the parents will continue to feed them on the ground but it is clear that had not been the case for this girl. We wrap her back up in the jacket that we’d brought her in and start a long chat with Kandie to decide what to do. She shows us a barn owl and some great horned owls that she is working with and we realize that her granddaughter-in-law is a good friend and even someone I had done births with. The threads of connection between us seem divine rather than just “small world” coincidences.
After much discussion, Kandie asks if we would like to learn to rehabilitate this bird under her license and start working to become rehabilitators. This is a two-year process that can only work when an individual finds someone to proctor them. We had every intention of starting this journey at some point and had already started researching who might help us while simultaneously studying for the falconry exam. Now, with no effort of our own, someone was offering to be our mentor. Wasn’t my biggest hawk lesson that when you surrender and align to the natural flow, the greatest possible progress can be achieved? As Kandie talks about how we might go forward together, Audree reaches behind me and squeezes my hand HARD, saying “Holy crap mom. I can’t believe this is happening right now”, in mother-daughter sign language.
Kandie gets us all loaded up with supplies and food. She provides us giant, stainless-steel tweezers, gavage tubes, netting, electrolytes, potty pads, and a box to get the hawk home in. We seat belt the bird into the back seat next to Audree and travel home totally stunned and soooo nervous, but ecstatic. I say my silent prayers that I will be adequately equipped to support both my girl and this bird in this unexpected miracle.
When we get back to casa Bingaman, Ashton and Mrs. Bennett are expecting some super cool pictures and a great story, not a box with a bird inside! What a nutty life. Audree eats the beans and rice that I’d prepared for the day I thought we’d have and does as much testing as she can squeeze in while I figure out how to get the bird settled.
The first thing I do, as directed by our new mentor, is give the hawk some electrolytes with a little glucose syrup added. Just like it’s too hard on the human body to feed a child a steak first thing after they’ve had the flu, animal’s bodies also need fluids and a tiny bit of energy before they can start digesting food. Using a special tube, we can deposit the fluids right into the bird’s crop and avoid getting them in or around her airway. Practicing neonatal resuscitation and tubing babies helped prepare me with some skills to do this pretty easily. I just have to add a healthy dose of courage and get on with it.
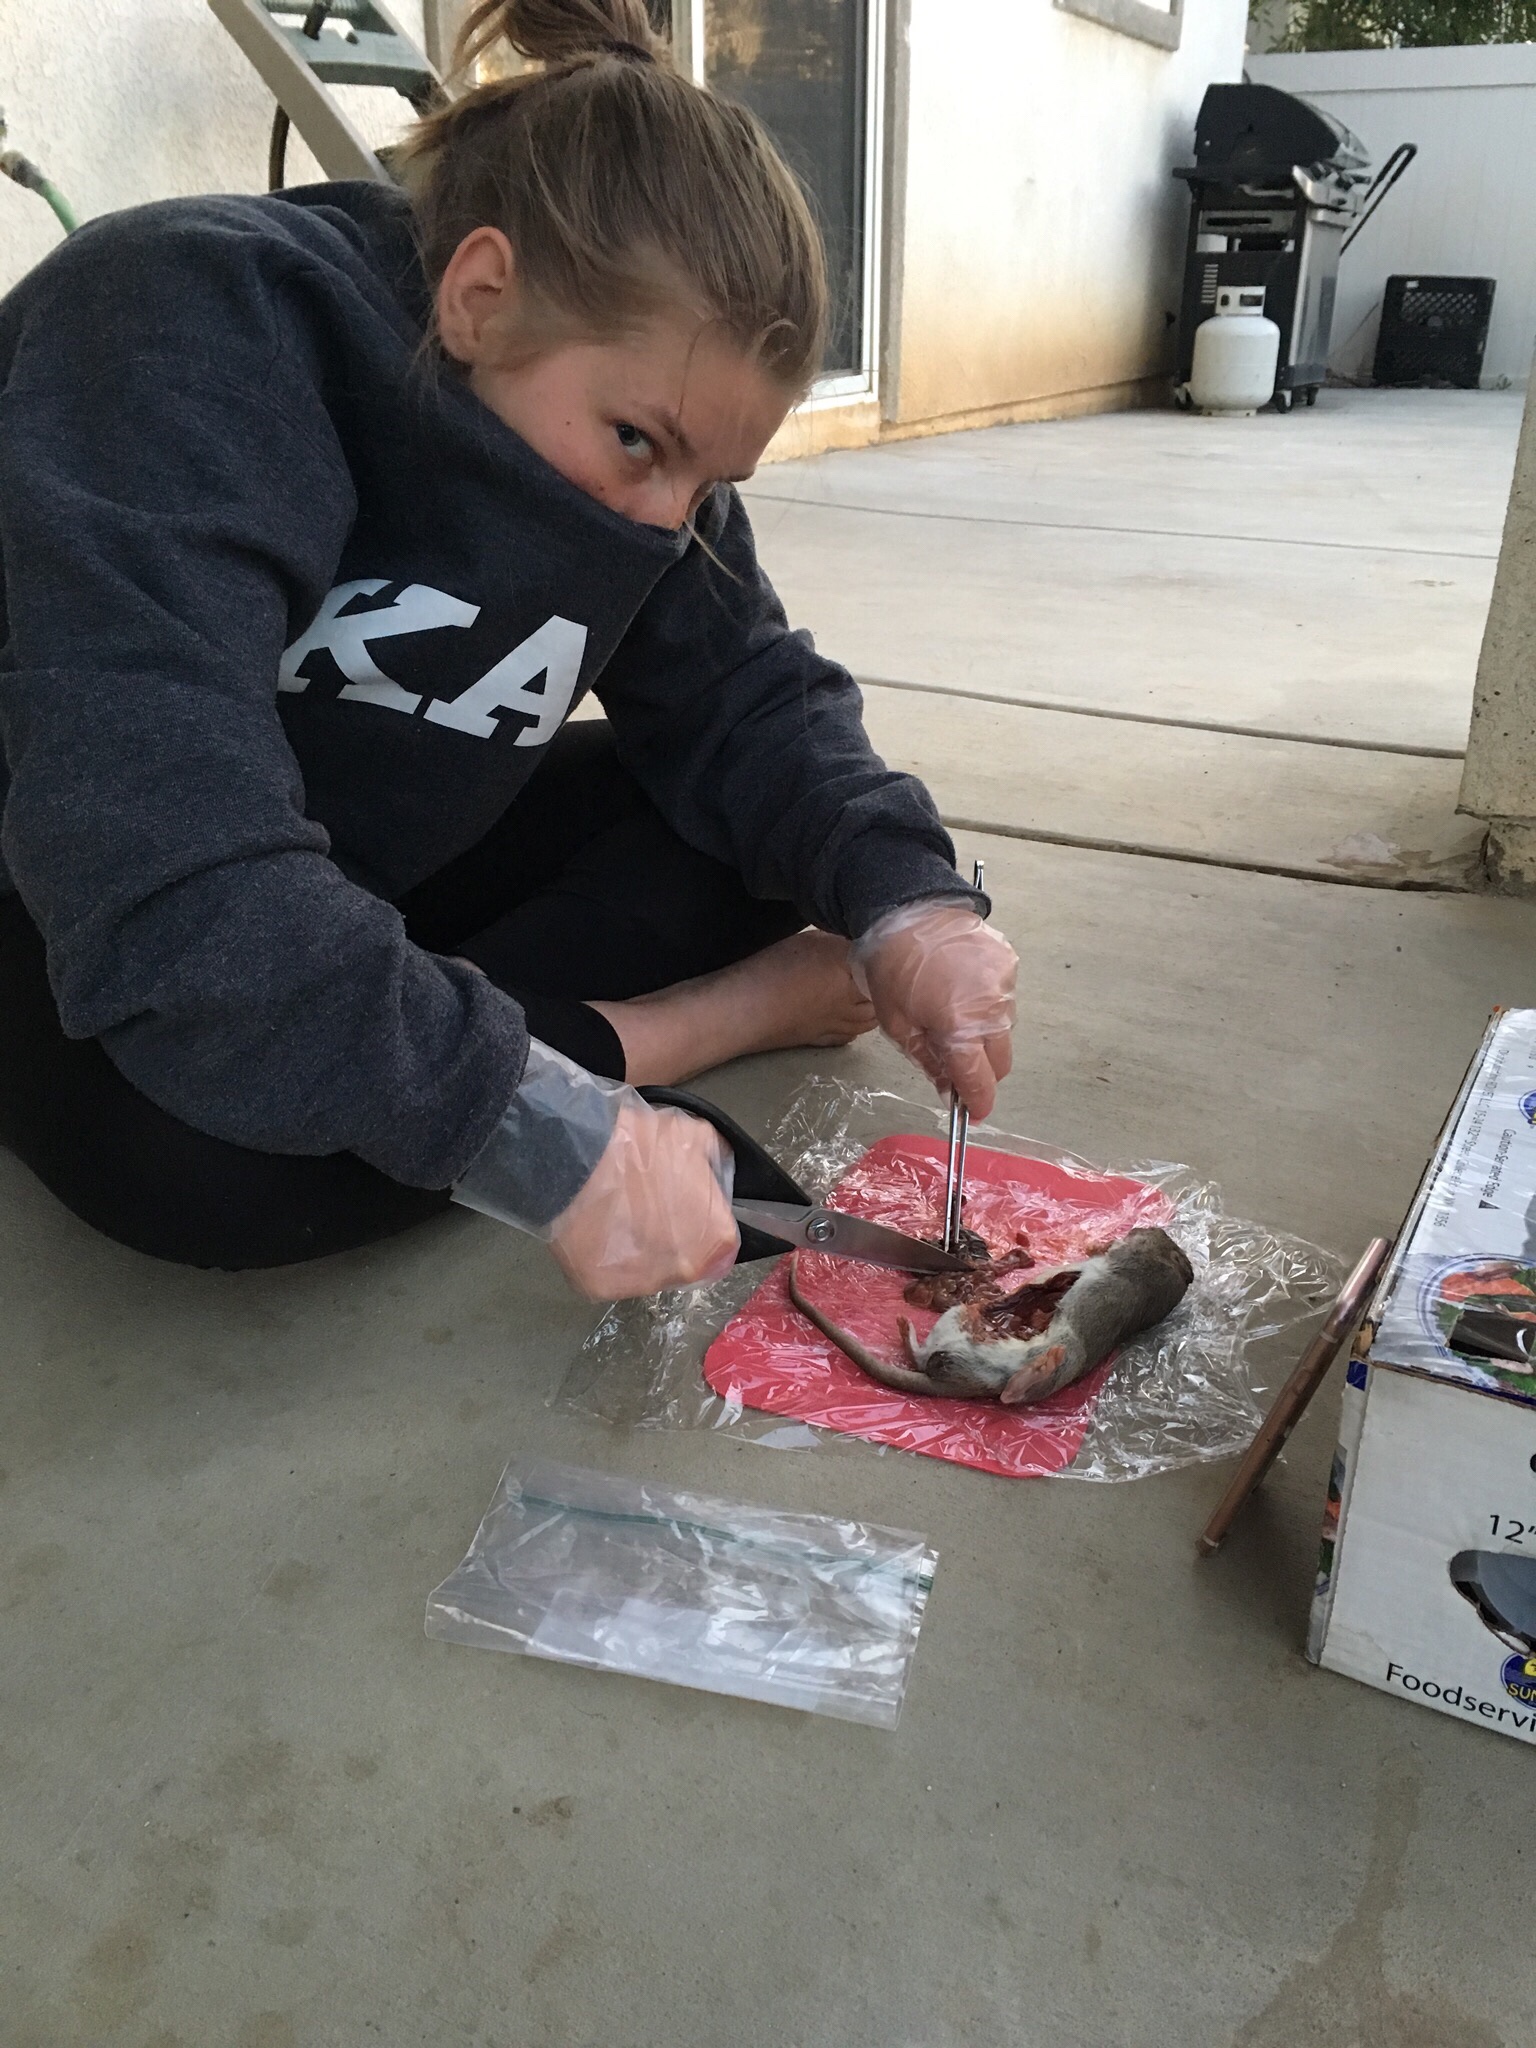
The next thing I need courage for is cutting up the meat that we will offer later in the day. I want to get as much done as possible while Audree finishes testing so that we can get to helping this bird with four hands instead of two ASAP. Let me preface what I’m about to write by saying that I don’t label myself as girly or wimpy. I love nail polish, and fashion, and bubble baths, but if there is a nasty job to take care of, I just go after it. I have gone to the bathroom in cockroach-infested huts in Africa, cleaned milky coffee sludge out of the drain of my restaurant, and been barfed on and sprayed with amniotic fluid more times than I can begin to count. I don’t gross out easily.
This is why I am so very humbled when I find myself retching over a half-cut up rat on an old cutting board at my laundry room sink. The smell, the sounds, and the newness of it all of take me DOWN. I pray my silent students can’t hear my travail in the next room. I hope that I will learn to prepare the hawk’s food quicker and that I will eventually grow desensitized to it. Audree and I will definitely have to take shifts on this particular task. Wow.
The house is still while the kids finish up and the intensity of what has just occurred finally catches up with me. I look at this massive, pitiful bird peering at me from its box and feel all of the pressure of keeping it alive. This coupled with the idea that Audree’s very first rehab experience should be positive, hits like a ton of bricks.
What in the world have I gotten myself into? My brain races in every direction to see if there is a way out of the responsibility. I question whether I have taken my love for these birds and my desire to help my kids follow their dreams one step way too far. It’s so hard to know when things just fall into your lap if they are an incredible gift of grace, or an opportunity to exercise clear thinking and self-control. But here we are. I say my silent prayers for guidance and give thanks for the fact that there is a HAWK IN MY HOUSE.
After more fluids and getting an indoor rehab space prepared, we get this hawk that Audree decides to call Finnick into a safe spot for the night. *I feel it necessary to add a little side note here for my reader – Many if not most rehabilitators band or tag animals they work with to keep track of them instead of naming them. There is much controversy around whether a name creates an attachment for the rehabber or makes us more apt to anthropomorphize. I will remind you here and maybe many other times throughout this work that I am telling the tales of brand new, baby rehabilitators. What I share is in no way intended to be the definitive guide on wildlife care. This season our animals got names. In the future, many will not. If you are a scientist or involved in wildlife management in some capacity, I encourage you to enjoy the optimism and naivety of some very new individuals finding their way in your world rather than critiquing anywhere you think we went wrong. All experts start as novices.
Right before bed, we offer a few small bites of the cut-up rat. The hawk doesn’t have the strength to bite them off the tongs yet, so we wrap her gently but firmly, like a giant bird burrito, and pull her mouth open, depositing the food inside. She gulps them down into her crop and then perches when we let her go. We find her in exactly the same place when we check on her later. It looks like she is using all of her energy to digest the food.
In the morning, we start off with more fluids which she opens her mouth for and drinks down herself. After a bit, we try some more rat and she takes it easily off the tongs. Now that she has the tiniest amount of energy, she is hungry! As Audree feeds her, she squeaks between bites like she is saying “more”. We haven’t heard her vocalize yet so this little peep is the sweetest sound to hear. The iconic eagle and hawk sound in every commercial and movie EVERYWHERE is the screeching call of a Red-Tail, but we’ve never heard these quieter communications.
We also find lots of mutes (poop) in the space where we have her. It looks like a normal color and volume so this means that the food we are offering is getting digested. We just bubble with joy that she has made it through the night and all signs seem to be reassuring. This all just might work out.
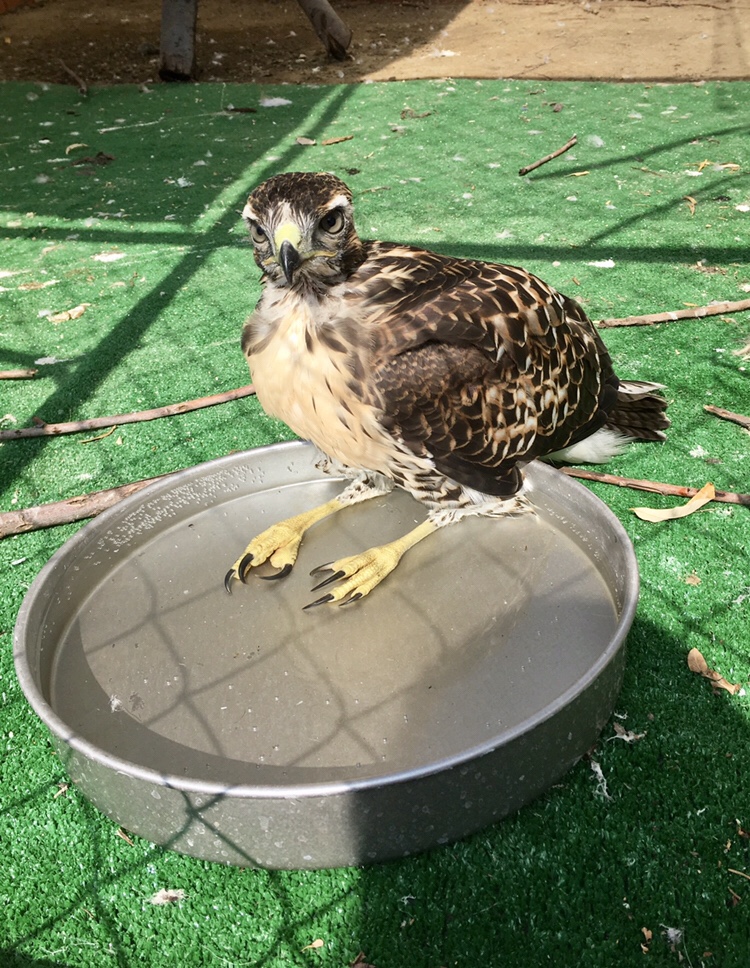
Throughout this second day with us, we continue to offer Finnick food every few hours and bring a water pan out to her in case she wants to drink or bathe. Hawks don’t require extra water in nature since they get much of their necessary fluids straight from the prey they ingest. They enjoy bathing and drinking though, and look as silly when they take a dip, as they do majestic when they fly.
We see her preen a little and perch with one foot tucked up into her downy abdomen. These are both such reassuring signs that she is doing well since one of the first things a sick bird stops doing is preening. Perching on one foot is a sign of relaxation and contentment. We feel that since she is eating heartily and exhibiting signs of wellness and relaxation, maybe we can take a couple of enormous, deep breaths. Even the dreaded rat preparation is getting a tiny bit easier once Kandie explains how to remove the intestinal tract whole which really helps the smell. The next important step is getting her into an outside enclosure.
Finnick spends one more day inside the space Brett prepared in the garage while he and Audree build a mew (hawk enclosure). We still haven’t seen a pellet, but there is so much mute that we have to clean her indoor space twice a day. When the new structure is finally ready, it feels great to get her outside. When we release her in the mew, she runs the perimeter, checking out her boundaries.
We also see her drink from the water pan so it seems safe to stop the fluids now. We continue to feed her the cut-up rat three times a day and she eats until her crop looks like it will burst. She is already plumping up a tiny bit and it’s only her third day with us. It seems like she is coming around really fast.
On Monday, day four, the weather is incredibly hot. Audree and I sit outside most of the day to watch her, partly because she is so magnificent and partly because as beginners, we are a bunch of nervous control freaks. As the day heats up, Finnick starts to pant. At first, I reason that it is just because of the balmy temperature but as it continues, I start to fret since this is also a sure sign of stress in raptors.
I text back and forth with Kandie for more information (It’s a good thing that we don’t have to pay per character!), but she can’t be sure that it’s not a distressing sign either. I feel panicked that after we have come this far, things might be going badly all of a sudden. I’m having the most intense “What have I gotten myself into?” doubts again. I am certain that if Audree rehabilitates birds for any length of time, that some of them will not live. They will come to us for every variety of reasons, and some will just not pull through. But not THIS bird, and not her very first experience. She is a mature kid who can handle pretty much anything life deals out, but I want so badly for this to go well for her. Plus, I have let this bird have my heart. I know it’s not very scientific of me, but I have, come what may.
I have already tried misting Finnick with water but when Kandie brings it up again, I wonder if I got her wet enough the times I tried before. I change spray bottles and really douse her this time. She snatches water in her beak and swallows while I spray her, squeaking happily. She also stops the panting the very second her head is soaked. I laugh wishing I would have tried that three hours ago. She was just hot!
Audree and I keep spraying her throughout the day whenever she pants. She is as well taken care of as a bird princess in a children’s movie! Finnick is such an incredibly sweet animal though, you just can’t help it. In the days since she has been here, she has not exhibited one single aggressive behavior in our presence. We know she has it in her because she mantled and put her hackles up when our husky first came around to inspect the mew. She is just never like that for us.
This hawk has felt like she was half-hawk/half-angel from the minute Brett found her. Or maybe more correctly, all-hawk/all-angel. Even as she heals and gets stronger, she never shifts to being either aggressive or timid with us. She would make the absolute best partner for a falconer but fate has decided that she will be released to enjoy life as a wild hawk very soon. Maybe too soon for us.
The next step in Finnick’s rehabilitation is to leave her food to find for herself instead of tweezer feeding. We put some meaty pieces on a tray and leave her alone to see if she will find and eat them independently. When we return, every scrap is gone. Success! In the following days, we offer an entire rat, broken open at first, and then whole. She passes each milestone with flying colors.
On the sixth day, we find our thriving babe sitting on the cozy nest Brett put together for her, just like a chicken. She continues to sleep here each night until her release. We see her attempt to fly more every day, practicing gliding between perches on either side of the mew. She has already lost much of the downy fluff on her face and her tail feathers seem like they lengthen nightly while she sleeps. She is looking more like a majestic, full-grown hawk every single day. She is also doing a great job bathing and preening. Her feathers glisten in the sunshine, a great sign that she is healthy and flourishing.
Although things are going even better than well with Finnick, neither Audree or I have any concrete notion that we will be trusted with any additional birds. Since we leaped into this situation rather serendipitously, she and I haven’t had any expectations about what should come next. We just do our best each day and give thanks when it works out.
It feels a little like being a brand new parent. I remember getting my oldest son ready to leave the hospital after he was born. Brett and my mom were coming to get us so I had him dressed in his adorable “going home” outfit, with matching pacifier and a fresh diaper. While I waited, I looked down at him, all buckled into his car seat, and had the most visceral thought. “It is up to me to keep you alive”. This is the same thought I had about Finnick during my mini-breakdown while the kids tested. We have been so busy keeping this winged beast growing, we’ve thought nothing about the future!
On May 27, While I’m, working away at N7 Kandie calls about another juvenile Red-Tail who has fallen from its nest in Redlands. Since Audree is home caring for Finnick, Brett and I decide to keep our plans to pick it up on our way home a secret and surprise her. She calls me off and on all day to check in so I have to tell a hundred little, white lies to keep from revealing what I’ll really be up to after work. I’m so excited that I feel like a kid who can barely wait to go to Disneyland in the morning while I try to pay attention to my tasks and customers. It’s hard to surprise kids once they get older, so this is going to be super fun.
Brett and I make our way up the apple tree-lined highway to Oak Glen the minute we get our work finished. Kandie gives instructions and encouragement, and we get this new bird situated in the car, knowing immediately he is not Finnick. This hawk screeches and squawks at us if we even look toward the crate in the back seat to make sure we are abundantly aware that he is not a friend of humans.
When we pull up to the house, Brett puts the pet carrier, with its secret occupant inside, at the front door and rings the bell before hiding around the corner. We’ve called ahead to make sure none of the other kids open it and ruin our fun. When Audree answers, she laughs and exclaims, “I knew it!” This new rescue, we come to call Rue, repeatedly screams back his answer. Audree says, Oh my! This is NOT Finnick.”
We hustle the carrier through the house avoiding the canine and feline welcoming committee and go about trying to introduce Finnick to Rue. We give them lots of time to inspect each other through the door of the carrier and eventually let Rue out to see if they will get along. Rue pops up onto Finnick’s favorite perch and she unceremoniously plinks him right off, sending him tumbling to the ground. After we get them some dinner, whole rat for Finnick, and cut chunks for Rue, we put him back in the carrier so that they don’t tussle in the early morning before we get up.
Finnick and Rue do a little more posturing the next morning but work out their business early in the day, deciding they will get along. We try offering a whole rat to Rue as well since he seems so feisty, and he eats it easily sitting next to Finnick on the nest. They mantle a little to protect their meal but there is no longer any competitive behavior going down.
Rue is much, much smaller than Finnick (suggesting a male hawk) and is covered with the cutest fluffy down. When he rouses, little bits of it poof off of his body and fly into the air, sticking in the mew. Several times I notice that hummingbirds are coming and grabbing the stuck down, taking it to a nearby tree where they nest. It’s maybe the sweetest, little example I’ve ever seen of the perfectly designed, cycle of nature wasting nothing and working seamlessly.
Rue is growing stronger every day but still isn’t flying. Finnick, on the other hand, looks full-grown all of a sudden with new, sleek feathers and is flying overnight; and I don’t mean the expression “overnight”. I mean she is actually flying overnight. Yesterday she was hopping and gliding and today she is pumping her wings between perches. It’s bittersweet because, after some more practice and another milestone or two, she’ll be ready to release.
The next test that she has to pass is capturing her own food. This will be a test for Audree and I as well since it’s obvious that we prefer to be in the business of keeping beings alive, not setting up their demise. Nature doesn’t apologize for being equally beautiful and grisly though. The perfect symbiosis of life and death is what keeps our world spinning.
It would be inhumane for us to release Finnick or any raptor without knowing that they can kill their own food, so we take off to get the needed supplies as directed by Kandie. Once home, we set Finnick up with her live prey and wait. She wastes not even a second, capturing her meal and eating it up hungrily. Audree punctuates the whole scene with an utterly appropriate curse word, lightening the mood and making us laugh.
Now that Finnick is both flying and a successful huntress, we are all pretty overcome with emotion. We are proud of ourselves and her. So proud. But we are also sad because she is ready to go. In the weeks prior, we haven’t noticed her trying to break out of the enclosure very often. In the last few days though, she calls out to our local hawks when they pass over the yard at maximum volume and flies toward the ceiling to test if it will hold her inside. We know it is time.
We eat dinner outside this night so that we can spend the last few minutes saying long goodbyes. Brett puts Sia’s other bird song, Bird Set Free on Spotify, maybe to be a little silly, but it makes me bawl like an idiot. So much for mom being a pillar for the children. These releases will get much easier, but letting this first angel-hawk fly free is rough.
In the morning our neighbor has caught another live specimen. He brings us regular offerings over the fence like “Tim the Tool Man’s” neighbor now. Finnick successfully captures and eats the mouse with Rue watching her dexterity. We let her eat her fill of other food and get her ready to release.
In true Finnick form, she doesn’t streak away once she free but stays close to us for a good while before she flies to a fence and then a high tree. It feels easier on our tearful souls that she doesn’t disappear into the distance instantly.
We watch her for a long time while she acclimates herself to the new, wide-open, space. She preens and vocalizes, and even sits in her chicken pose, leg dangling like a kid on a church pew.
Eventually, we feel that it’s necessary to give her a little extra nudge to move farther away and find a good space to hunker down. Her connection to us is special, a miracle really, but it will not help her to be a successful wild hawk. Her instincts and natural abilities are what she needs to guide her now. We’ve done our part. She finally takes off and flies far out of our sight. Over the next few days, we check in to see that all is well. Audree and I observe her flying strong and Brett even sees her hunt. We did it. And she did it. I say my silent prayers with my whole heart that she thrives, finds a mate, and makes new, little baby Finnicks during next year’s nesting season.
A couple of weeks ago the daughter of my heart had a fermenting emergency. She needed sauerkraut urgently but drank all of the juice in her last jar. Nobody ever really needs sauerkraut urgently, but when you love it like we do, this is a mini crisis. You use leftover liquid from past batches or whey to inoculate your cabbage when you are making a new batch. She was also out of yogurt, so no whey… She had a strike of problem solving genius and asked me if I thought that a spoonful of sourdough starter would do the trick.
Sourdough starter is full of the good bacteria that grows in all fermentation so I thought it might just work. This morning Mandy texted me and said the result of her experiment was the best batch of kraut she’d ever tasted. Pretty cool! I also read the other day that a friend used starter to thicken a sauce instead of roux. In both cases, if you have a mature starter, it eliminates a step and saves time. It also means you can drink your kraut juice which is a huge bonus if you are Mandy Lanphere!
Sauerkraut is the perfect introduction into the world of lacto-fermentation. The ingredients are inexpensive and easy to obtain and work well with the simple fermentation method below. The result for a small amount of effort will be a delicious and highly nutritious food teaming with healthy bacteria that is normally pitifully absent from the western diet.
Do not mistake the pasteurized, and to many, soft and unappealing sauerkraut that is sold in supermarkets for the same product as the one you are creating here. Lacto fermentation is an artisanal craft and does not lend itself well to industrialization and mass production. For this reason, commercial sauerkraut is heated after packaging, killing all of the beneficial bacteria that developed during it’s production. Homemade sauerkraut retains this beneficial element, boasting a count of ten trillion live bacteria in a four to six ounce serving. This means that two ounces of your house kraut has more beneficial bacteria than an entire bottle of probiotics. These bacteria kill pathogens in your digestive tract and replenish it with healthy flora.
Another benefit of this product is that cabbage is notably high in anti-inflammatory properties, vitamin A and C. When cabbage is fermented, it opens up the cell walls unlocking a higher ratio of vitamins. A fermented head of cabbage can have 200 times more bio-available vitamin C than it did raw or cooked.
A note on equipment: Websites with beautiful crocks equipped with special valves, wooden pounders, powdered fermentations starters, and lovely jars to store your fermented products abound on the internet! All of these materials are fun to use and can make fermenting large quantities much easier. NONE of it is needed though!
We Americans tend to take old world knowledge and methods and create lots of high priced gadgets and rules needed to implement them. This creates barriers to doing new things that can increase our health and well-being TODAY. My goal with this recipe is to show you that you can lacto ferment nearly any vegetable or fruit with things you already have in your fridge and cupboards. After you have followed the method a few times, you can make adjustments to your equipment and know where to invest a little money to simplify things. In the meantime, keep every glass jar that you can get your hands on, remove the labels, and keep them for storing all of your experiments.
Historically, fermentation has been done in glass or ceramic vessels for best results. Before stainless steel, the metals that bowls and containers were made of were reactive and would even break down as the veggies did their work inside, so metal was never used in any of these preparations or dough making. Low quality plastic can also break down in exactly the same way although restaurant grade containers should be fine. Knowing all of this, start your first fermentation in a mason jar. They are inexpensive and most likely to give you a great result.
Recipe
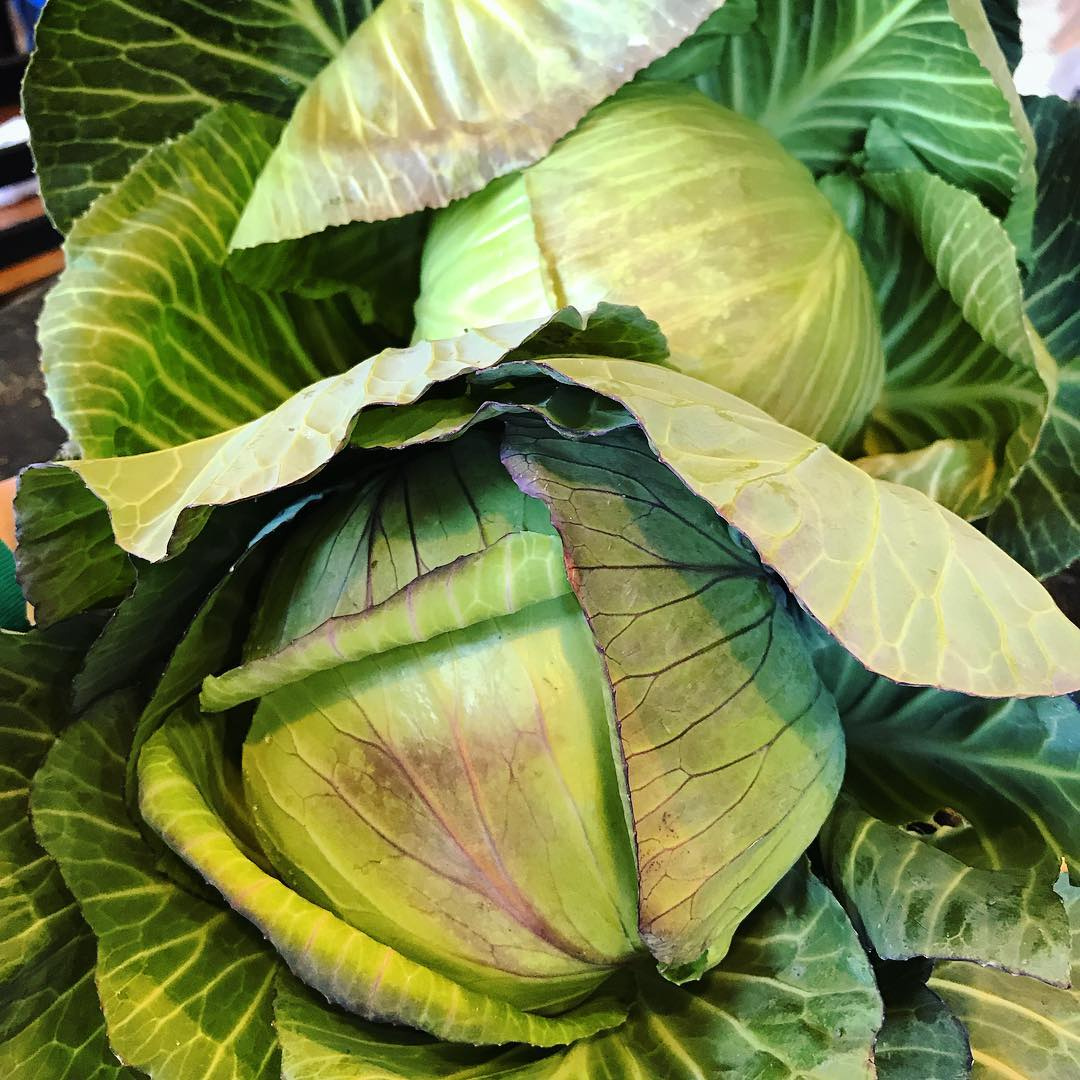
1 medium head organic cabbage
1 teaspoon caraway seeds (optional)
1 scant tablespoon of sea salt
4 tablespoons of whey or reserved sauerkraut juice from a previous batch (whey recipe below)
Buy the best cabbage you can find for this recipe. Organic cabbage from the supermarket will work just great, but if you can buy it from a local farmer there will be more beneficial bacteria on the leaves. The lacto-fermentation process creates an environment for these bacteria to multiply. This will ultimately preserve the food and also create a product that is essential for proper gut flora. Over time, eating these kinds of foods will heal your digestive tract and help you begin to absorb the nutrients that you consume much more efficiently and completely. So the better the cabbage is to start with, the more nutritious the final result will be.
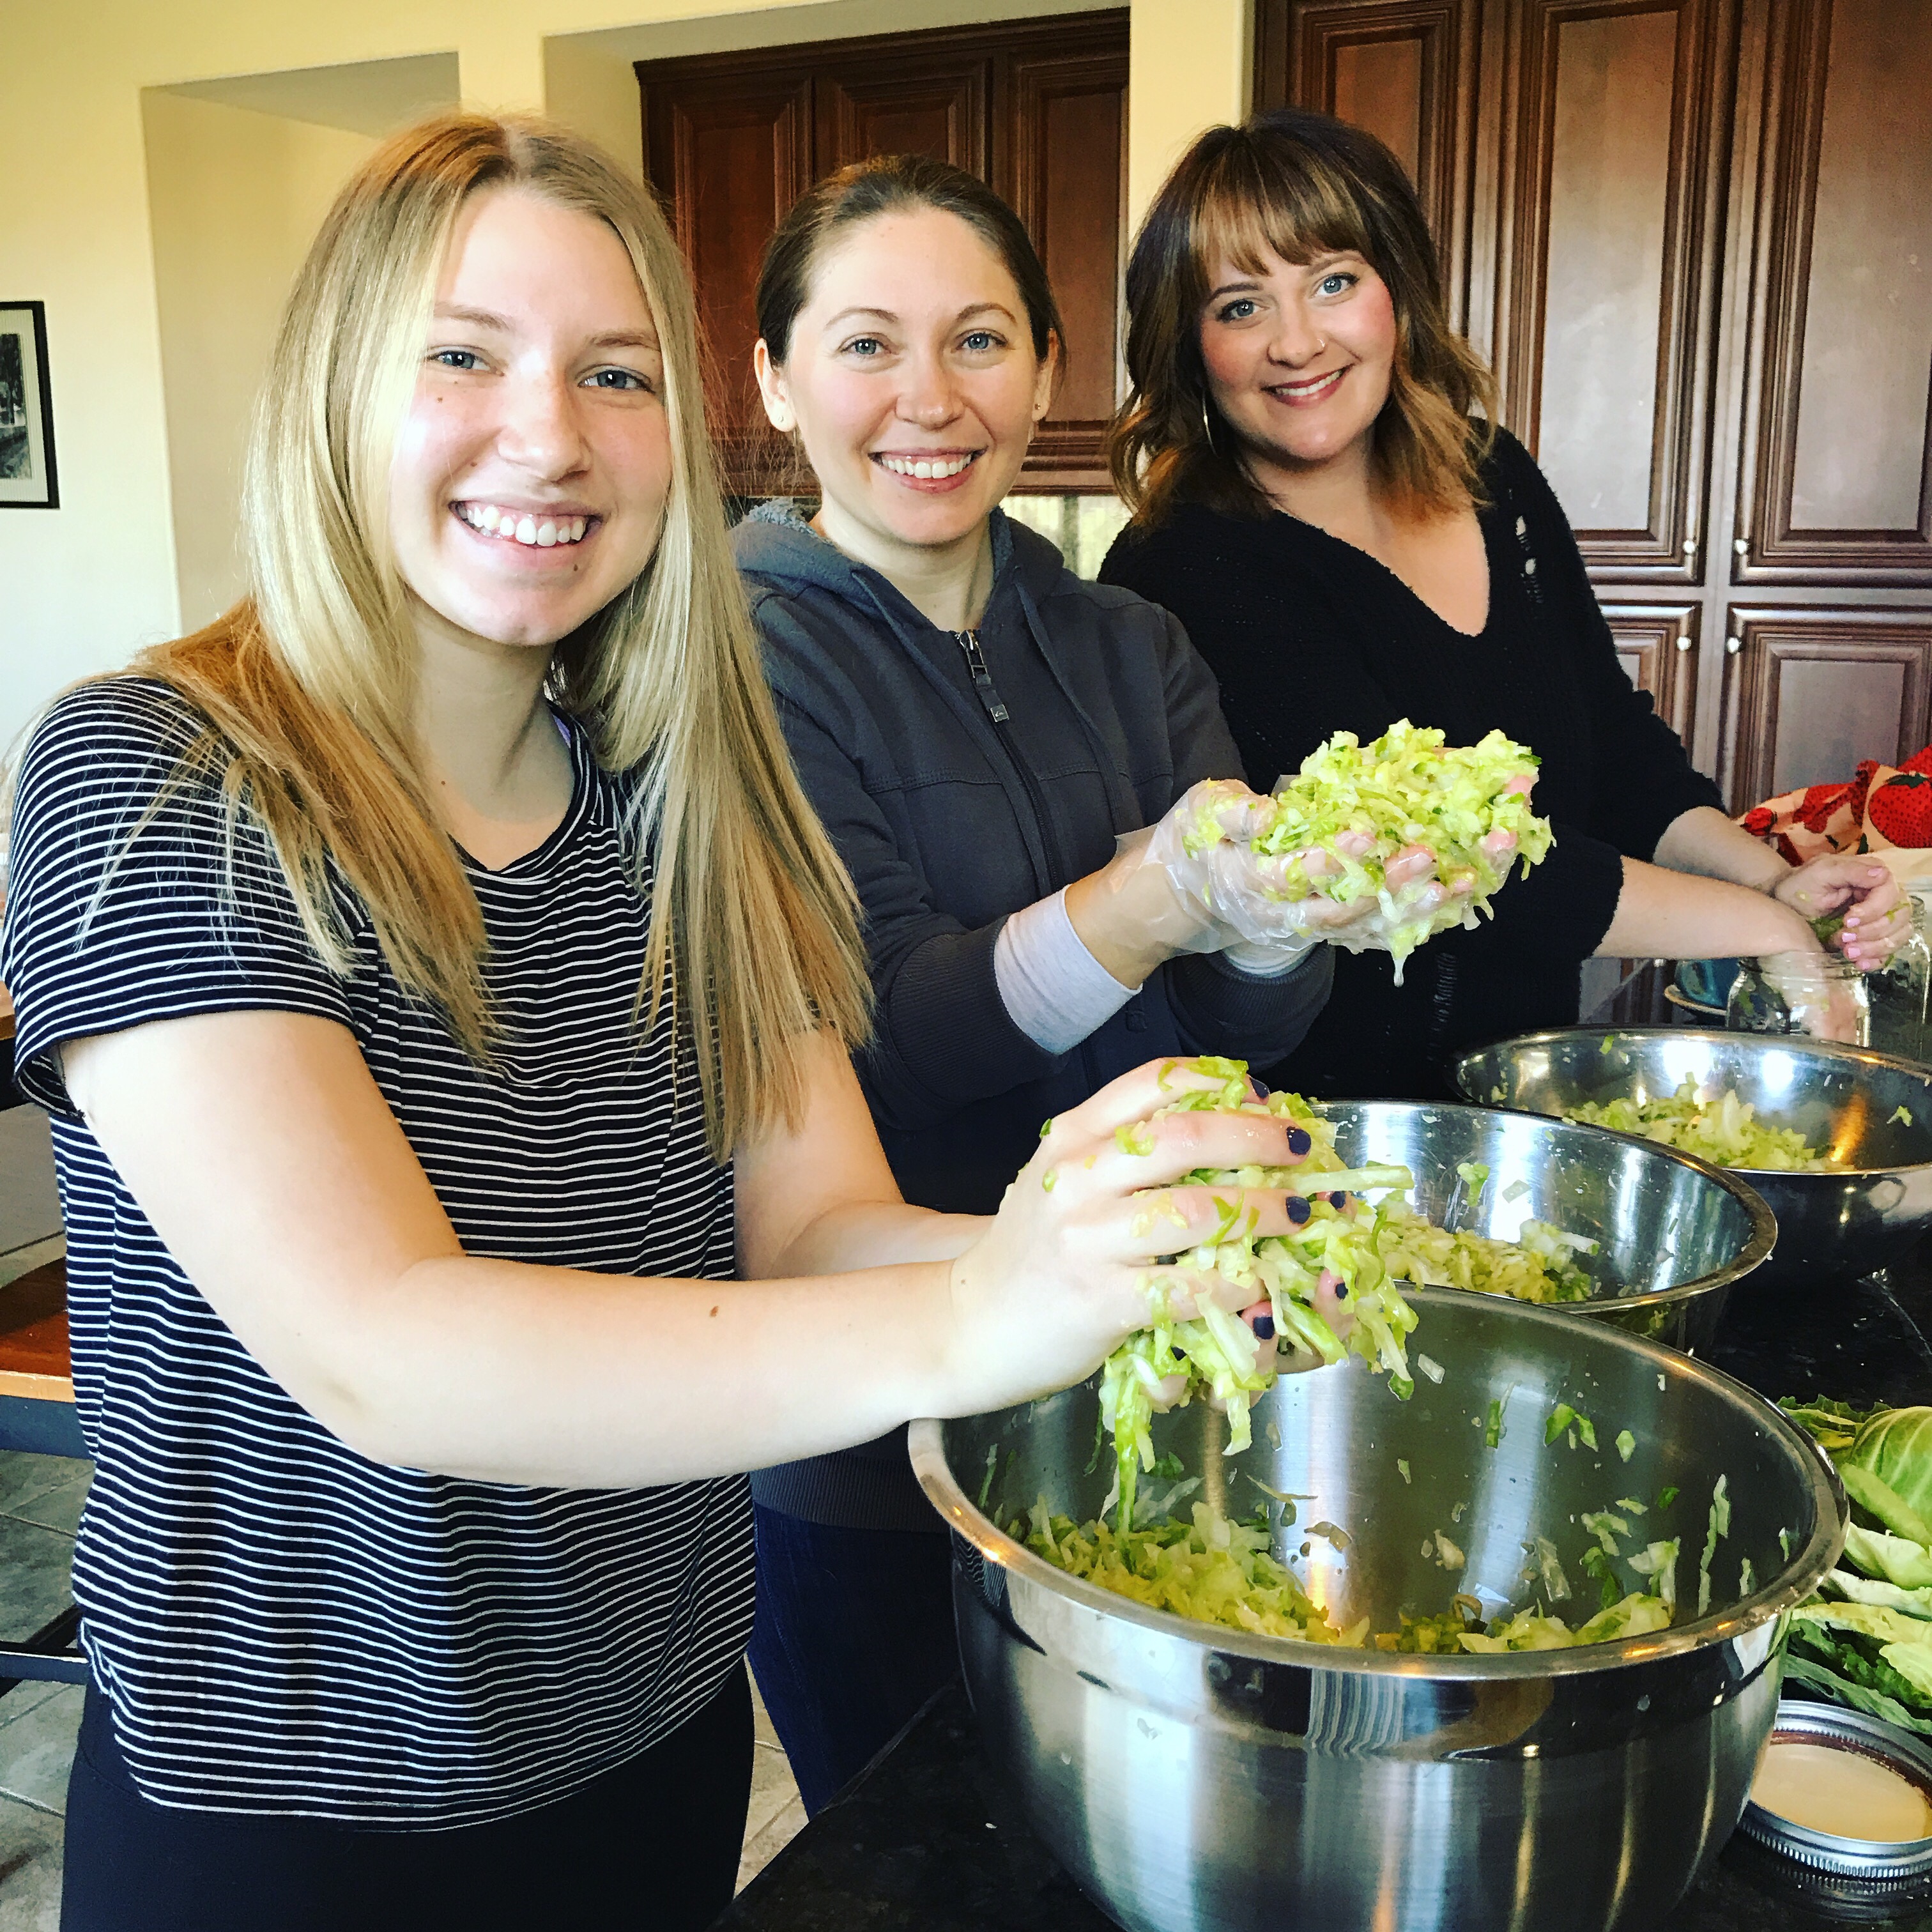
Rinse the cabbage and discard any badly damaged or wilted leaves. Remember you are not trying to clean every trace of bacteria from the cabbage. Just remove visible dirt and insects. Briefly dry the leaves and separate them from the core. Slice the leaves into small strips just as you would for coleslaw and place them in a bowl. I like to slice them by hand because the sauerkraut ends up crunchier and thicker. If you use the food processor, it will be a much quicker process and your final product will be a softer. Now very thinly slice the core and add it to the bowl.
Now add the salt and caraway seeds to the cabbage and start massaging to get it to release the water in its leaves. You can do this by squeezing it with your hands or smashing it with a potato masher or wooden mallet. Keep this up until the cabbage is noticeably wilted and there is lots of liquid in the bowl. Once it is nicely wilted, you can add the whey or reserved sauerkraut juice and briefly mix.
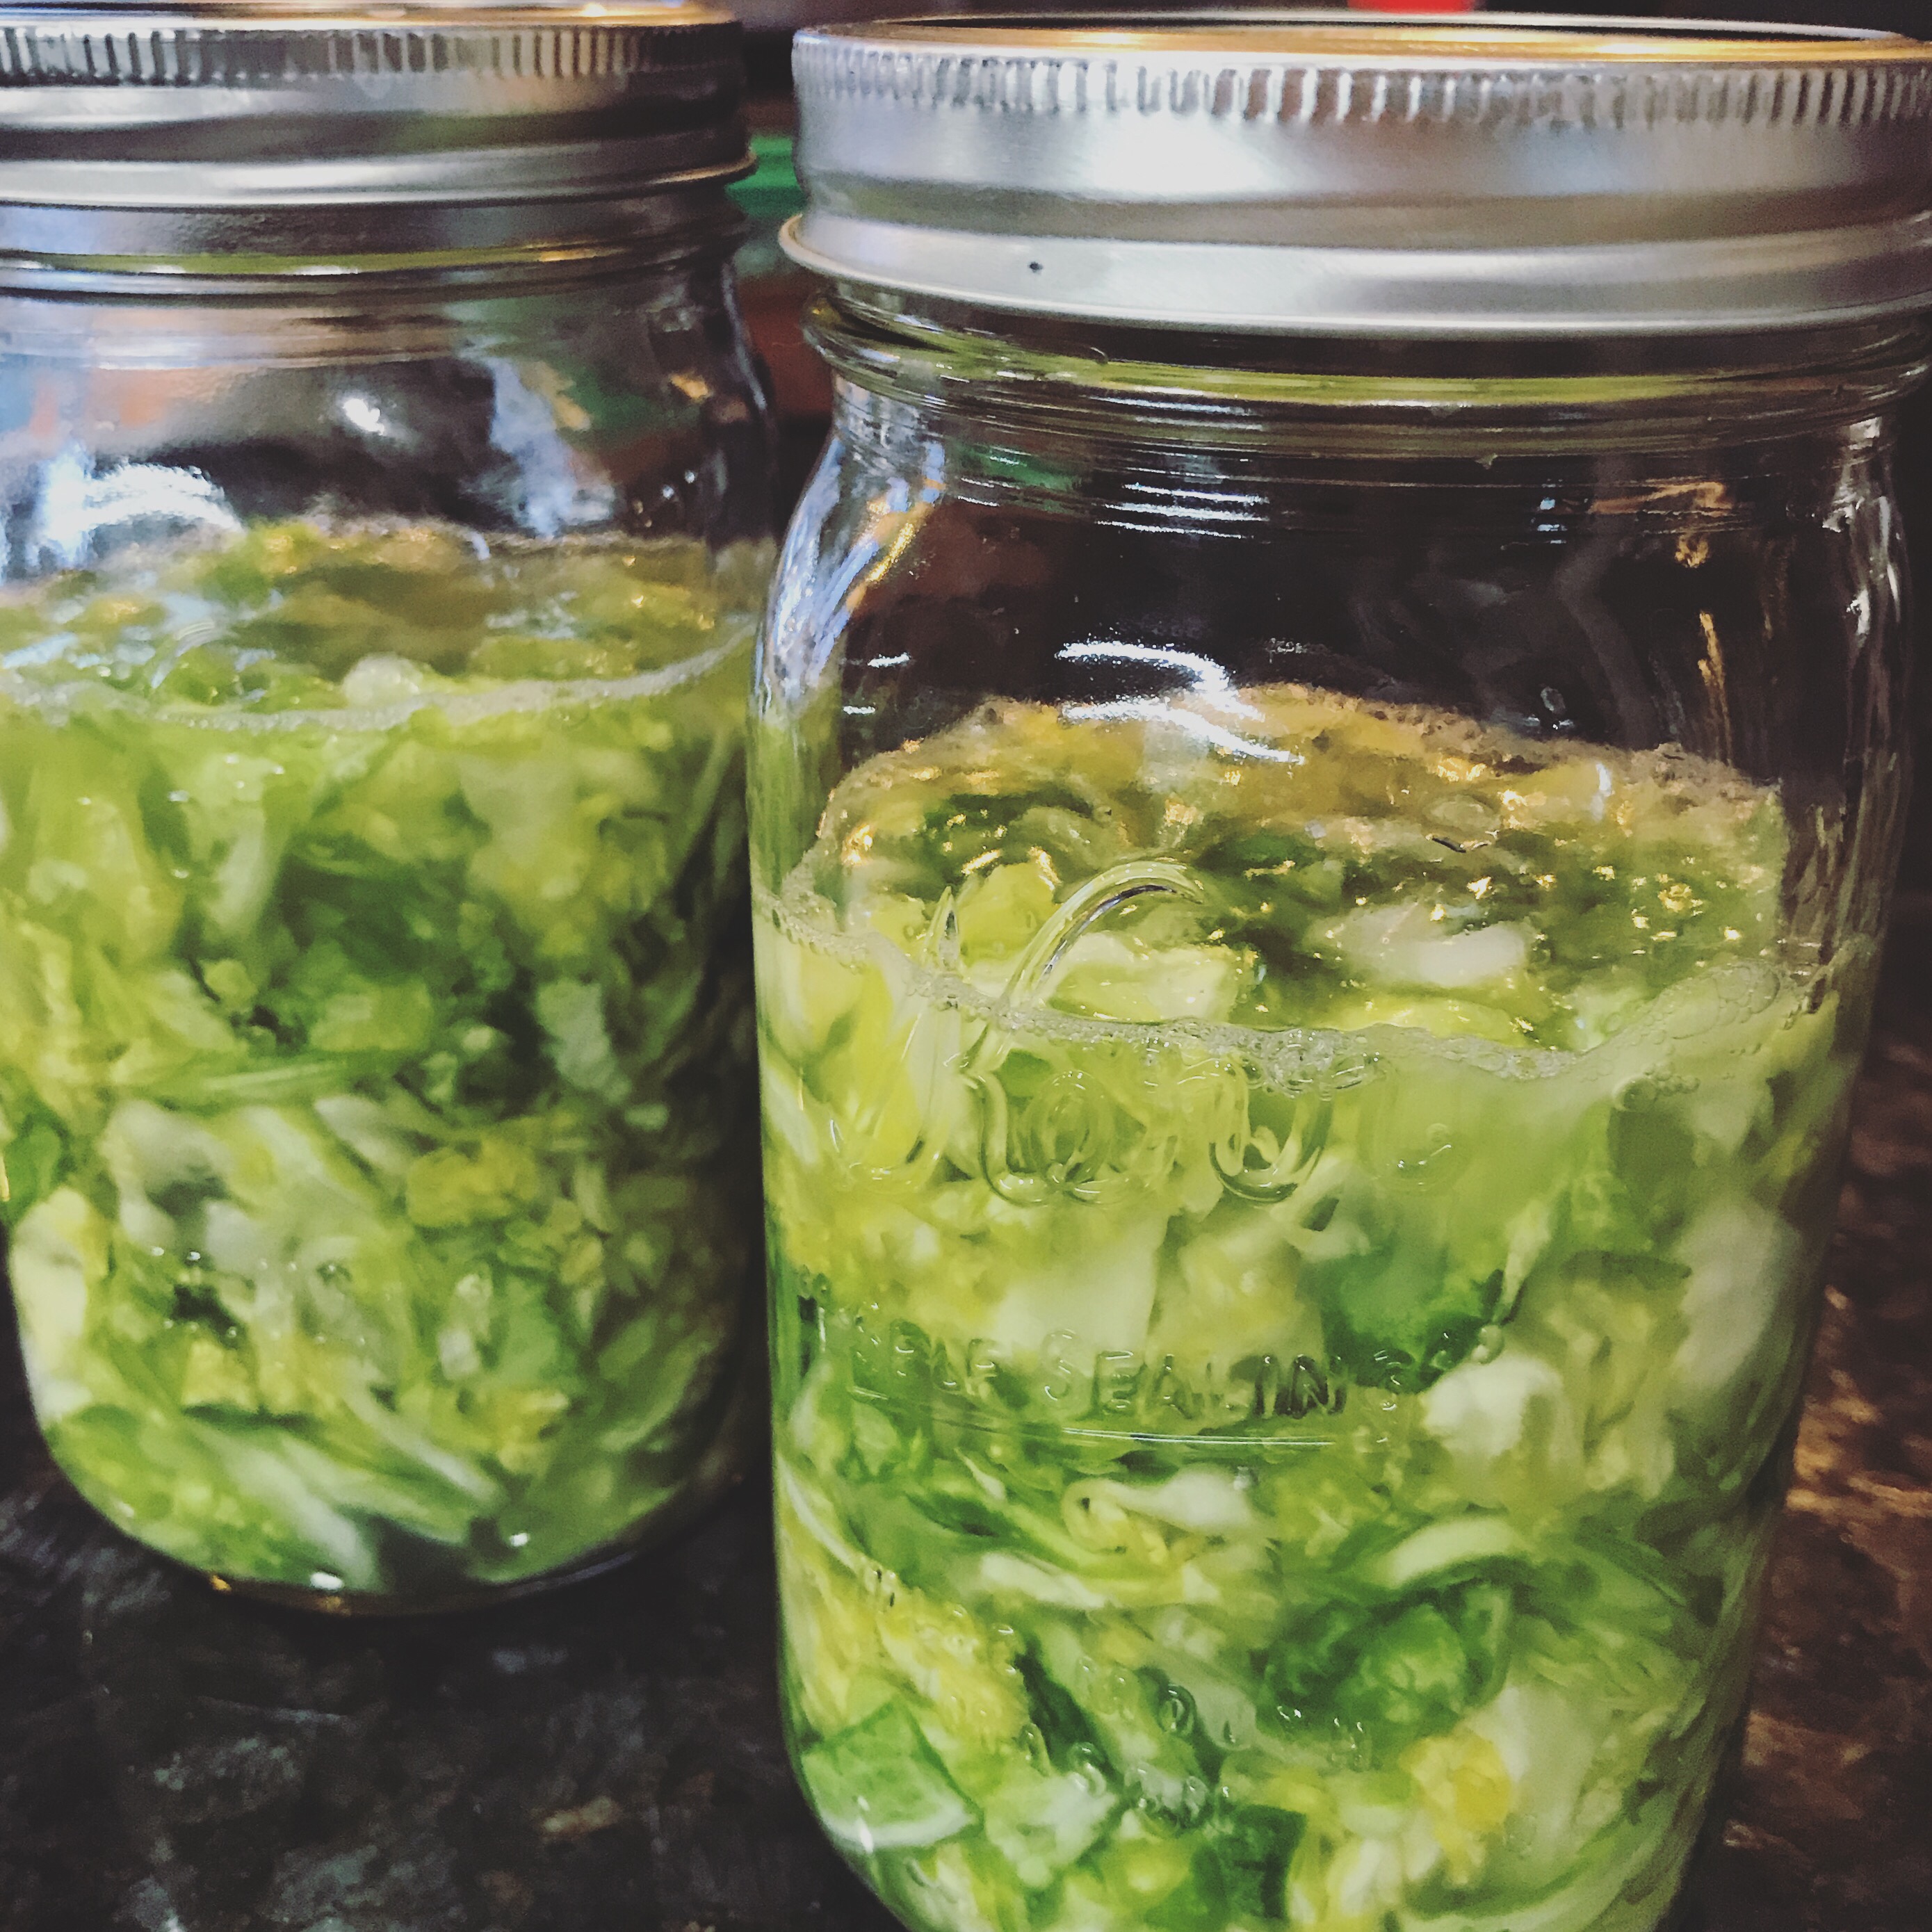
To begin the lacto-fermentation you will need a large mouth, one quart mason jar. The large mouth is important because it will allow you to weigh down the food. A standard quart jar with the smaller opening will make this more difficult. Make sure that your jar is clean and dried. Add the cabbage with all of its liquid to the jar. Use a heavy spoon to press the cabbage down into the container, forcing the liquid up to the top.
Now you will need a weight to keep the cabbage submerged in the brine while it is fermenting. I set this up by placing a small (very clean) mason jar filled with water right on top of the cabbage, pressing down until all of it is sitting under the brine. This is important because cabbage that is exposed to air will spoil, while the cabbage submerged in brine will ferment. Once submerged, cover tightly over the top of the small jar with plastic wrap. You must have an airtight seal for the fermentation process to happen properly. When I do this in larger quantities, I just make sure I have a glass jar or bottle that fits easily into my larger vessel before I start the recipe and use plastic wrap to press it down and create an airtight seal in the same way as with the smaller jars.
This is some beautiful romanesco that I fermented using a stoneware weight I have come to love. It makes me so happy every time I pull it out to use it! Knowing how to weight the ferment until I found weights that will become heirlooms for my kids served me well.
Once everything is covered nicely, set the jar on the counter for at least three days. During this time, press down hard on the smaller jar a couple of times per day to help the bubbles that are forming to come up to the surface. You can tighten the plastic wrap occasionally as you release the gases. The temperature in your house and your personal taste will determine how long you let the cabbage ferment at room temperature.
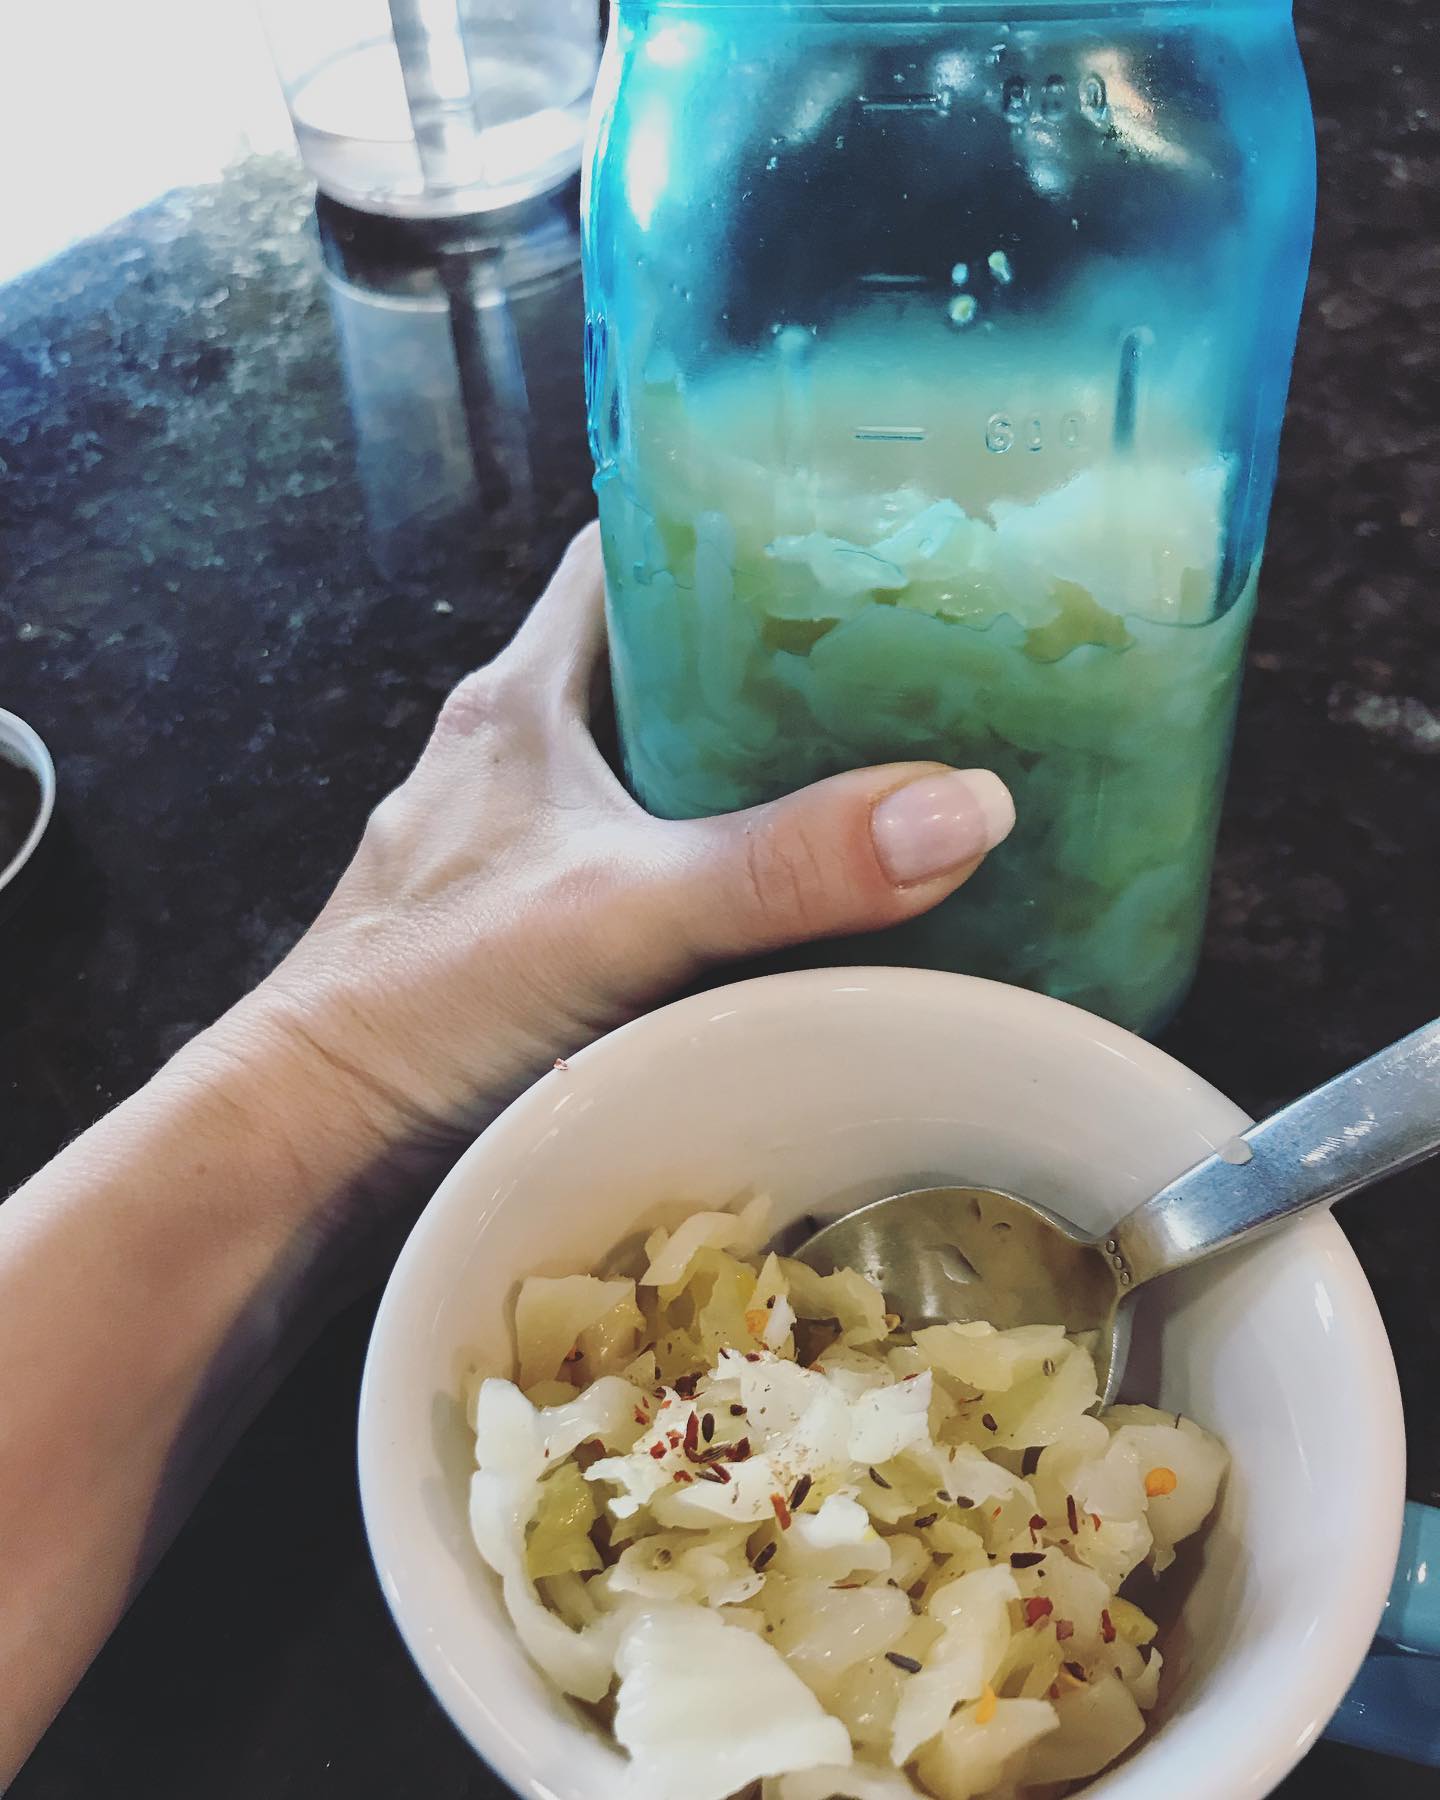
On the third day, try a bit and see how sour the kraut has become. Continue tasting each day until it seems perfect to you, up to a week or even more in cooler months. You will notice the freshly fermented kraut has a distinct smell when you open the container. Don’t worry that this means it’s spoiled. If it tastes something like a sour pickle, it is just right and that smell will continue to go away as it ages in your fridge.
You can remove the weight and put the lid on your jar now or transfer your freshly fermented sauerkraut to smaller, clean, dry mason jars, leaving an inch of headspace so that the cabbage doesn’t touch the rim. Date and label your jar/s and place them in the fridge. You can eat this straight away or let it sit in the fridge for a few weeks before eating it. Many authors say that this rest time mellows the flavor and increases the nutrition in your kraut.
Now you are on a roll!
Now that you have this basic method under your belt, you can use it to ferment just about any vegetable or green. With veggies that have less of their own liquid, you will make a medium brine by dissolving 1 to 1 ½ tablespoons of salt in one quart of water. Add four tablespoons of whey or liquid from a previous ferment to the brine. Pack your mason jar full of sliced veggies, cover with the brine and follow the directions above.
WHEY and CREAM CHEESE
This recipe produces two products. The first, whey, is essential for making all kinds of lacto-fermented products and soaked grains. In lacto-fermentation, the beneficial bacteria in the whey will give your fermentation process a kickstart, allowing you to use less salt in your recipes. You may also use whey in soaking grains, brown rice, and beans to reduce the phytic acid and other “anti-nutrients” in them, allowing for easier digestion and increased nutrient bio-availability.
Recipe
32 ounce carton of organic, full fat yogurt
stainless steel bowl and strainer that nest nicely
paper towel
plastic wrap
Nest your strainer inside the stainless steel bowl and place the paper towel in the bottom of the strainer. Make sure there aren’t big wrinkles in the towel and that the edges are tucked in at the top. If the edges of the towel are hanging over the side, it will draw the whey up and out instead of into the bowl. Stir the yogurt and add the entire carton to the the towel lined strainer and cover the entire contraption with plastic wrap. You may use some extra plastic wrap or a large rubber band to secure the strainer and bowl so that you have a sturdy system.
Place the straining yogurt into the fridge overnight or until there is no liquid dripping through the strainer. The liquid that ends up in the bowl is your whey! Pour this liquid into a very clean mason jar. It will keep in the fridge for 6 months, but if you start fermenting all the veggies in your refrigerator, it will get used up quickly.
Once you have the whey that you need, you will be left with strained yogurt which is what is sold in the market as Greek yogurt. This product is also what was historically used as cream cheese. You can eat this just like regular yogurt, adding maple syrup, your favorite fruit preserves, or nuts. Also try making it into muesli with oats and seeds. This traditional, European breakfast is incredibly healthy with both soaked grains and beneficial bacteria. You can also make savory spreads or dips with it. Add chives, parsley, cilantro, dill, and a tiny bit of chopped garlic with salt and pepper for a healthy and delicious veggie dip or spread for a bagel.
Birthday thoughts for my 43rd year around the sun 🌞🌞🌞🌞🌞🌞🌞🌞🌞🌞🌞
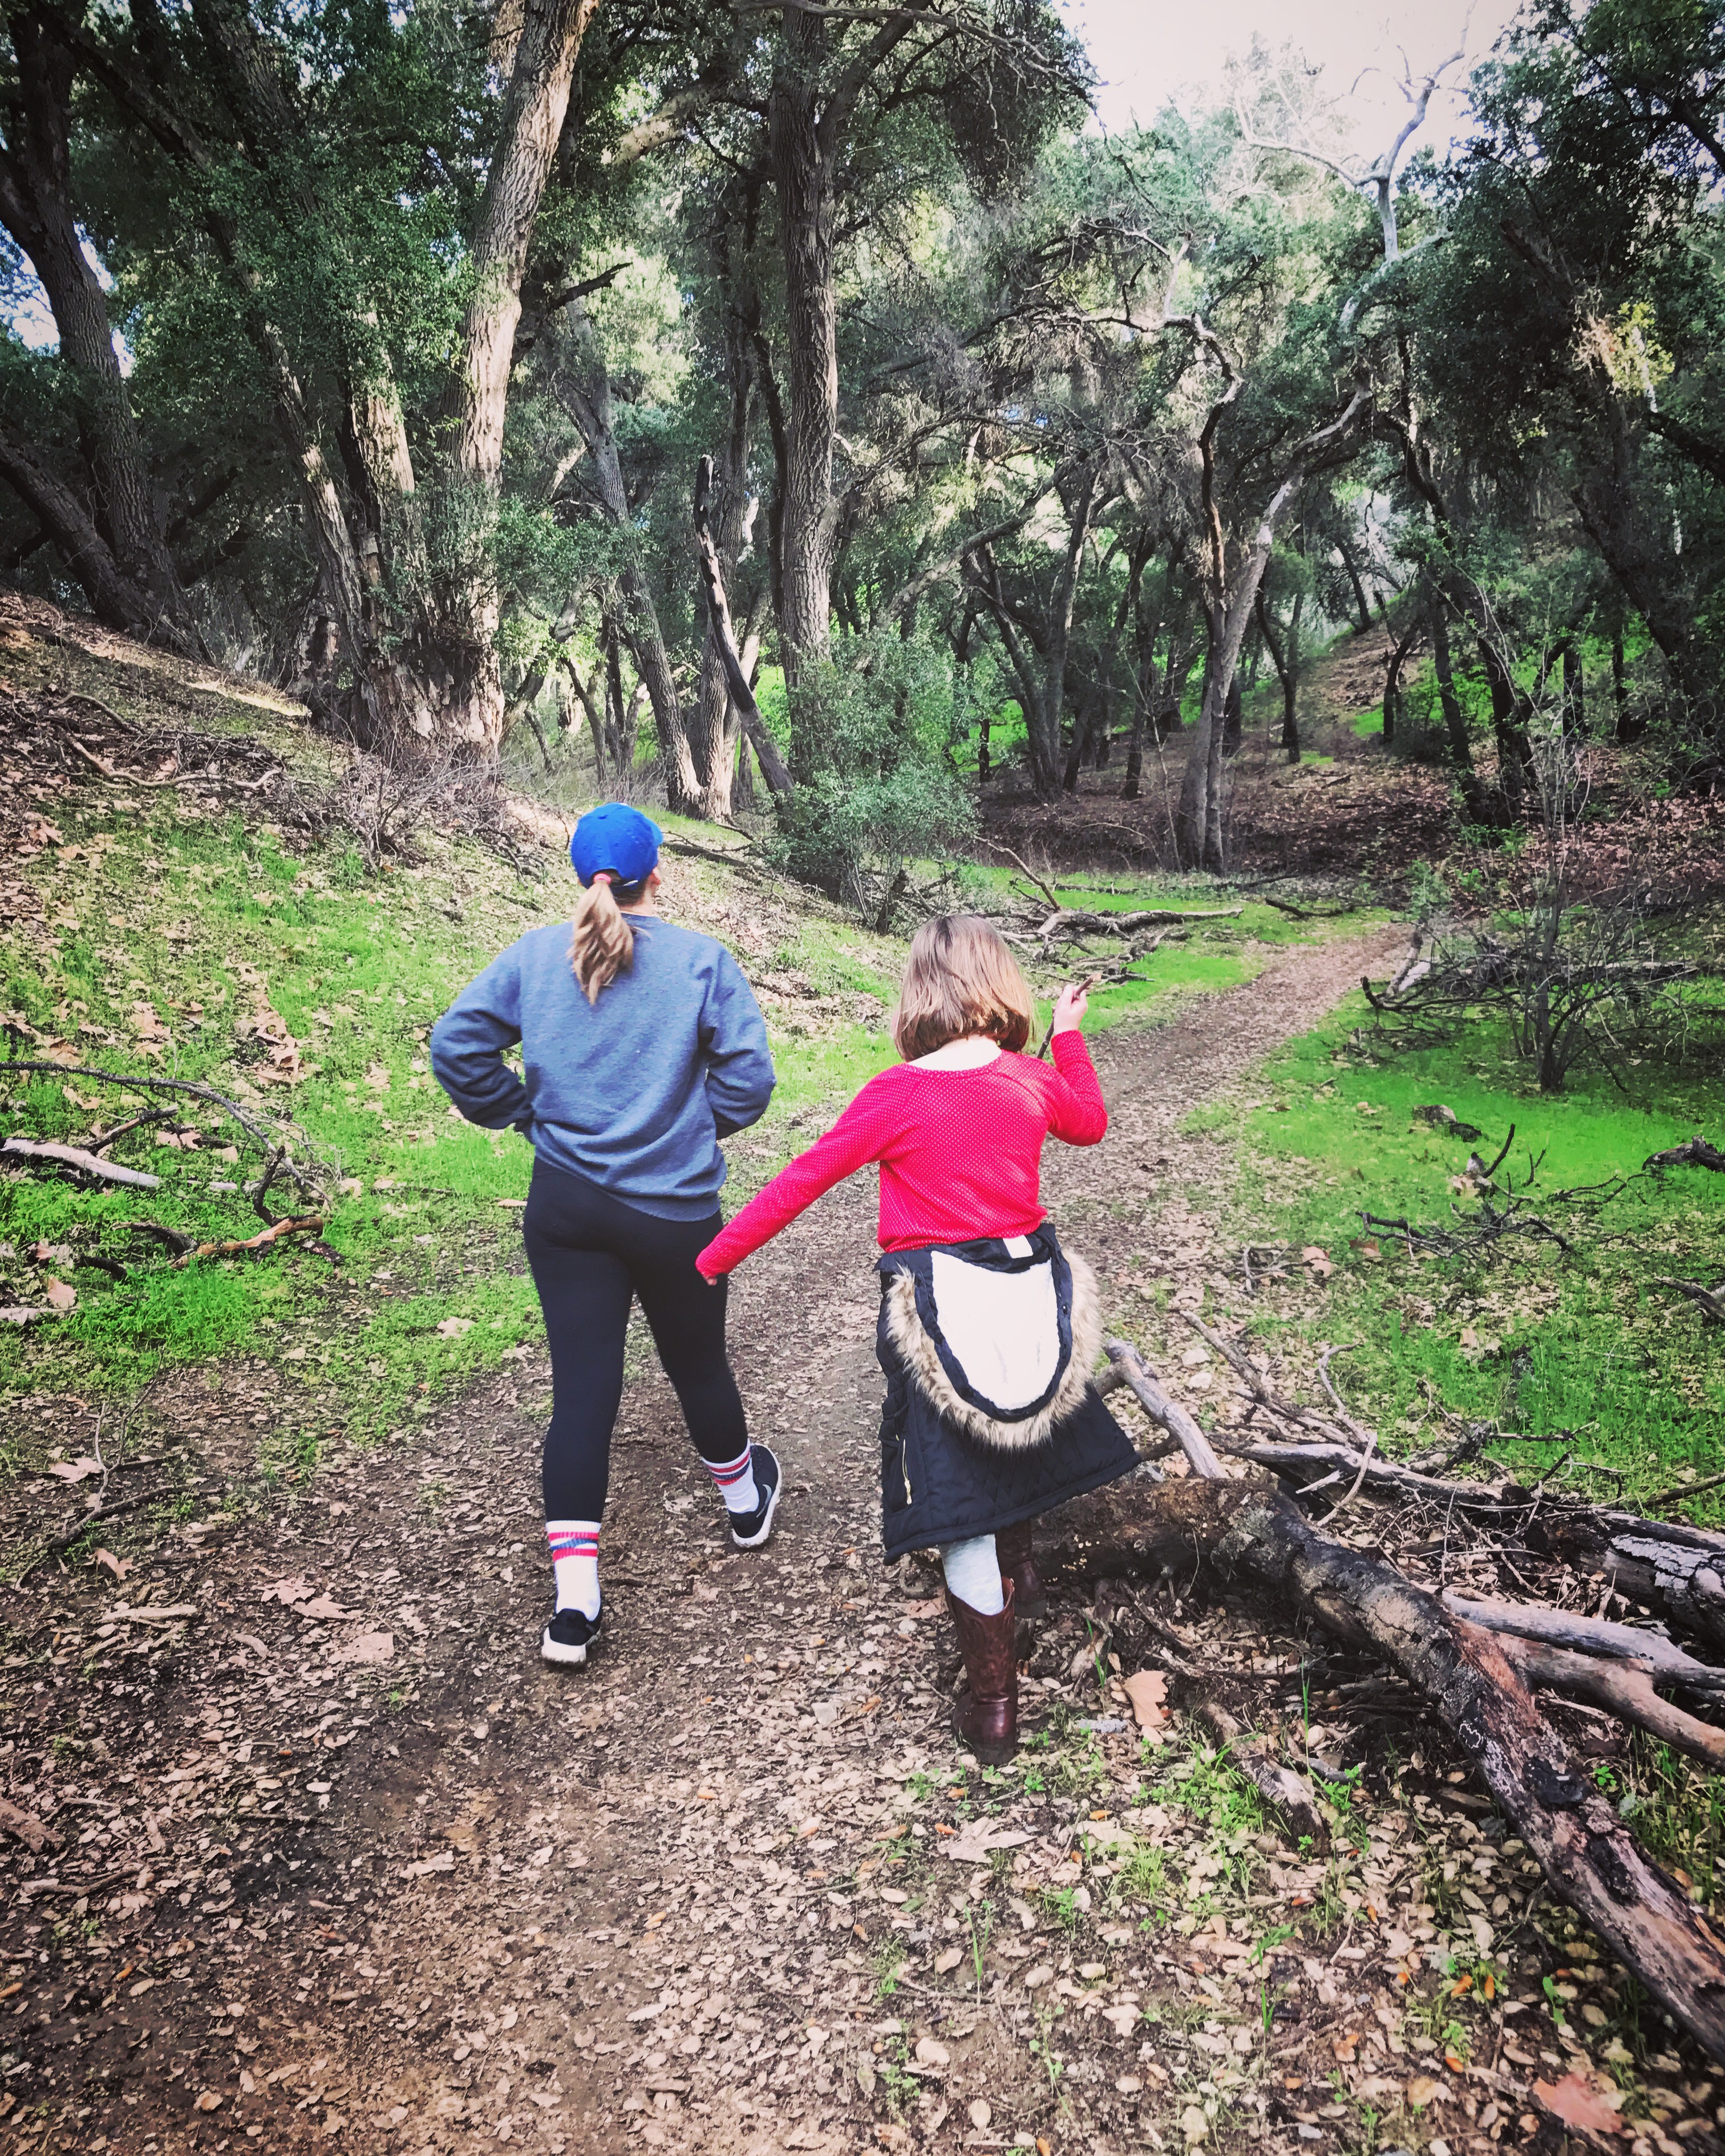
Everyone knows I like to hike. As feet smack muddy, dusty, or green covered earth, one purposeful step at a time, stress and confusion rearrange into productive plans. The forest revives the human and she can return to civilization balanced and energized. This is absolutely vital for me….
When I was a kid, I used to frequently attend church services by Pastor Paul Tsiki. He often told his audience that he had written a poem that was the direction manual for life… After much drama leading into the value and complicated nature of the poem, all were on the edge of their seats as he cleared his throat and began. He would softly at first, and then with the increasing fervor of a Baptist minister, bestow his wisdom. “Plow on, plow on, plow on, plow on, plow on, plow on, plow on…. Plow on, plow on, plow on, plow on, plow on, plow on, plow on”. “Are you getting it yet?” he would ask. Then right back to it… “Plow on, plow on, plow on, plow on.” Then the audience would join in, chanting these simple words and people would weep as he preached that this is really all there is to it. No magic pill.
I’ve carried those words, his poem, all my life. They are what I think about walking in the forest, one step followed by the next. On my birthday I have a few thoughts to add. I make no claim to mastering any of this. If I had, I’d have nothing left here to do 💛
Plow on ONE step at a time. Staying grounded in the moment increases joy when things are lovely and keeps me focused when things suck. Anxiety comes from worry about the past or future and is totally unproductive. Taking the next right step stops this internal spin.
Plow on listening to intuition. The times that life has sucked is when I’ve ignored my gut. She ALWAYS speaks integrity and truth.
Plow on looking for the the love and beauty. Even when things suck, there is always something beautiful happening. When I look for it, it sees me through every time.
Plow on saying yes to miracles. It’s often scary when the things I have been praying for actually show up in physical form. It’s OK to say yes and take a leap even when I’m afraid.
Plow on letting others be human. We are all trying our best and make mistakes. Sometimes the mistakes are giant. Forgiveness isn’t just a gift to a loved one. It’s also essential for my own soul.
Plow on with humor. Laughter is absolutely the best medicine.
Plow on in style. Everything goes better when I feel good about how I’m presenting myself in the world.
Plow on in gratitude. Every breath, every minute, every hour, every year, always.
I thank pastor Paul for this incredible gift all those years ago and to everyone who joins me in this crazy life. Plow on 💛💛
This month we take time to bring awareness to all kinds of loss mother’s and families can experience. I think I can confidently say that everyone I know has been touched by this topic in some way, but it’s not something that we share about much. My intention for sharing my story is not to sing my sad tale. It is to voice the visceral feelings I experienced and to proclaim from the future (20 years later), that we survive and even thrive. My deepest sympathy to anyone who has dealt with their own loss.
When I was in tenth grade, my favorite teacher decided to start her family. She became pregnant easily, but then miscarried in the first trimester. Upon hearing her news my immediate, singular thought was that I could never survive such a thing. I had a close, adult friend who had infertility issues. I’d watched her pine for a baby, adopt, induce lactation, and then struggle immeasurably as they tried to adopt a second child. I’d celebrated and mourned with her, but I’d never known anyone to lose a pregnancy. Actually, I don’t think I knew this was possible. My teacher was rather pragmatic about it all (with us at least). The science lover in her reasoned that when cells don’t make a good union, the body expels them and you try again. All I could think was that a baby died and that had to be the worst thing a woman could ever live through. This was the one and only miscarriage I ever heard mentioned until I had my own. Most women just don’t talk about these things.
In 1999 Brett and I decided to add a third child to our little family. Brett was traveling a lot for work so this was tricky, but his Christmas trip home produced a tiny present in my belly. We were planning a trip for me to visit him in France and I was over the moon. I remember realizing I was pregnant in Off 5th at Ontario Mills because I got super emotional over choosing a travel bag with enough zipper compartments, because that is really something worth getting riled up about. Realizing that this was a completely insane reaction to the moment, I told Brett that the only explanation for my emotions was that I was pregnant. I was right.
I was so thrilled to be going to Europe, a long time goal, AND with this little bean growing in my tummy! How could life get any better? Our trip was dreamy. We stayed in beautiful, historic hotels, ate every regional delicacy, and saw as much of Europe as we could squeeze into our short ten days together. Two days before I was set to return home, we went to Paris. When I woke up that morning, I felt really off and was so frustrated that my mood was affecting this special day I had hoped and planned on for so long.
This is how I wish I’d felt in the most romantic city on the planet.
By midday, Brett and I got to the Eiffel Tower. We took the elevator up awash in the romance of it all. We marveled at the incredible landscape so far below! In the midst of all this beauty, I made a quick bathroom stop. Actually, I made quick bathroom stops about every 45 min this entire trip. I have an incredibly small bladder and pregnancy only makes it worse. The variety of toilets in Europe are their own entertainment. Everything from computerized, self-sanitizing robots, to literal holes in the ground. I visited them all.
This bathroom visit was different though. I rushed in, mind distracted with loveliness, until everything slowed to an urgent stop. There was blood in my underwear. Where was it coming from? Women bleed occasionally when they are pregnant. I tried to soothe myself with reason. Not me though. Two pregnancies and never a drop. I knew that very moment the baby was gone. I didn’t want to believe it, but my gut never lies. I felt my boobs and the soreness was gone.. I’d barley been able to touch them only the day before. I went into a sort of robotic shock. I went to tell Brett what had happened and found the glorious heights and landscape turned terrifying. I wanted DOWN! I wanted my feet on the ground. I wanted this to not be happening to me, to us. Brett tried to reassure me the way I’d reasoned to myself. Everything could be fine. I hung my hopes on that and tried to finish this day. This precious day in this beautiful place that I’d dreamed of my whole life. “This day when you started having a damned miscarriage in the Eiffel Tower” my inner voice screamed inside my head.
Brett caught a shot of my true disposition. Ugh, that’s a rough memory.
The next day I lay in my hotel room while Brett went to his office to work. The bleeding increased and I knew for sure I was losing the baby. Now to figure out how to make my way home on a long flight that I surely would not have been allowed to board had anyone known my state. I sent Brett to the drug store for the biggest pads he could buy. His French failed him on this particular subject, but someone had mercy on him and translated. At the airport, I had to leave him once I passed through security. I felt like my heart was being ripped from my chest as his image faded in the distance of the busy terminal and I went to go home and deal with what was happening alone.
Once I got on the plane, I realized an angel was sitting beside me… A gruff, bristly, Greek angel that asked me to share what was wrong as soon as we took off so he could help me since we would be “row mates” for the duration. He made sure I ate, distracted me with movies, and kept a supply of wine from first class coming because he found what they served in business class “totally undrinkable”. He walked with me back and forth to the bathroom and carried my bags off the plane. Then he disappeared before I could ever thank him adequately.
Once I got some sleep, I saw both my midwife and doctor. They were equally helpful and I was given drugs to increase contractions and hasten the completion of the miscarriage. This caused intense pain and it still took two days for me to pass the baby. It was the middle of the night when I finally felt it start to happen. I was alone except for my sleeping babies when the fetus slipped out into the toilet. Without even thinking, I plunged my hand in after it and fished out a tiny, perfectly formed being.
The next morning I called the doctor to update her. The nurse on the line asked me what I had done with the “contents of my uterus”. When I said I had saved it to bury the baby, she said I wasn’t allowed to have it because it was biohazard and I needed to bring it to them at the office that minute. I’d kept my cool until this point except for a few gentle tears. I NEVER lose my temper in public and the phone counts as “public”. But this was the end of my ability to stay calm and conscious. I told the nurse that it would take an army to compel me to hand over my baby and that would be from my cold, dead hands. I told her she was insensitive for using technical terms about my loss and that she must have never had a baby herself! When I stopped yelling there was silence. The long, uncomfortable silence was followed by some whispering. She returned to the phone and said she was having a Christian nurse call me back that could better understand my attachment to this “tissue”. My blood boiled all over again.
When the next nurse called, she told me that I must say I flushed the baby down the toilet so that she could write that in the chart. I did, but it wounded me. I was an active doula at this time in my life so even in my grief, I was always analyzing what happened to me and my body as much like a women’s studies student as I did like a human being… I wondered how many other women, who were in the midst of a loss, had been told the same thing, but hadn’t insisted on a different answer. With this small war behind me, I asked my mom to buy me a rose bush to bury my baby under. A few days later we carefully placed the baby into fresh soil, covered her with the meticulously selected plant, and said some prayers.
Now to recover. With my husband still abroad, I went about trying to physically recover and spend time with my kids. I’d never been separated from them for as long as I was during my trip with Brett and then was in bed when I returned. I craved their silliness and snuggles. My feelings were so raw with grief that everything brought me to tears. Everything was either too beautiful or too sad for me to contain. I felt so empty to have lost something so dear and so full to have children and a husband I loved so much. The contrast was just huge. This contrast is what gives meaning to its opposite. Without deep pain, you never know elation. Or more simply, without tasting something awful, how do you know delicious? This sadness was helping me define something so important. What I could see is that ALL of this emotion came from the same core of love. Without my love for Brett and my desire to continue to grow our family, the grief would never have existed. The grief WAS love in the form of sadness.
This felt sacred to me. It felt like I needed to hibernate to be close to these feelings until they started to ease. I’d noticed that the way most adults showed compassion to each other was to minimize their friend’s feelings. They would either compare a friend’s situation to someone else’s… “At least this is only your first loss. I have this friend that has had three miscarriages!” Or, they might reason why the hurting individual might look on the bright side… “You have two beautiful children! You’ll get pregnant again.” I could predict these conversations coming my way and knew every damned reason I had to be thankful and keep my chin up. It’s just that being able to get pregnant again or kissing the sweet faces of my littles didn’t erase the loss of this baby, this soul. I needed time to gain my strength before I could face people’s reactions.
One evening I decided to brave the public for a meeting. I told my mom why I was hesitant to go, but I’d been inside the protective veil of my little casa for several weeks and it seemed like time. I literally was not inside the conference room for ten minutes before a well meaning friend came to offer her condolences. I put my amour up a little right before the words rolled off her tongue, “At least you weren’t that far along! You can get pregnant again because you got pregnant so easily with Andrew and Alexis. Lots of women have to try for years.” Why couldn’t people see that getting pregnant again was not the point? I would never know THIS person. I was glad I’d waited so long to go out.
Time did heal, just like I knew it would, and my husband returned from his travels. My loss was one of the first ways that I learned to how to BE with other’s pain. I learned that there is no way to help people feel better when they are grieving except listening and sitting. No explanation, no looking on the bright side, no hope for the future can erase grief. It has to move at its own pace. But bringing a meal, offering an embrace, or helping with a ceremony, that’s support. Women CAN support each other. We can cook. We can sit. We can listen. We know how, deep inside.
After some months passed, I DID get pregnant again easily. This baby stuck and was born to a mother who had much more compassion and strength than she’d ever had before. On one optimistic morning I rose early to pee on a stick. I wish I’d had stock in those sticks! The magical double line showed up and I went to tell my mom the happy news. When I got to her house, I visited my rose tree in her yard. That very morning, the little plant had it’s very first, perfectly formed, delicate, white rose BLOOM.
A rest stop in South Dakota holds a little gift that will change what I think is possible with animals forever.
In 2010 my husband Brett and I had the bright idea that the most prudent way to get our family to a wedding in Minnesota would be to drive cross country. We thought that we could both be economical and turn the trip into an epic homeschooler’s adventure by stopping at landmarks like Mount Rushmore and Yellowstone, ending the trip at our summer camping spot in Beaver, Utah with my parents before heading home. We mapped our route and headed off with ridiculously optimistic expectations.
The trip was epic, to say the least. One needs little imagination to envision the calamities that might await two adventurous and well-meaning parents with an SUV packed to the gills with luggage and kids smashed in like sardines. Before we even arrived at the wedding, we lost my son Ashton’s Heely shoe in a labyrinth of corn fields during a potty stop. Why had I only packed the child one set of decent shoes for a two-week trip? And how was the shoe still in the road waiting for us after 45 minutes of backtracking?!? I also left Brett’s suit for the wedding in a perfectly packed luggage bag, at home, in our closet, 3 days drive away.
Somewhere close to Mount Rushmore, the computer in my car showed that we had a major transmission failure when we were packed to take off at 6 AM. We were hours, or maybe days from a Land Rover dealership (or anyone who had ever seen a Land Rover for that matter), but were saved when we discovered that it was really just a battery problem. My daughter Alexis also had an altercation with an ATV during this trip that could have ended with an ER visit or worse instead of just revised rules of operation. Woven between these moments of resistance though, were some of the most beautiful, life-changing moments of this season of our lives. I continue to notice that life requires me to overcome obstacles with integrity before some amazing grace pours in.
We call this work of art Geyser with Brooding Teenager
That’s a mini buffalo nursing!!
Everyone has different desires and expectations for what makes a road trip excellent. Some people want to see rich history or meet new people. Some want to eat great local food. I like all of this a LOT, but what I want most is to see wildlife! This trek was brimming with close encounters. After visiting Yellowstone National Park, my animal interaction tank felt full to bursting like the geysers we had marveled at there. We’d seen creatures of every kind who were quite relaxed with humans and so abundant that it was like Disneyland for nature lovers.
Little did I know that something so special was still waiting for me at a rest stop in South Dakota. After driving all night to make our way to Utah and meet up with my parents for the last leg of the trip on-time, Brett pulled off the highway for me and our waking kids to stretch our legs (and pee!). There were dew covered hummingbird feeders scattered around this mountainside rest stop and it was very early so the birds were coming out for their first sips of nectar. There were just swarms of them! The kids and I ran to stand in the middle of the frenzy even in our morning haze.
Brett, always encouraging me to up the ante where animals are involved, silently removed a feeder from its hook and put it in my hand, positioning my fingers above the tiny perches. Inside, I was momentarily hesitant thinking I might be breaking a rule of some kind. But before I could protest, there was a hummingbird eating breakfast from my finger. The kids gathered around and also held feeders, feeling the vibration of wings by their cheeks and tiny claws on their thumbs and forefingers. We stayed at this rest stop for at least an hour taking pictures and drinking in the awe. I’m pretty sure I didn’t need my morning coffee that day. I was buzzing all on my own.
I think Brett and I should publish a coffee table book called “The Crazy Faces Of Jessica Bingaman When She Plays With Birds”
Ashton is a calm, cool, collected bird master.
Alexis gets her expressions from her mother.
When we got home from our great, cross-country expedition, ripe with lessons and wild nature experiences, I became obsessed with the idea of getting hummingbirds to come to my balcony and yard to eat. Brett helped me get feeders set up all over the yard and the whole space turned into a hummingbird haven for a long season of our life. It took a tremendous amount of work to keep the feeders clean and full, but like anything that we have an internal drive to do, it nearly always felt like pure joy to keep it all going.
Audree uses an Audubon app to call birds to the balcony. This works!
At first, we just sat in awe of the tiny bird’s beauty when they came to visit. We looked for personalities in the “regulars” and named them. Scruffy was a beat up, older, magenta headed Anna’s that commanded the yard. He tried with all of his tiny might to keep the territory clear of other birds. Blueberry, whose gorget sparkled deep violet, was a little Costa’s male that was much more gentle. He had no natural fear of us, knowing that he could speed away at even the slightest hint of danger. He would sit on the feeder and go back and forth between eating and looking at us with curiosity, tipping his head from side to side like he was solving a complicated puzzle.
Eventually, the bird word got out that there was abundant food at Casa Bingaman, and the numbers of visitors skyrocketed. Every evening that we were home, I sat with Brett and the kids in complete stillness as we watched them come for their last feedings before sundown. This time we spent felt so important and even reverent because of the awe it produced in all of us. We began to make it a priority every single day.
I later learned that we weren’t just craving the rejuvenation and wonder that was created by these magical evenings, but there was actually something happening to our brains in this state of stillness. And it wasn’t just happening to one of us. We were sitting each night together, syncing up on the very same joyful, wondrous wavelength of rapture!
Awe finds all of us and can come from an endless variety of sources. As I’m sure you have already gathered, these moments are often fueled by animal encounters for me but I also love delicious food, music, wild places, and reading other’s inspired work. You surely have felt awe many times singing a favorite song in church or in front of the mirror as a kid, watching the full moon rise over a mountain horizon, or reading a poem that seemed like it was written just for you. Time stops, attention to the physical world around you ceases, and rapture takes over. Sometimes it’s punctuated by getting the chills or truth bumps. Then at some point, you find yourself back in your body, feet on the ground thinking, “Where am I”?
Biochemically, the brain creates a surge of nitric oxide and a chain reaction of other feel-good hormones whenever we are overtaken by rapture. This produces an incredible sense of well being, wonder, and delicious relaxation that is healing medicine for a human. Once it’s released into the system, nitric oxide works with anticoagulants in the blood, increasing its flow, signaling white blood cells to fight infection, balancing neurotransmitter levels in the brain, reducing cellular inflammation and even preventing heart attacks and strokes. Our urge to satiate this craving was more than just looking for a fun time! We were under the spell of beautiful brain chemistry which was creating deeply rutted neural pathways to help us learn to purposefully create awe in the future, healing our bodies and minds with nature.
All of this nightly hummingbird observation was pure bliss, but I always had this little voice reminding me that they ate from my hand on our trip and I wanted a redo of that. Audree and I tried quite a few times but our birds seemed a bit more skittish than the ones we’d first met. We could get very close to the feeders where they would inspect us, eating right within reach, but never perch on our hands.
One blustery, lazy afternoon I resolved to figure out how to get them to sit on my finger until it worked. I took all of the feeders down and hid them away so that the one I held was the only possible option for food. The birds would come to investigate but then look me in the face and zip away. Moments later, they’d be back to see if the crazy lady had reassembled their nectar buffet. They just weren’t falling for it.
This went on for some time. They’d fly up and I’d think, “Please just eat on my hand… please!” As my arms started aching, my brain started problem-solving. Physical stress is often the impetus for a new thought. I questioned, “What is the element keeping them from just sitting down?” It occurred to me to try changing my internal dialog from “please” to “thank you”.
Instead of thinking “Please, oh please sit on my finger” when they buzzed up I’d purposefully think “Thank you for sitting on my finger”, wondering if I could cultivate the outcome that I desired before it happened with more inviting thoughts. Sure enough, it was only seconds until Scruffy perched on my thumb, drinking up his lunch. I was elated! Could their willingness to light on my hand be that directly tied to my own thoughts and the messages my body emitted?
Scruffy wonders if he can trust the freezing bird lady enough to sit down for a sip of nectar.
I ran inside and got Ashton and my daughter Audree to help me experiment with what I’d discovered. I gave them each a feeder to hold and asked them to think and try to feel the word love or welcome in their hearts and bodies to see if the birds would feed. Within just a few minutes, they did. Then I asked them to imagine and feel the word want or need. The birds zipped around the feeders but wouldn’t stop to eat. We tried other feeling states like contentment, fear, desire, and lack. Sure enough, the negative feelings repelled the birds, and the positive ones attracted them. We sat outside and played with the experiment until our fingers were freezing off, giggling with excitement that we’d figured out the puzzle.
Success! Those tiny feet feel awesome.
The dramatically obvious results of our little hand feeding experiment were the perfect material for contemplation at this particular stage of my personal development. Later, I’d discern that all of these animal lessons always came to me perfectly timed containing a divine direction manual that I could learn to read based on each animal’s meaning historically and by observing their behavior.
Once I learned to watch and listen closely, animals became more than a simple fascination. Instead, they began to help me work to heal old patterns and move through some furiously intense times in the coming years. At this moment though, all I knew is that I had physically been able to act out a concept that I’d previously understood but had never effectively integrated.
“External circumstances do not create feeling states, feeling states create external circumstances”.
~Martha Beck
I have always been a highly sensitive, feeling, loving, grieving, empathetic little human! I am never just happy, but elated, never just sad, but devastated. My emotions don’t naturally hang out near the center where balance is found. I also could always feel the mood of the people around me with reliable accuracy. I knew exactly what state my parents were in when I hopped in the car each day after school or the mood of my co-workers as they walked through the door to begin a shift.
This empathetic perception gives me tremendous insight and makes me a sensitive parent and friend but also has a troubling downside. Without a mature understanding of it, I could allow myself to be too easily influenced by others emotions. If one of my friends was sad or upset, my mood synced right up with theirs, seemingly without my consent. Equally, if a close friend was feeling excited or my family was buzzed about some future fun we were planning, I found myself surfing on good feeling waves. I spent my teenage and early adult years stuck on a roller coaster of feelings and emotions, tossed around by whatever was going on with those I loved or even whomever I chatted with in a grocery store line.
By the time I found myself feeding these hummingbirds out on my balcony, I had a nearly desperate desire to be more in charge of my internal ecosystem. I grew up surrounded by adults trying to effectively use positive mental attitude principles and read people like Wayne Dyer and my beloved Christiane Northrup’s writing about staying present and in love and gratitude as a young mother. It’s not that I had a lack of good upbringing or material for growth to construct a balanced internal life. I just struggled intensely with putting it all to use while adulting. By now, I yearned to find a way to stay more centered without giving up my effervescence in the process. I knew if I could solve the puzzle of how to master my emotional states it would stabilize my daily living and also create and attract better future experiences.
But what I knew just made me feel like I was going cuckoo for Cocoa Puffs. I constantly watched myself roll down into the pit of anxiety, or depression, or fear, all the while knowing I was the only one who could stop it. When I was on the joy upswing, it was contrasted by the reality that it would soon pass and I’d be cast back into my internal struggle as soon as the momentary high ended. I tried cognitive/behavioral techniques like the Sedona Method, read voraciously about the mind-body connection, and tried till I sweat to take charge of my feeling states with no lasting success. I understood that there was no magic formula that an author or scientist had recorded that I could follow for instant healing. What clicked during that moment on the balcony is that I was able to intentionally control and create my desired experience by feeling it first, instead of waiting or begging for it to come to me, for the very first time.
Hummingbirds are excellent kindergarten teachers because we can practice these concepts completely unattached to the outcome. The kids and I easily found this flow because there was no real risk. The worst thing that could have happened inside of our experiment was that they wouldn’t sit to feed; certainly not a life or death scenario.
This experience created a brand new neural pathway in my brain which I would continue to work with for years. Animals were always willing to help! The effort created so much fun in me and my family’s life that it didn’t feel like therapy, but ultimately it would be the exact the medicine I needed to master my own energy, healing the fear, anxiety, and sadness I’d had running the show in my head.
The hummingbird kindergarten lesson is that grasping, begging, feelings create resistance to what we want and need and therefore repel the very solutions to difficulties that we are trying to create. Just like the “Little Engine That Could” had to change his mantra from “I think I can” to “I know I can” to make it up the hill, these little, winged gems teach me to master internal dialog and begin to form what I desire from knowing to being.
The children survived! Even the ATV scrapes were evidence of tremendous gifts.
I start my batch cooking each week with a poached chicken. It is one of the easiest ways to cook a whole chicken and leaves you with delicious and very versatile meat plus lovely, clear stock. It also makes the chicken very easy to pull apart so the bones are ready for bone broth in a snap. Both stove top and Instant Pot instructions are below!
Even if you don’t do batch cooking, this perfectly cooked chicken can be turned into multiple meals, making this recipe both delicious and economical. Everyone can afford a local-organic chicken if it is going to stretch into many dishes! I buy a really ethically sourced chicken at my local health food store each week for about $2.89 a pound. This is a lot more than what I can find at the regular supermarket for $.69 a pound if it’s on special.
Here’s the thing though. We made a commitment a long time ago not to spend our dollars on food that harms us and our ecosystem. We are willing to stretch the more expensive meat into several meals. The higher priced chicken doesn’t increase my grocery budget even a dollar but we can feel great about our food. We know that the chicken we are eating led a totally normal life outdoors, foraged and ate it’s natural diet and died humanely. This can’t be said for the grocery store brand. In fact, I would never make one of those chickens into bone broth because it would only be concentrating the junk that it had been exposed to during it’s life before we consumed it.
So out of this one chicken, this is what I make each week:
4 Quarts Chicken Soup – Once my poached chicken has cooked and cooled, I remove all of the dark meat and reserve it for soup. You’ll find the whole recipe below. We eat this throughout the week topped with fresh herbs as a side to our lunches. You can also easily turn chicken soup into a chicken pot pie or chicken and dumplings dinner if it doesn’t all get eaten up.
1 Quart Chicken Stock – Before I make my chicken soup, I reserve one quart of plain chicken broth for the base to another soup. You can use it for anything but I like to make nettle soup in the spring, cream of broccoli, lentil, or white bean with preserved lemon. When I’m batch cooking, I get this soup made as soon as my chicken is done and put it into a container for later. The stock will save nicely for up to a week in a mason jar you choose not to cook with it right away.
1 Family Dinner – After I remove the dark meat for my soup, I am left with the perfectly cooked breasts. If you are not batch cooking, this meat will save nicely if it is covered in some of the broth and refrigerated or frozen. I like to turn it into my meal right away so that my time is free on other days. We shred the breast for lettuce wraps, add it to pasta with sauteed greens and Parmesan, add it to an easy mushroom and Dijon cream sauce that tops rice or pasta, stir fry it with lots of veggies, or eat it simply sliced with mashed potatoes and broccoli. There are endless chicken breast recipes so you won’t have trouble making use of your perfectly cooked meat.
Bone Broth – There are a lot of cranky food know it all’s on social media that complain that some big distinction has been made between stock and broth as a marketing hook. I don’t know if this is true but I grew up with grandparents who always cooked from scratch and they used broth and stock differently.
Stock is the liquid that is the result of cooking meat in water, just until it is done. It is usually served along with the meat like in chicken and rice or dumplings. The broth my grandpa Clarence had eternally simmering on the back of his stove is made from the bones and bits of meat that can’t be removed from a carcass. Veggies are added for nutrition and flavor. A good broth has to be cooked for a very long time to extract its healing properties and will be rich and dark in color when it’s finished. This can be sipped plain or used to replace some of the water in recipes that call for cooking liquid.
So as far as me and my grandparents, broth is not stock. So with ALLLL that background info, I’ll get to my point. Each week, I take bones from my chicken and the veggies that I poached with it and turn it into bone broth. The recipe for this is in a separate post.
Ingredients
1 5 lb chicken
4 carrots
1 whole celery heart
2 large leeks or shallots
1 large onion cut in half
4 garlic cloves, smashed
1 inch of ginger
Whole fresh herbs like basil, parsley, cilantro, tarragon and sage
1 bay leaf, fresh if possible
8 peppercorns
3 whole cloves
1 cup white wine (optional)
3/4 lb small mushrooms
1 Tbs salt
1/2 tsp of dried chili flakes (optional)
Stove Top method
Start by chopping all of the vegetables that you have to add to your poached chicken into large pieces. Those suggested above are just a rough guide. You can use absolutely anything you have on hand. Leave out or go light on cruciferous veggies like cabbage, broccoli, or turnips. Their strong flavor will overwhelm your dish. Rinse your chicken and remove the giblets.
Leave all of your herbs as whole as possible to make them easier to remove from finished stock.
Place it in the largest stockpot that you have along with all the other veggies. Add the wine, spices, salt, and herbs. Now cover the chicken with cool water, about 10 cups or more.
I like to use a generous amount of water so that I end up with lots of stock. If the chicken is floating to the top, place a colander over the top of it to weight it down before covering the pot.
Place the pot over high heat and bring it to a boil quickly. Lower the heat to a gentle simmer and cook for 20 minutes. If you needed a colander, you can remove it now. Cover your pot again and bring the pot back to a strong boil. Turn the heat off and leave the covered pot to sit for 45 minutes to an hour depending on the exact size of your chicken.
When the chicken is cooked, remove the veggies to a bowl if you would like to eat them with the cooked chicken breast. They are perfectly cooked but will get soggy if left in the broth. You may also reserve these vegetables to use to make bone broth later.
Now remove the chicken into a casserole dish with a pair of strong tongs. Be very careful to approach this part with Julia Child confidence and courage since the chicken is extremely hot and slippery. Let it sit for 10 minutes or more until it has cooled enough to touch. The chicken may fall apart as you remove it so be sure to get all the pieces out of the pot.
Carefully begin to pull the chicken apart into large pieces. The bones should literally slip out. You may have to work slightly harder to take the breast apart but it should not be difficult. Unless you plan to serve the whole chicken, put the dark meat and breasts into separate containers. Leave the bones and skin in the casserole dish if you plan to start your bone broth on the same day. If you’d like to do your broth on a separate day, put them into a container and refrigerate or freeze them.
Instant Pot Method:
The instructions that follow are for an 8 quart Instant Pot and a 5 pound chicken. If you have a smaller pot and chicken you can use less vegetables and water. The cooking time decreases by about 3 minutes per pound for smaller chickens. You can’t really overcook the meat by cooking it a few minutes too long since it is in liquid. If it’s under cooked, just put it on for a few more minutes.
Start by chopping all of the vegetables that you have to add to your poached chicken into large pieces. Those suggested above are just a rough guide. You can use absolutely anything you have on hand. Leave out or go light on cruciferous veggies like cabbage, broccoli, or turnips. Their strong flavor will overwhelm your dish. Rinse your chicken and remove the giblets. Place it in the Instant Pot along with all the other veggies. Add the wine, spices, salt, and herbs. Now cover the chicken with cool water. I like to fill my Instant Pot all the way to the max fill line so that I get tons of broth from each chicken.
Use the pressure cook button to set your pot for 25 min on high pressure. When the pressure cooking has finished, let your pot natural release for at least 20 min.
When the chicken is cooked, remove the veggies to a bowl if you would like to eat them with the cooked chicken breast. They are perfectly cooked but will get soggy if left in the broth. You may also reserve these vegetables to use to make bone broth later.
Now remove the chicken into a casserole dish with a pair of strong tongs. Be very careful to approach this part with Julia Child confidence and courage since the chicken is extremely hot and slippery. Let it sit for 10 minutes or more until it has cooled enough to touch. The chicken may fall apart as you remove it so be sure to get all the pieces out of the pot.
Carefully begin to pull the chicken apart into large pieces. The bones should literally slip out. You may have to work slightly harder to take the breast apart but it should not be difficult. Unless you plan to serve the whole chicken, put the dark meat and breasts into separate containers. Leave the bones and skin in the casserole dish if you plan to start your bone broth on the same day. If you’d like to do your broth on a separate day, put them into a container and refrigerate or freeze them.
Chicken Soup
Dark meat removed and reserved from poached chicken
Broth reserved from poached chicken
4 carrots, chopped
1 whole celery heart, chopped
2 large leeks or shallots, finely minced
1 large onion, finely minced
4 garlic cloves, smashed and chopped fine
4-6 Yukon gold or red potatoes, chopped into bite sized pieces
1 capful apple cider vinegar
dried chili flakes (optional)
salt and pepper to taste
1 cup fresh or frozen baby peas
fresh herbs like dill, basil, chives, or parsley chopped for garnish
1 handful soft greens like mizuna, watercress or arugula
1 green onion, chopped for garnish
Start your soup by sweating the onions, shallots or leeks, carrots, and celery in a large stock pot until they start to soften. Adding a little salt while they saute will help this process. Add the garlic and continue to saute for 90 seconds or until the garlic is fragrant. Add the potatoes and the reserved chicken broth.
Simmer on low until the vegetables become soft but are still al dente. This can take anywhere between 15 and 30 minutes depending on their size. Add the capful of apple cider vinegar and simmer for 5 minutes.
Taste the soup and add chili flakes, salt, and pepper to taste. Add the peas and reserved chicken. If you are using fresh peas, simmer the soup for 3 minutes to soften them. If the peas are frozen, no further cooking is needed.
At this point, you can cool the soup and refrigerate or freeze it. When you are ready to serve it, put fresh herbs, greens, and green onion into serving bowls, then top with the hot soup. Add cooked rice or pasta for a hearty, nourishing meal.
My love for animals and flowers was certainly cultivated my Grandfather Lapp. He also started me reading Julia Child but that’s another post altogether. Today to celebrate the first day of my very favorite season, I’m posting a few of the beautiful blooms that he tended on his ranch in Auburn California. The time and love invested is evident in their beauty. I’m grateful that I took the time snap these photographs and that his spirit is always near when I recharge my mama batteries by enjoying nature.
Spring makes its own statement, so loud and clear that the gardener seems to be only one of the instruments, not the composer. ~Geoffrey B. Charlesworth
The year’s at the spring
And day’s at the morn;
Morning’s at seven;
The hillside’s dew-pearled;
The lark’s on the wing;
The snail’s on the thorn;
God’s in His heaven –
All’s right with the world!
~Robert Browning
That God once loved a garden we learn in Holy writ.
And seeing gardens in the Spring I well can credit it.
~Winifred Mary Letts
The naked earth is warm with Spring,
And with green grass and bursting trees
Leans to the sun’s kiss glorying,
And quivers in the sunny breeze.
~Julian Grenfell
Spring has returned. The Earth is like a child that knows poems. ~Rainer Maria Rilke
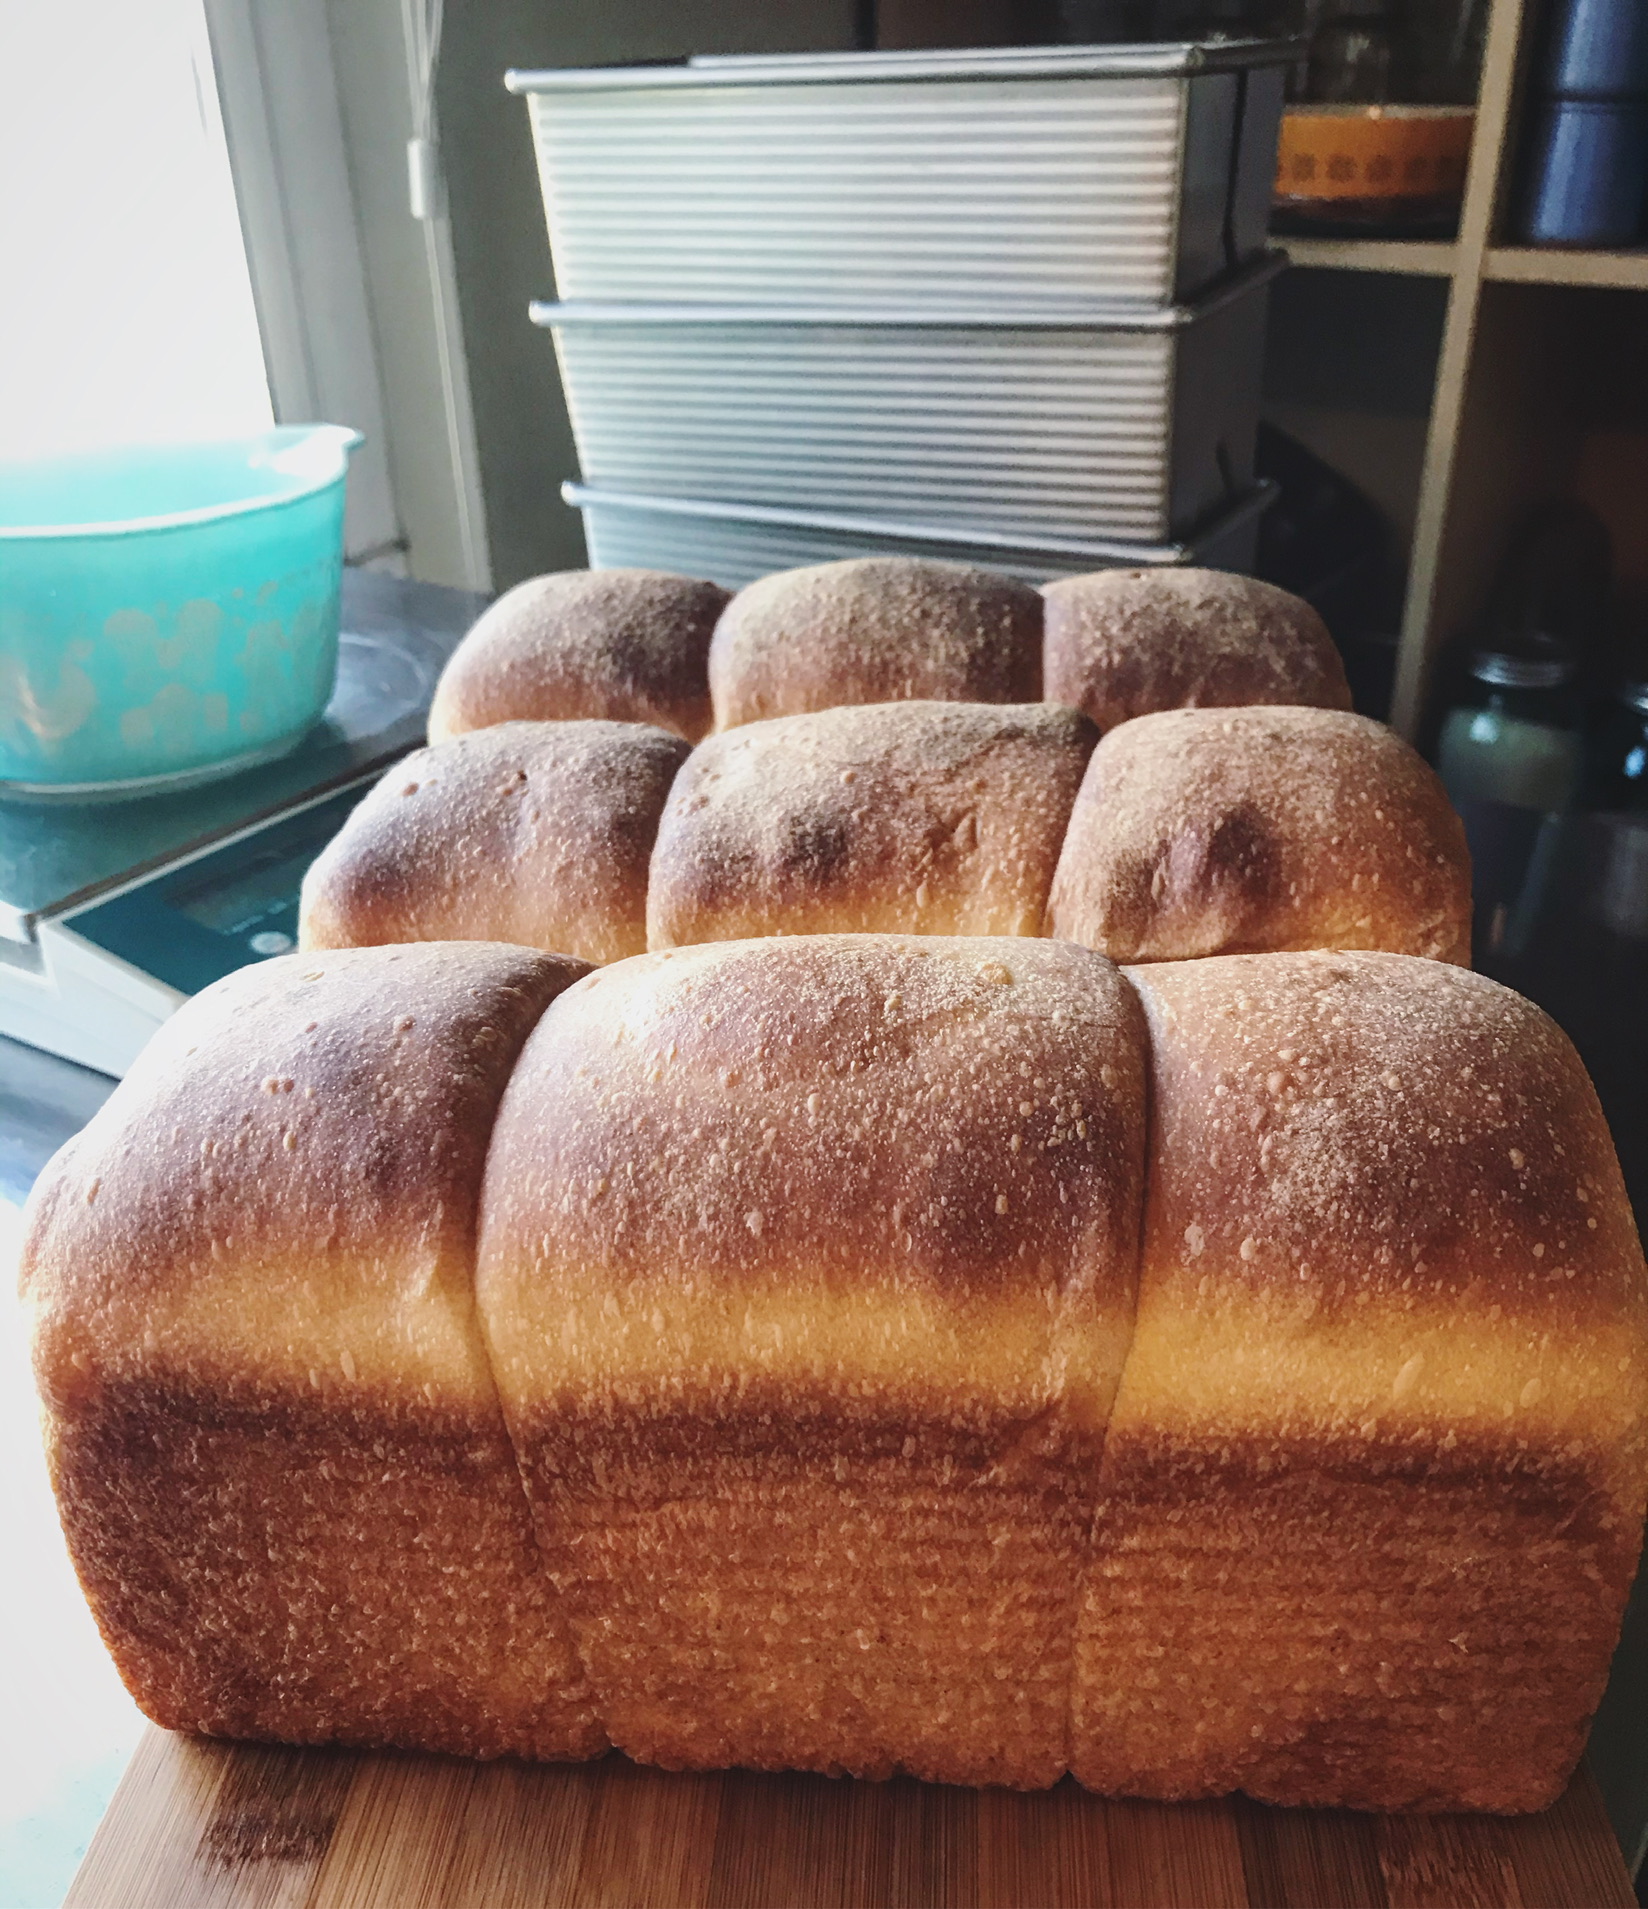


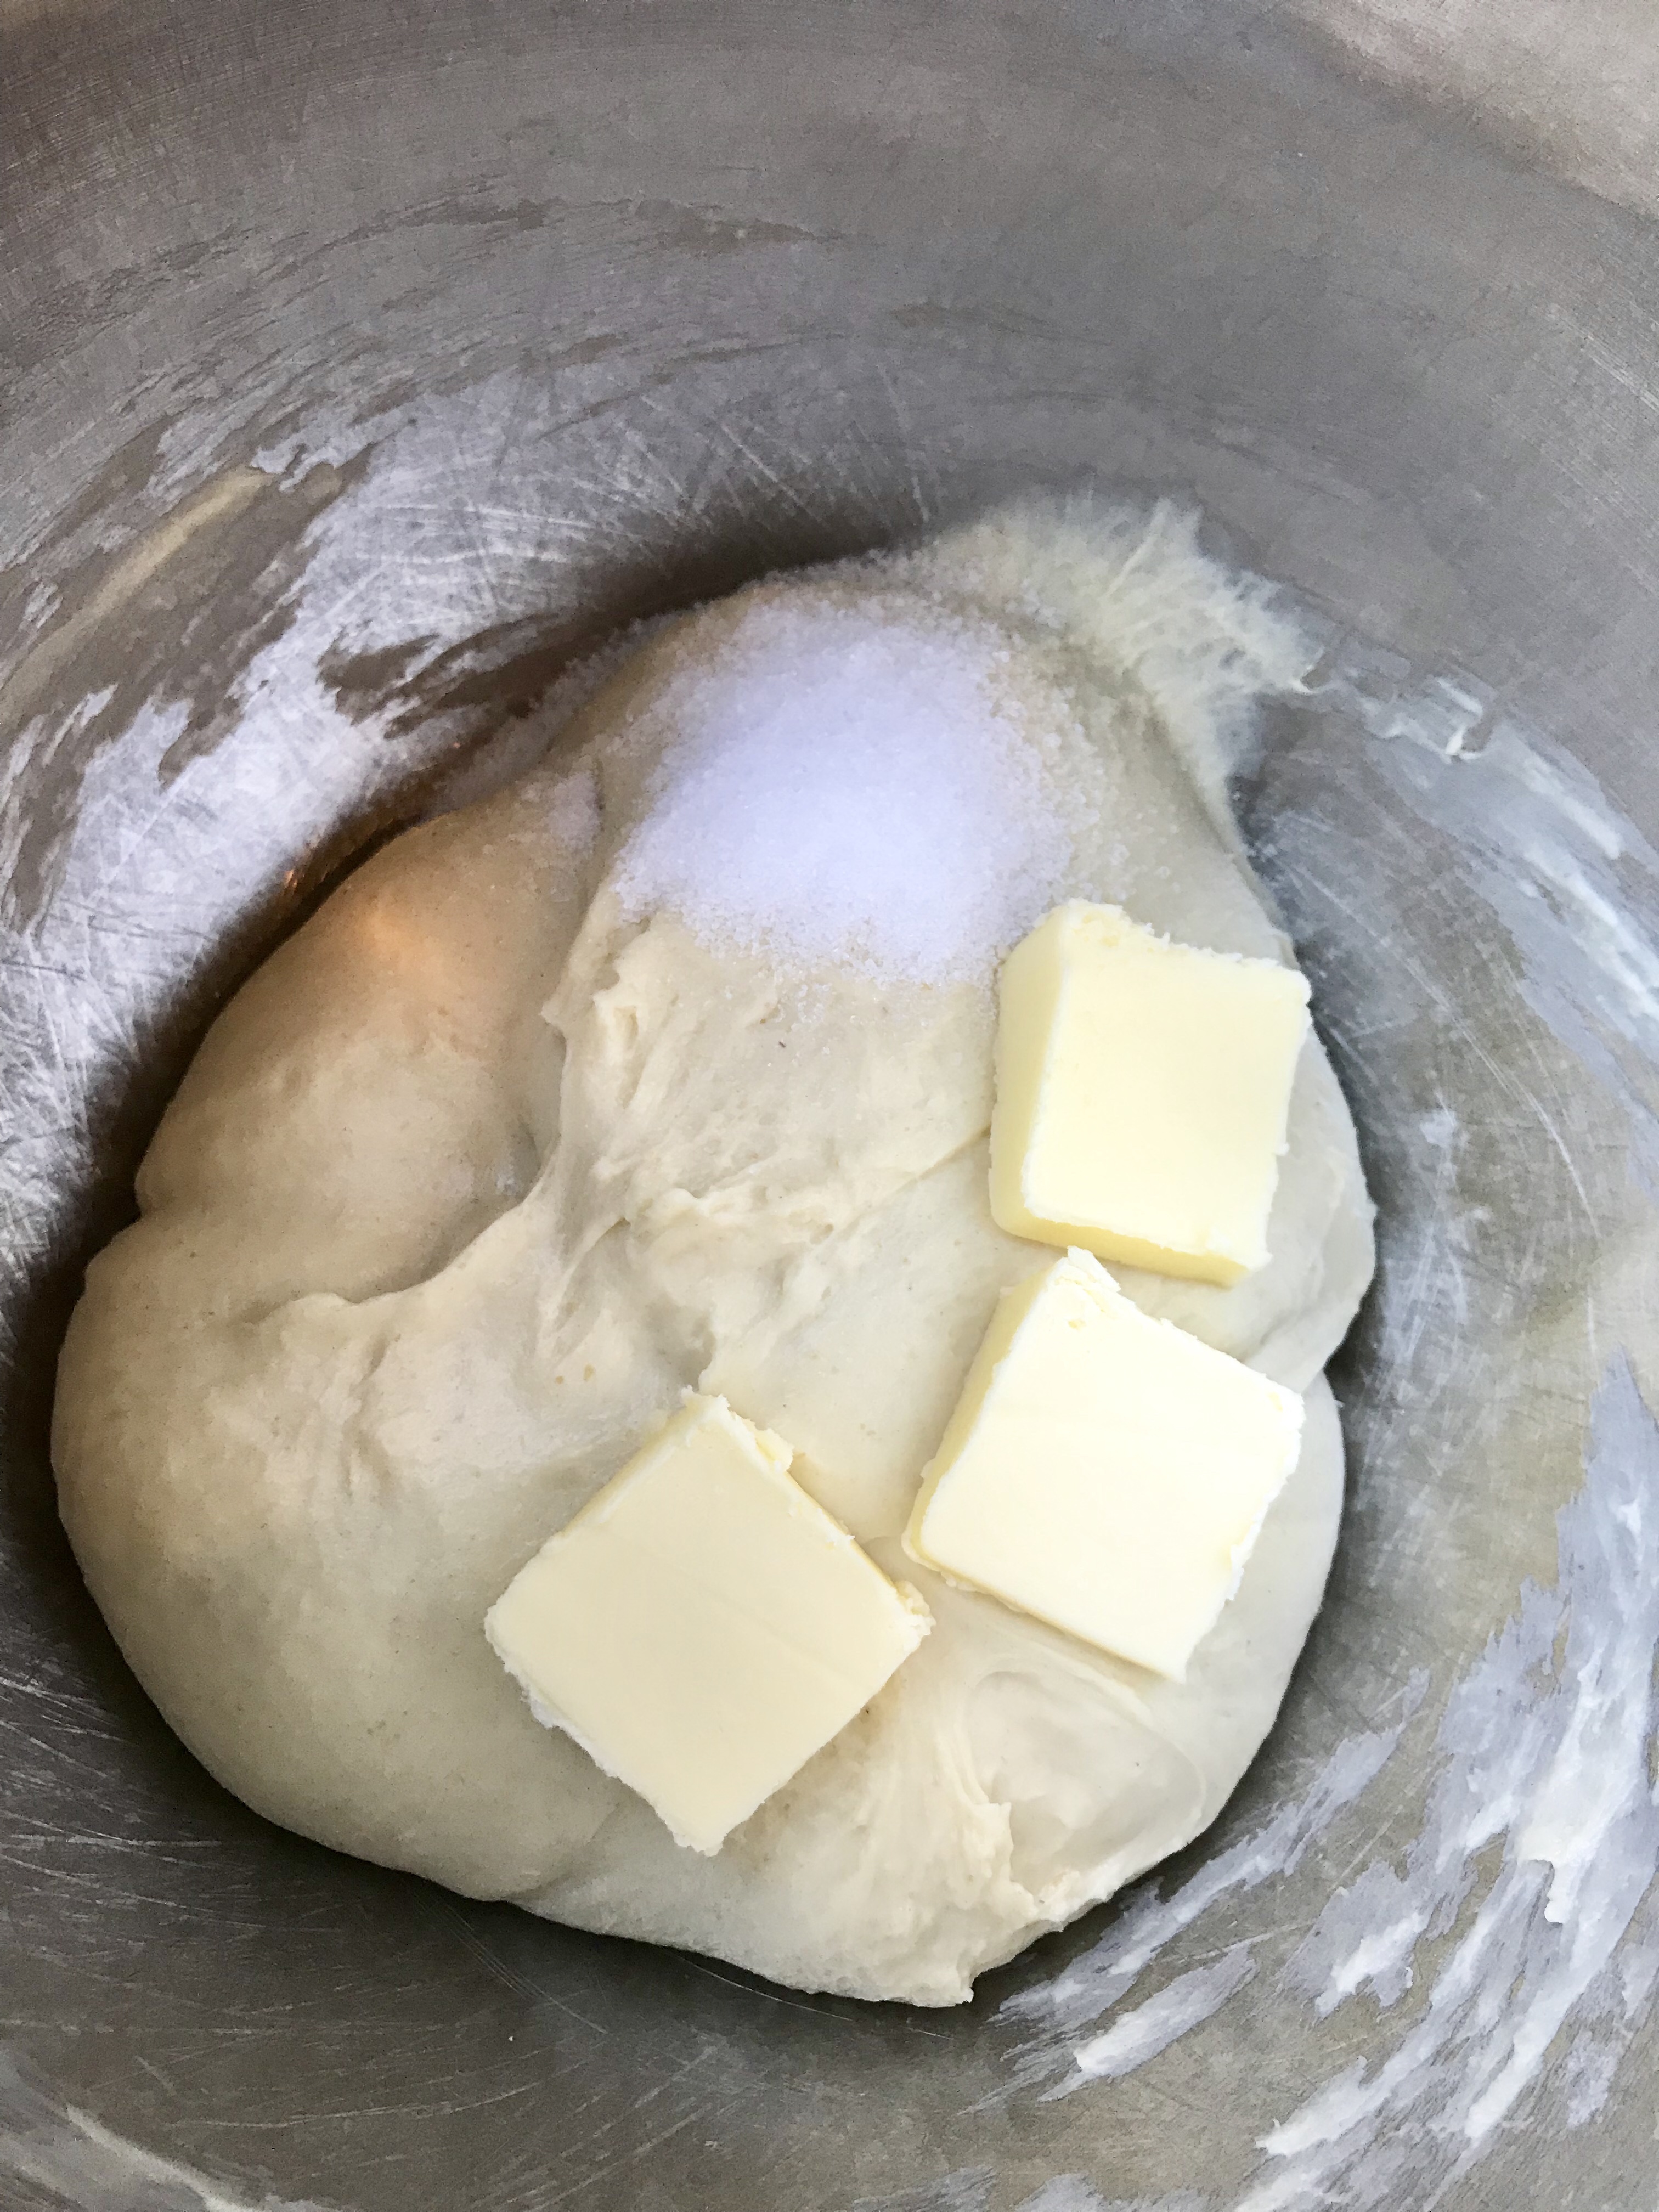

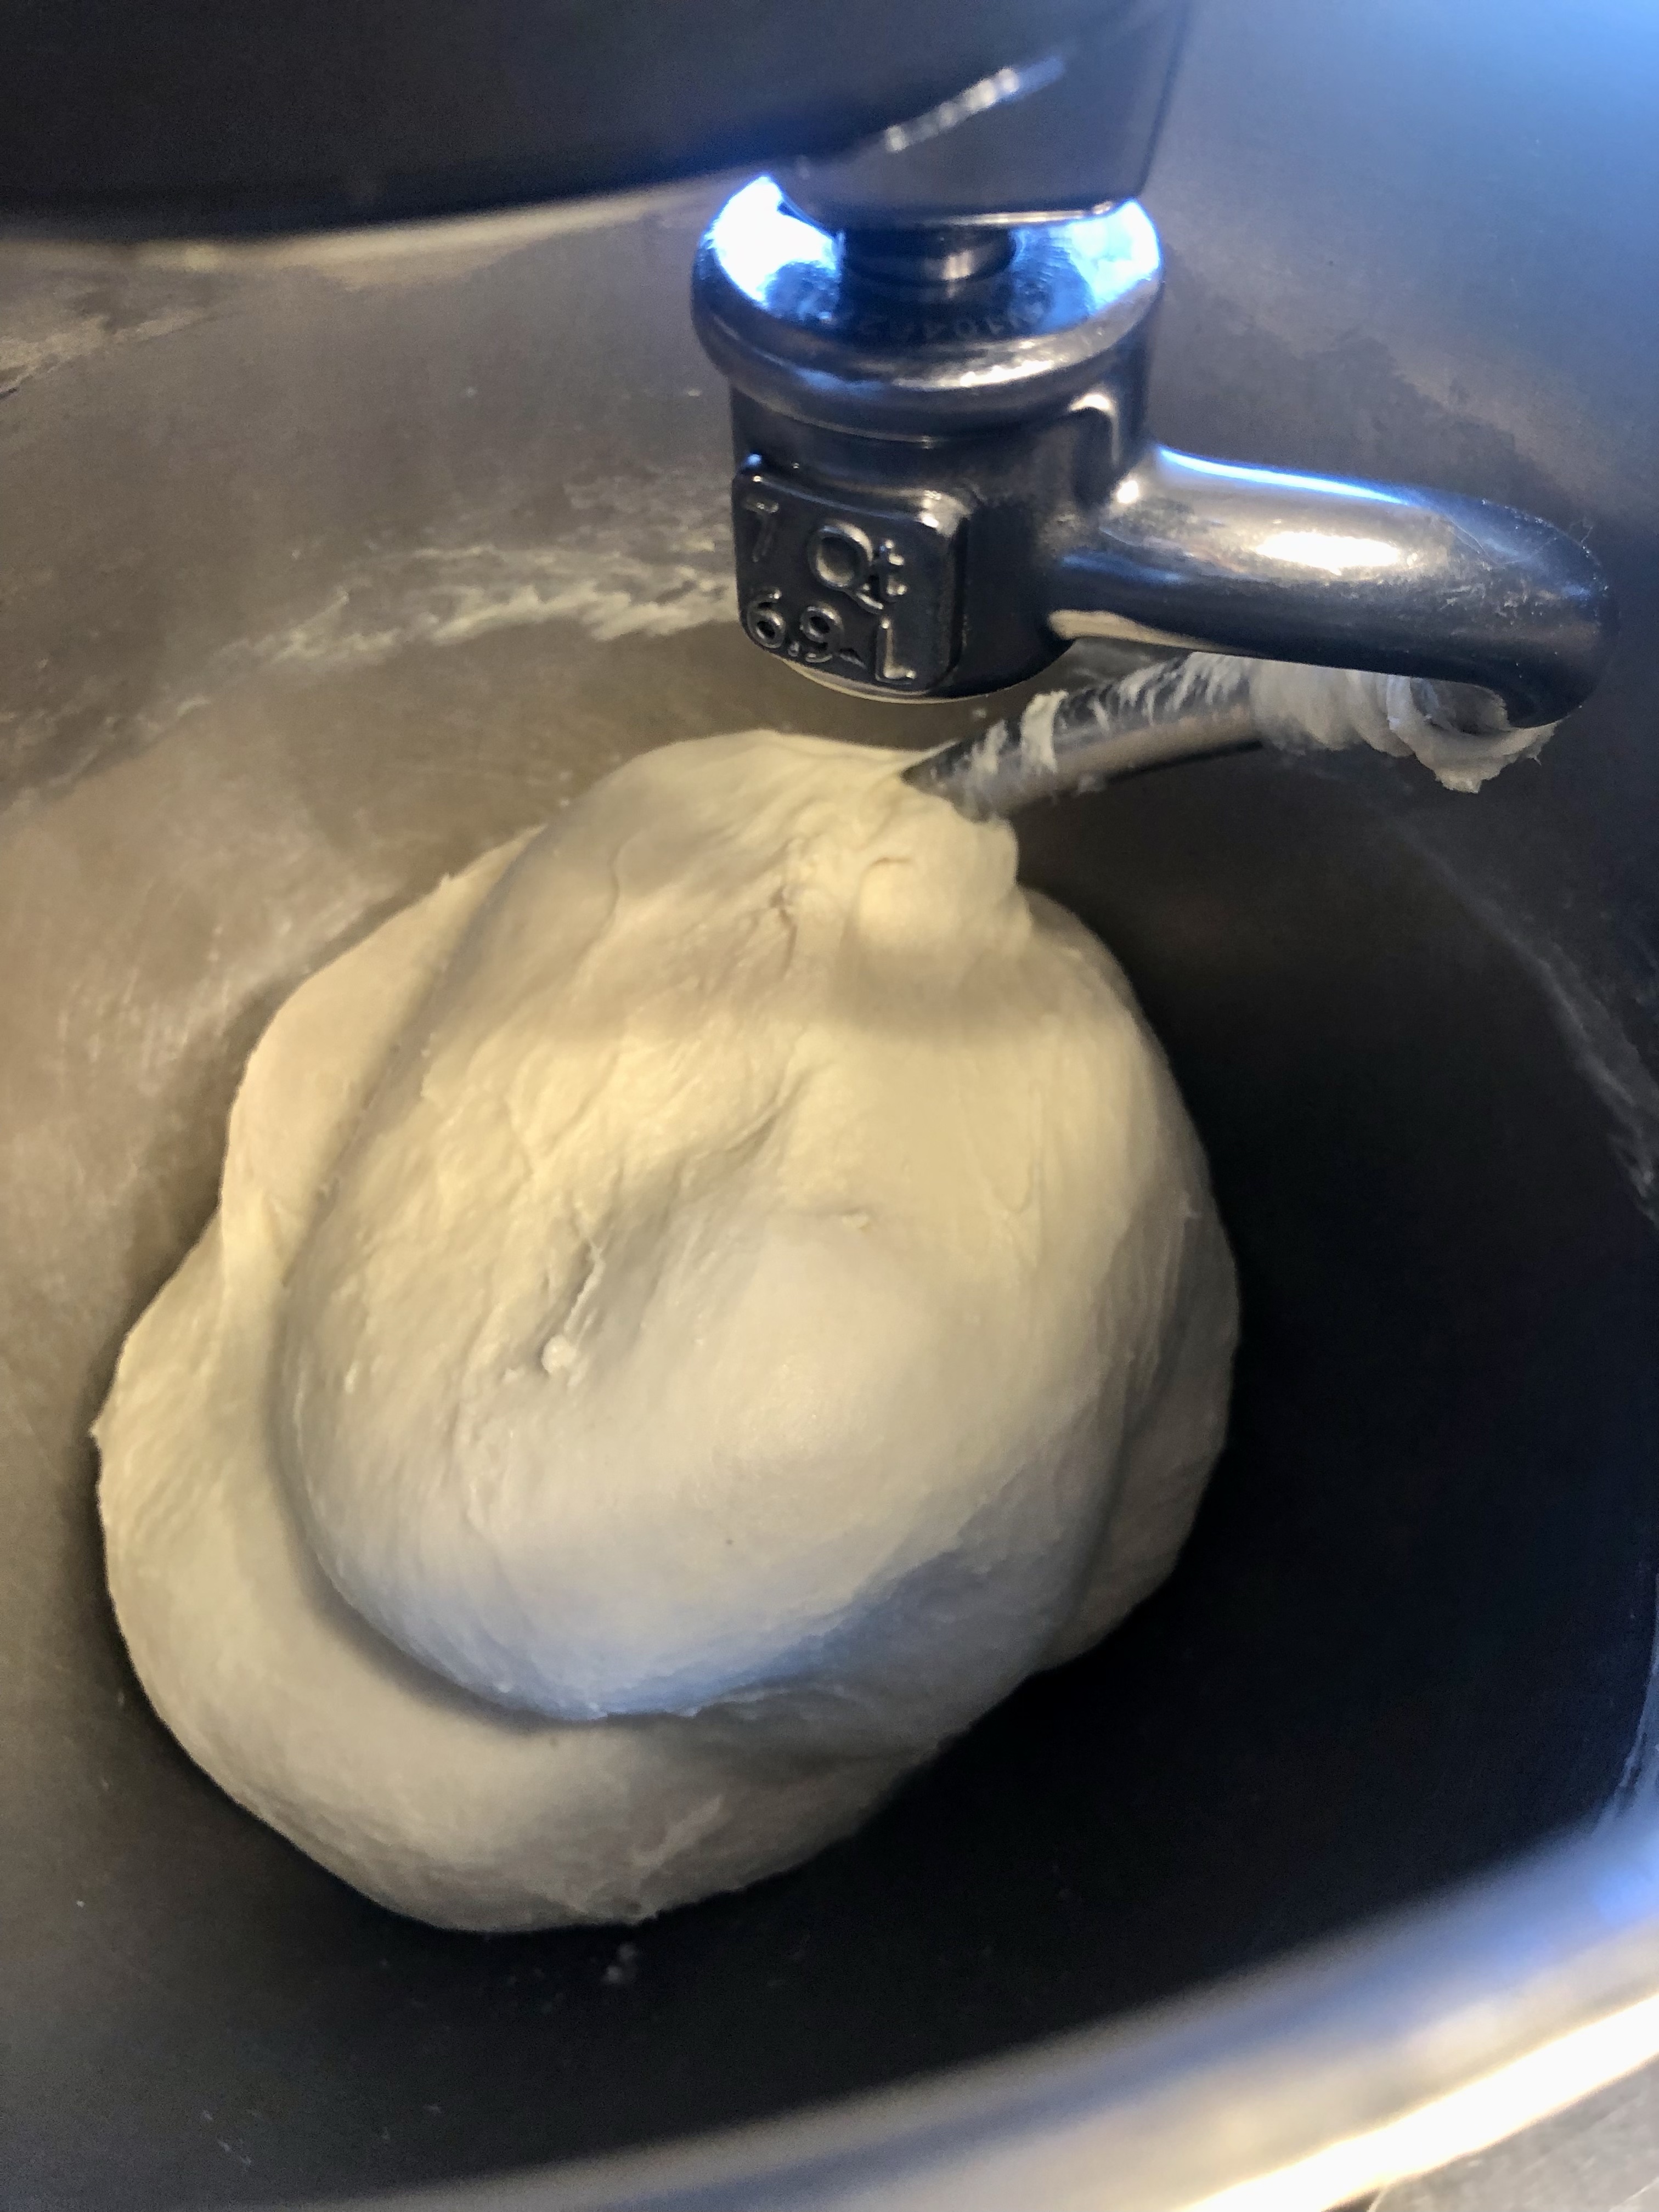


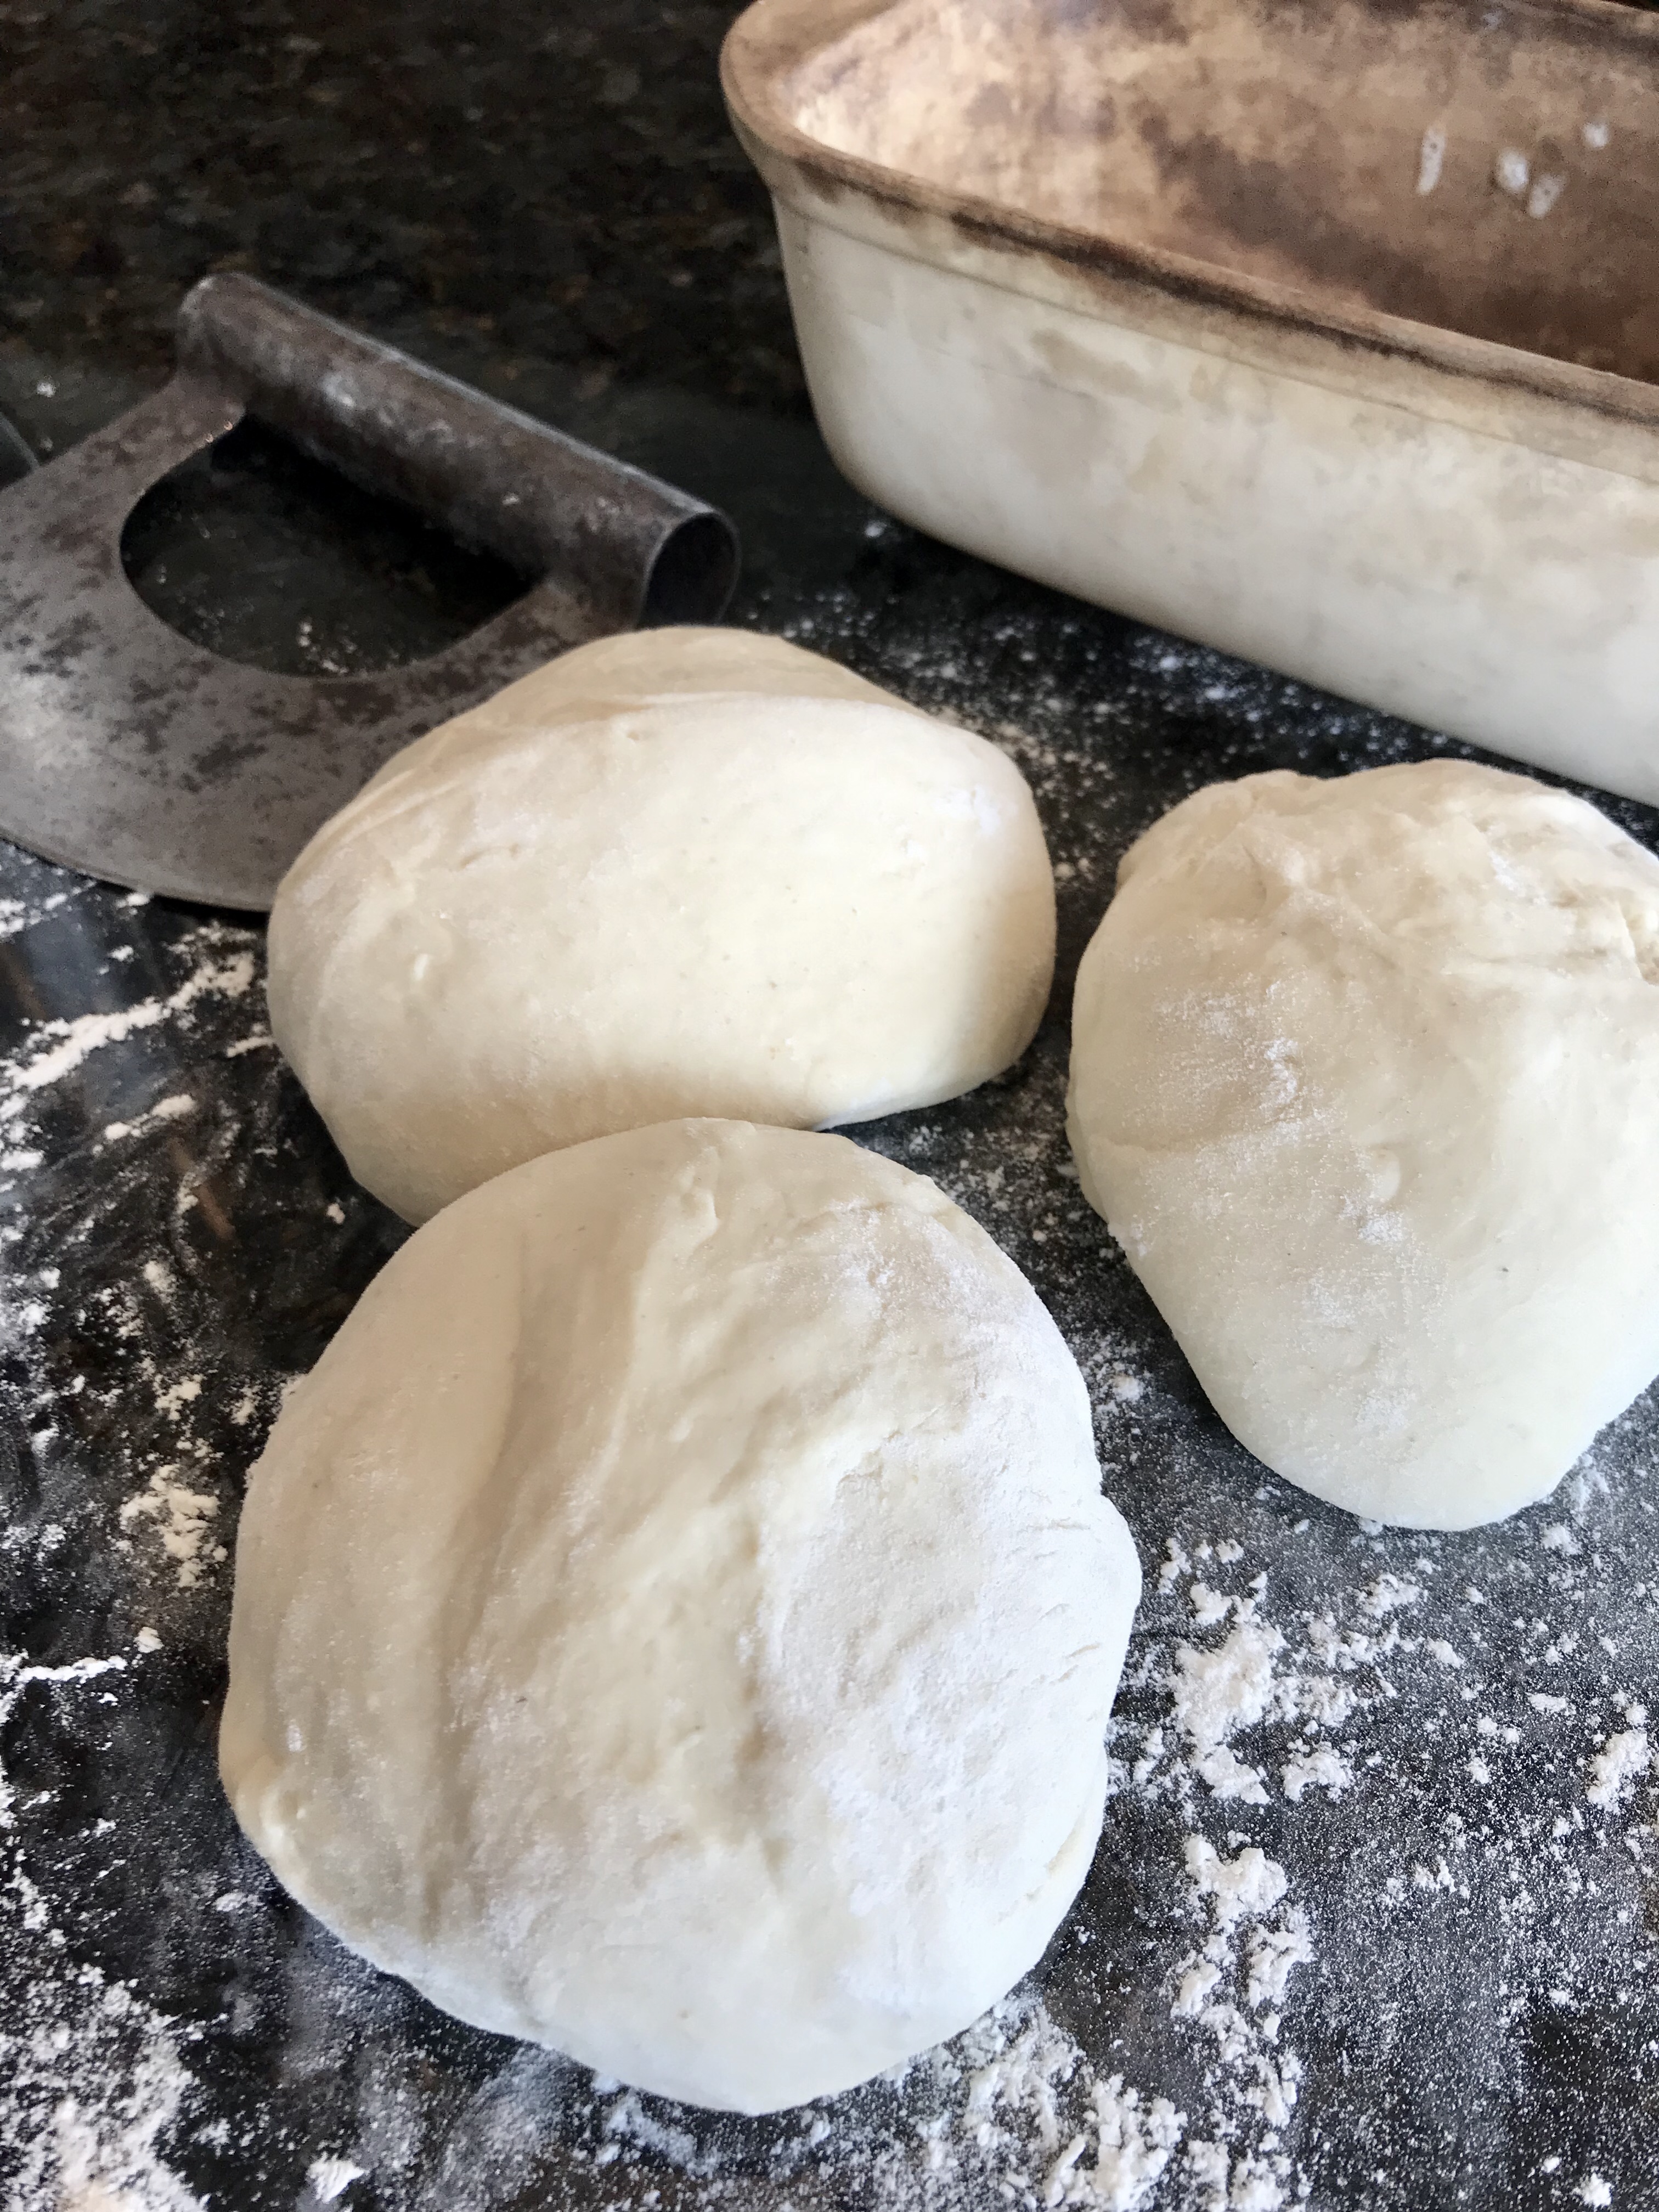
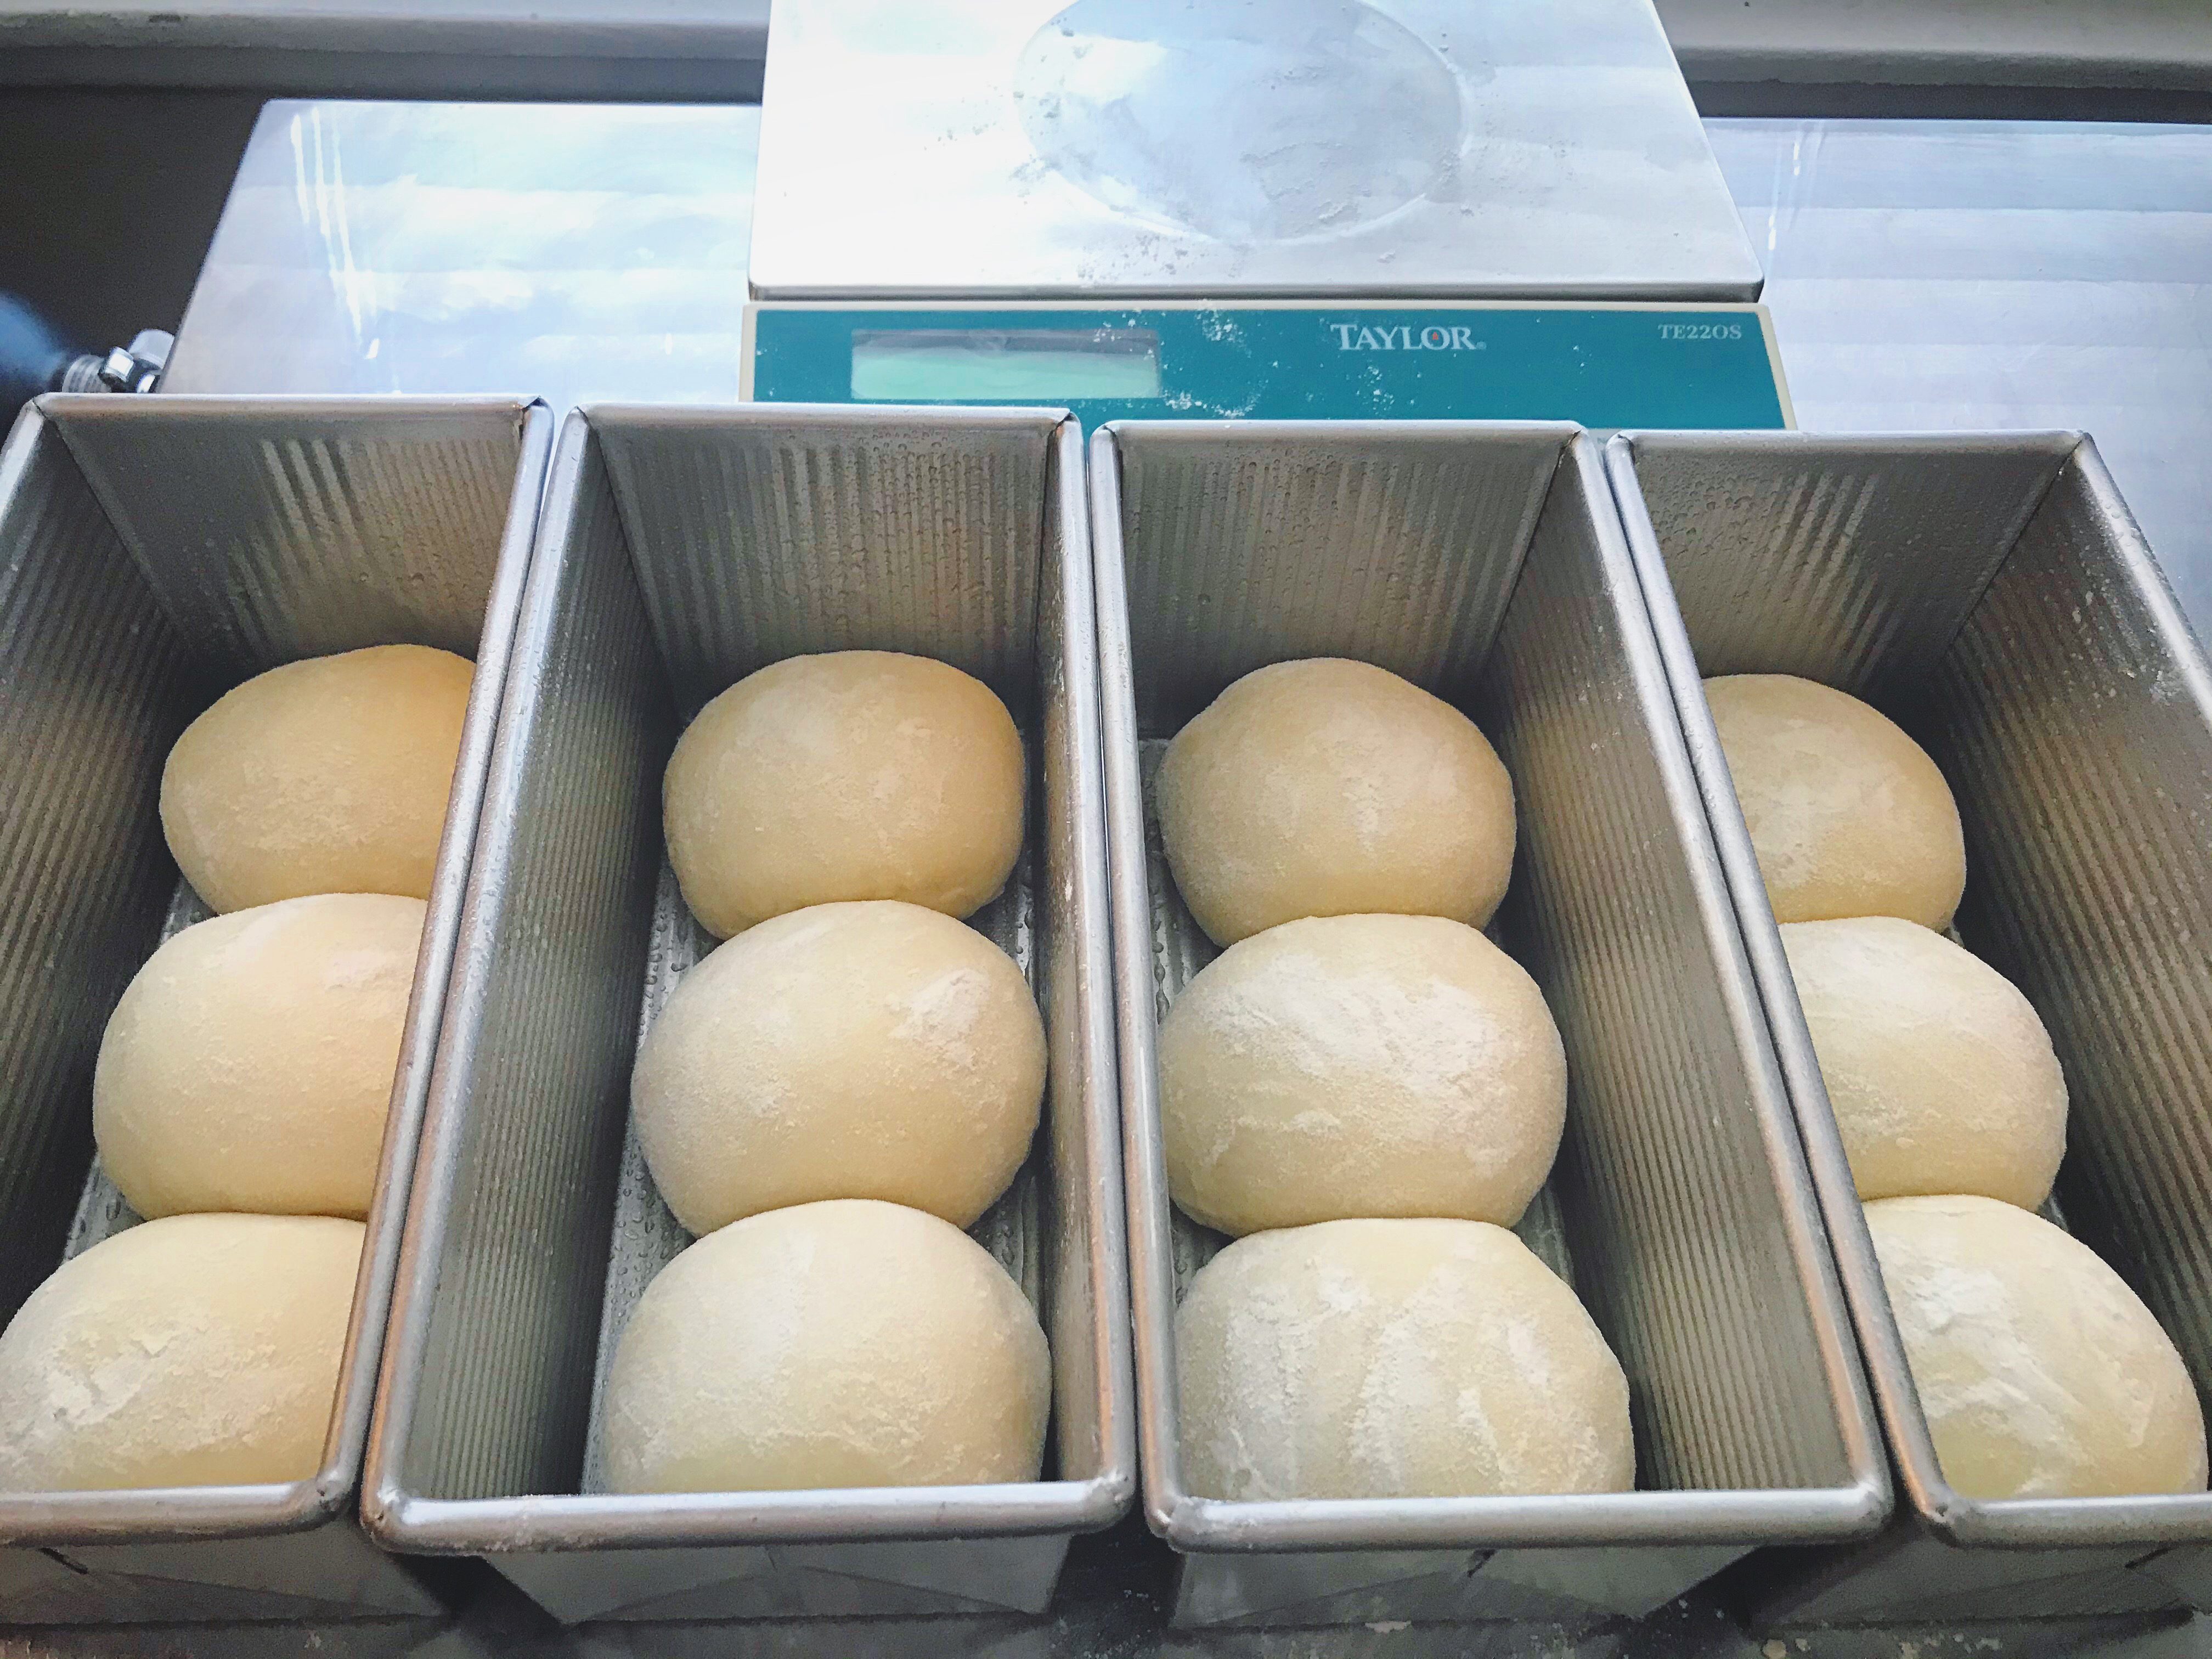 Once the dough has proofed, let it rest overnight in the refrigerator. This step is not absolutely necessary but will increase the nutrition and enhance the flavor of the bread without adding any more active work to your process.
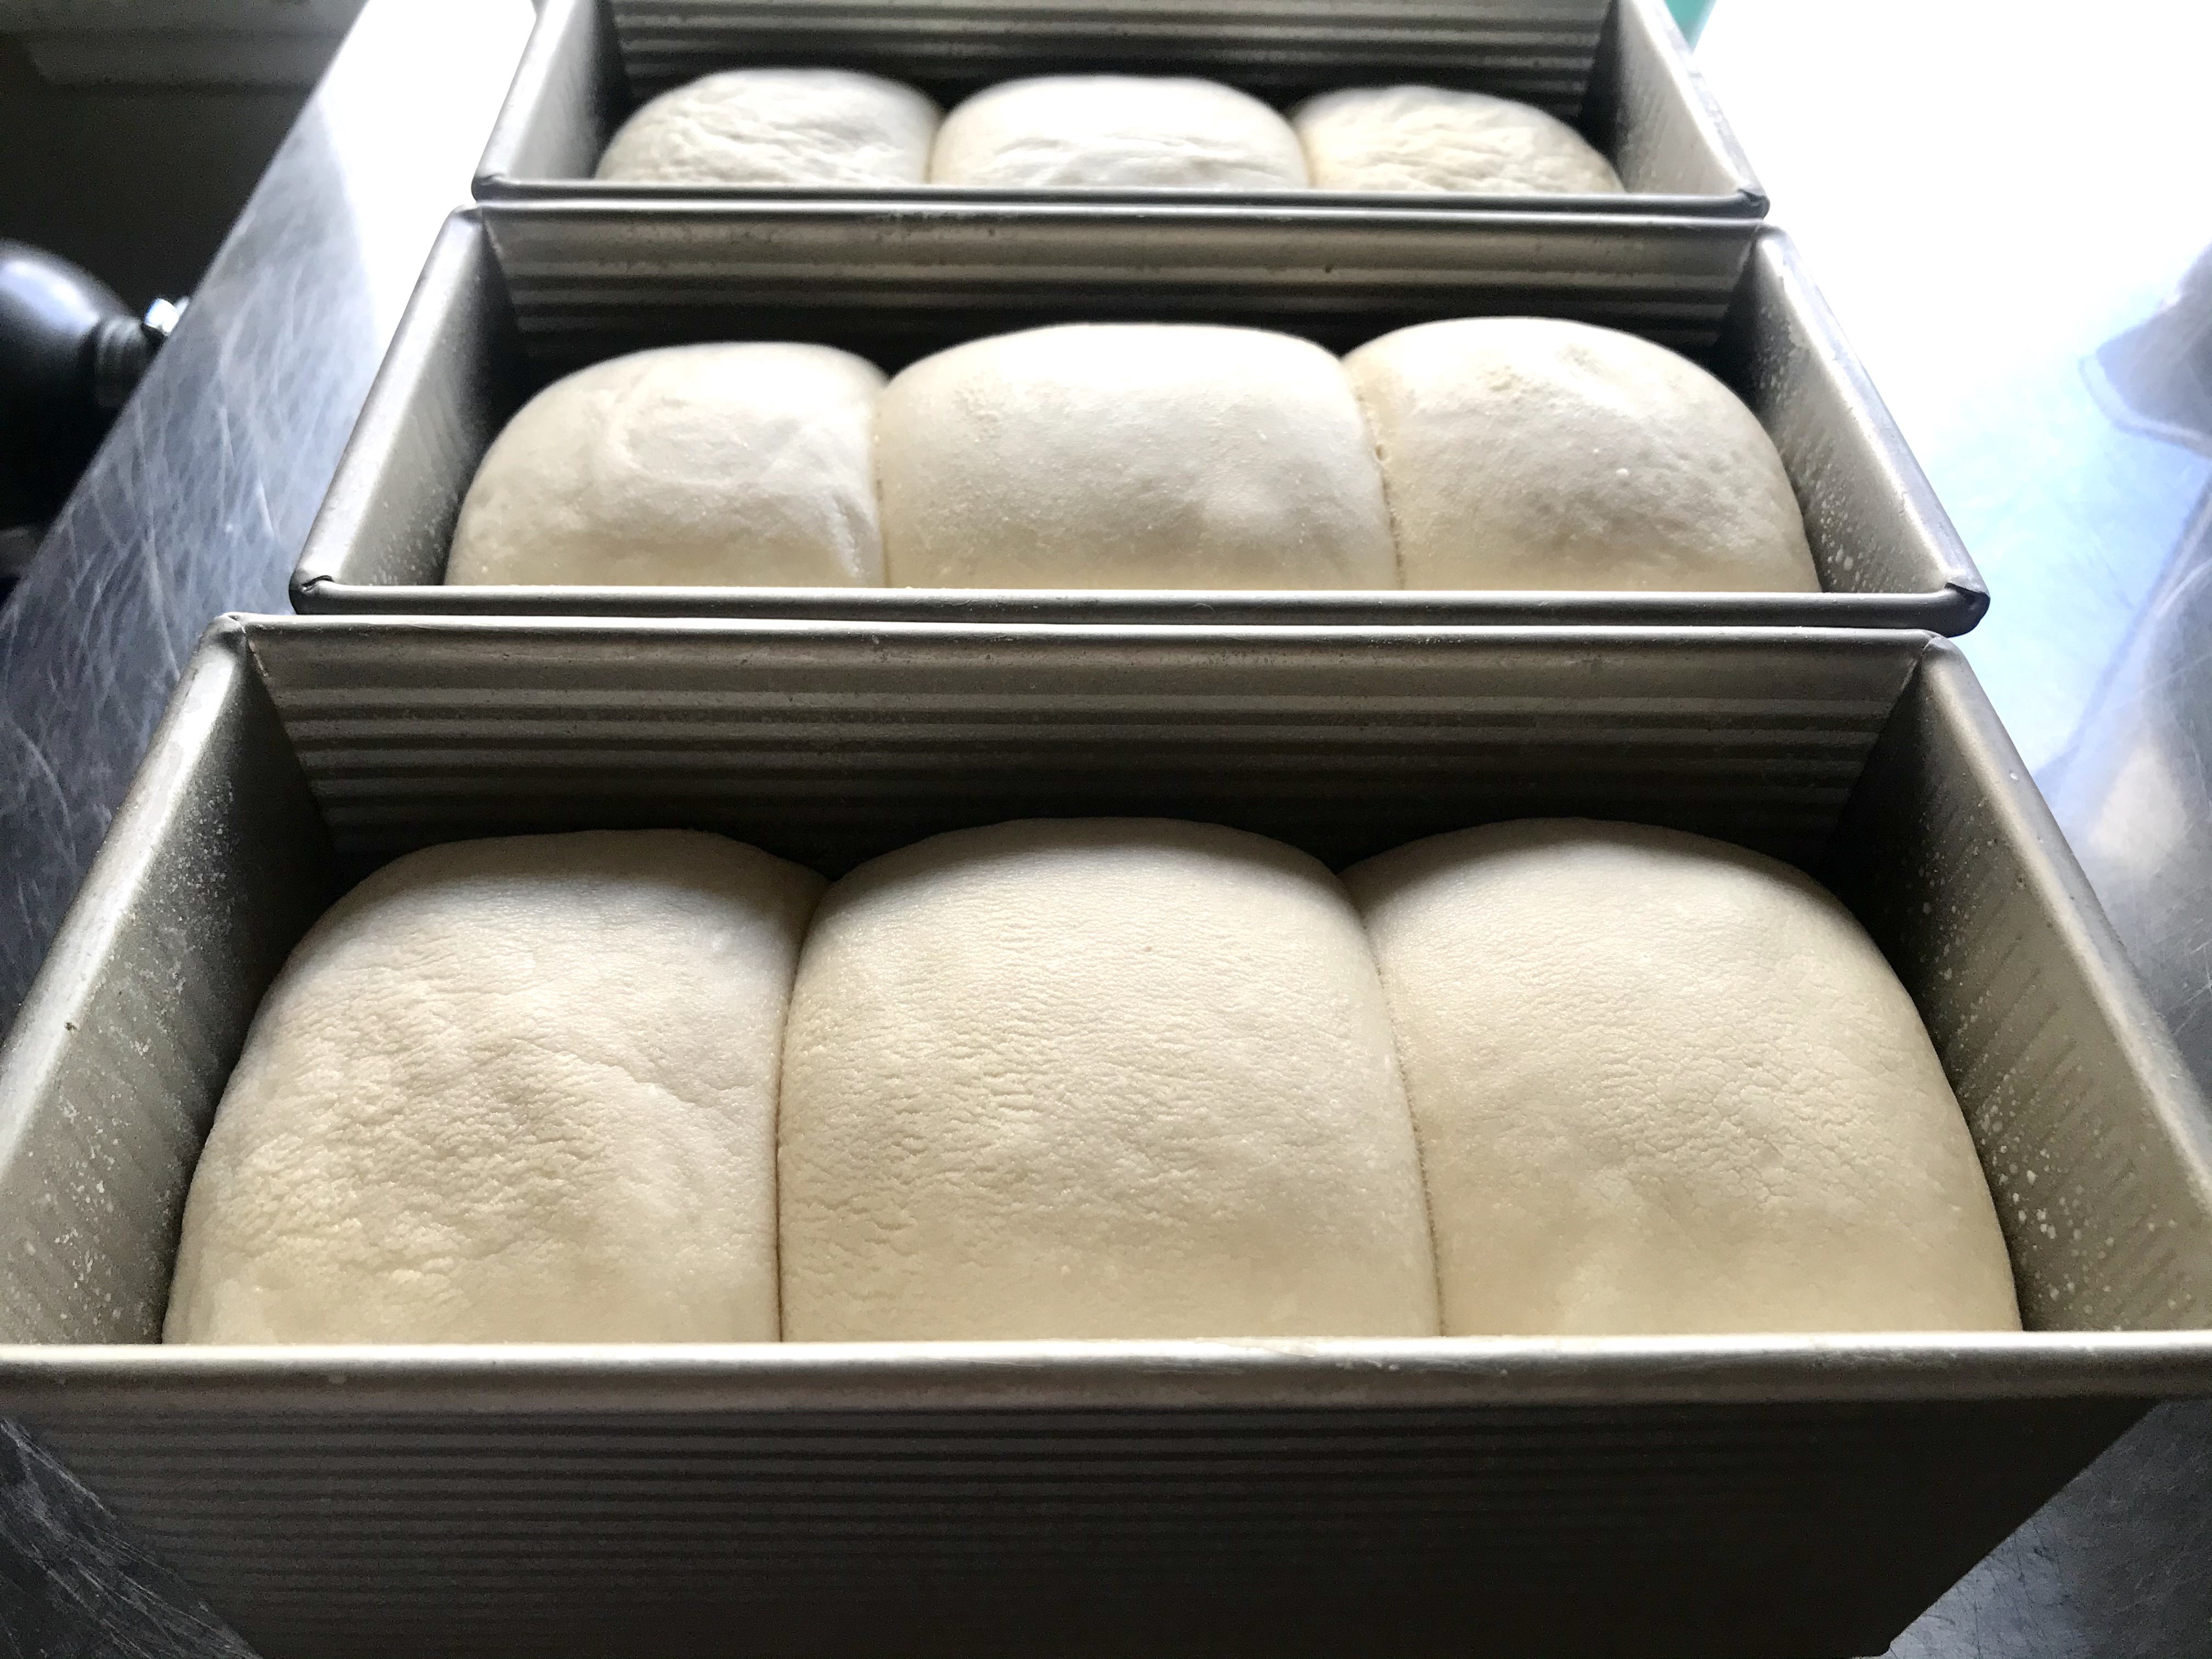 When you are ready to bake, remove the loaf from the refrigerator and preheat your oven to 450 degrees. Remove the plastic wrap and put the loaf in the oven, immediately turning down the oven temperature to 400 degrees. Bake for 15 min. Now reduce the temperature of the oven to 350 degrees and set the timer for another 15 min. During the second half of the baking, you may want to loosely tent the loaf with a piece of aluminum foil to prevent it from over browning before it bakes all the way through. You may also turn the loaf pan once, to ensure even browning.